Check out the ITS + Huckberry Holiday Shop for Awesome Hand Selected Products

ITS + Huckberry Holiday Shop

Even though the Black Friday / Cyber Monday Sale in the ITS Store has just ended, you can still get some awesome products at great prices through our friends at Huckberry. They reached out and asked us to hand pick some of our favorite items from their lineup for the ITS + Huckberry Holiday Shop. To be honest, it was difficult to narrow the list down as much as we did!

The products available include some items personally used and endorsed by staff at ITS HQ, as well as a few items on our own wish lists too. Either way, there’s a little something for everyone in this Holiday Shop and any item included will make a great gift for that special someone in your life (or yourself)!

There is however one catch, which is the requirement of signing up to gain access to these special deals. Don’t let that stop you though; it’s completely free and totally worth it. The best part is that once you sign up, you’ll get a personal referral link to share with whomever you want The link gets them $5 for signing up and nets you $10 in Huckberry credit once they make their first purchase. A pretty awesome deal if you ask us!

Click here to check out the ITS + Huckberry Holiday Shop!

Don’t forget that Members of ITS get a special deal of $10 in free credit after making their first purchase on Huckberry.com. Members, please sign in and visit the Vendor Discounts page for more information.

Posted in ITS Information | Tagged , , , , , , , , | 1 Comment

The Complete Guide to Land Navigation with the Military Grid Reference System

MGRS_Navigation_Main_01

The ability to navigate terrain with a map and compass is a skill-set that’s become lost in recent years due to technological advances like GPS and its integration into our smartphones. For many of us, navigating a city without a GPS would simply seem ridiculous. In a sense, we’ve become so used to the integration of our “devices” into every day life that we’ve lost the ability to perform a simple task, like leaving point A and arriving at point B without external help.

What if your life depended on your ability to navigate with a map and compass? Would you find yourself more alone than you’d hoped? Today, I’ll be going over the Military Grid Reference System (MGRS), which I feel is not only a better representation of our 3D world on a two-dimensional map, but also simple and easy to use. I’ll also tell you why it has an advantage over UTM.

With many Veterans returning home and leaving the service, MGRS has grown in popularity lately. This isn’t only because they’ve been taught this method in the military, but because it works and it’s simple. Even if you have your go-to method for navigating already, give MGRS a shot. When navigating in the wild, simple is usually better and you may find that you enjoy the experience much more than you’d think.

Refreshing the Basics

It’s always good to refresh the basics when talking about map and compass, but if you already feel confident with reading a map and shooting bearings with a compass, feel free to skip ahead to the MGRS section.

The Map

Muster 3 - Map

Lets start by talking about the most critical resource to have with you whenever you’re away from civilization, the map. Without one, it’ll be very challenging to move anywhere unless you grew up in the area and know it well. I highly suggest taking one with you, even if it’s a fishing trip just off of a road. The amount of information you can gain from referencing a map is actually pretty amazing when you break it down.

A few things that jump out at you are man-made objects such as railroad tracks, roads, power lines and more. These can be used as “handrails,” directing you to civilization if you come upon them while lost. You can also see natural landmarks, degrees of incline, lakes, rivers and even streams on the map.

For a good topographic map resource, check out USGS.gov to download topo maps you can print for free or pay to have certain printed topo maps shipped directly to you.

Water

MGRS 05 - Water

Knowing how to decipher these objects isn’t much of a challenge, but still worth mentioning. Water will always be shown in blue, whether lakes or small streams, this will remain true. Occasionally you’ll see small blue circles drawn over stretches of what appears to be land. This is to an intermittent water line. If you’re looking at a map of a Texas lake (like above) then you’ll see them in places which will be underwater after the rain season or without any water during a drought. You may also see small blue circles if you’re near an intermittent river. If these marks aren’t circles, but rather blue dashes, they represent large rapids. This is obviously important because knowing that the water is intermittent could tell you that in the late spring, after a snow melt, what would’ve seemed crossable is actually not. This is a mistake that anyone could make and the movie “Into the Wild” demonstrates the negative impact that it can have.

Please note that a topographic map stresses the importance of land, not water. If you’re interested in navigating larger sounds or inlets, then you may consider ordering a “chart,” not a “map.” Charts are for water navigation and will include sub-surface features.

Marginal Information

On the bottom of your map you’ll see some information meant to help you better discern what the map is telling you. One of the most critical pieces of information is the scale of the map. The two most commonly used scales are 1:24,000 and 1:50,000. What that means is that on a 1:24,000 map, one inch equals 24,000 inches on the ground. This also equals 2,000 feet, just in case you didn’t do the math.

MGRS 07 - Scale

1:24,000 maps are also known as 7.5 minute quadrangles, due to their representation of an area that’s 7.5 minutes of longitude wide by 7.5 minutes of latitude high. Just to give you some perspective, there are thousands of these quads that make up every inch of just the United States.

Below the scale at the bottom of the map, you’ll see a line showing distance. There’s a scale for kilometers, miles and feet on a 1:24,000 map. I highly recommend taking a piece of paper from your notebook and drawing tic marks from the kilometer scale for later use. The reason we’re using kilometers is that when navigating with MGRS grid lines, distance is measured in kilometers, not miles.

The Compass

MGRS 04 - Compass

There are a few different schools of thought when it comes to choosing a compass that’s right for you, but I can tell you that you won’t be disappointed with a sighting mirror compass like the Silva Ranger or a sighting mirror compass with a global needle like the Suunto MC-2. In my experience these are the easiest to use and most efficient out there. The benefits are that the mirror will make it easier to get an accurate reciprocal bearing, as well as provide enough standoff for you to aim at a physical target while viewing your bearing simultaneously.

MGRS 06 - Declination

A benefit of a global needle is that it’ll function anywhere on the planet. It also has a declination adjustment if you’re in the camp that advocates changing your declination. If you’d like to read more about setting your declination and the reasons to do so, check out this ITS article.

MGRS

The Military Grid Reference System is a geographic coordinate system that comes from the Universal Transverse Mercator (UTM) grid system, which is based on a flat world, not a sphere. When you look at your map you’ll notice that the MGRS lines and the Latitude/Longitude lines won’t match up. This is to say that the distance between the two will be different from the top of your map to the bottom. This is because both Latitude and Longitude lines are drawn on the globe, which is a sphere. One of the key advantages of MGRS is that it provides a scale small enough to make perfect kilometer-length grid lines by depicting a round world as flat.

MGRS_Navigation_Explanation_01

Making Sense of the Grid

An MGRS 8-digit grid coordinate will be expressed like this: 19TCG 3061 9196. Remember, we’re taking a projection of the entire Earth down to an object the size of a hot tub. Reading from left to right, you’ll be able to find a point as small as a ten-meter square from this number. If this was on a GPS then you’d have two extra digits and would be able to find a 1-meter location from the MGRS 10-digit grid.

Grid Zone Designation

The 19 refers to the grid zone. This means that your point is located somewhere in grid zone 19. The letter T refers to the Grid Zone Designation, which is a space measuring 6 degrees wide and 8 degrees high. There are 19 of these within grid zone 19. Note how the size of the grid squares near the Arctic are much larger than those near the Equator. This is because they’re actually covering the same amount of land space. The two dimensional depiction of our world is stretched at both poles out of necessity.

100,000-Meter Grid Square Identification

Next up you have a 100,000-Meter Square Identification that comes in the form of two letters. In our example grid 19T CG, the CG represents a 100,000-meter grid square within grid zone designation 19T. If you’re wondering, letters I or O don’t exist in the letter sequence in order to avoid possible confusion of the numbers 1 and 0.

If you’re already familiar with UTM, MGRS just simplifies this 2-digit portion of our grid by using letters rather than numbers. This avoids confusion by allowing you to quickly identify whether you’re looking at an 8-digit or 10-digit grid. If it was using all numbers like UTM, it’s harder to quickly identify.

10,000-Meter Square

Now the 100,000-meter square is divided into 10 parts. These separate parts consist of ten grid squares going west to east and ten more from south to north. If you look at the example coordinate again: 19TCG 3061 9196, the 10,000-meter grid square is the 3 in the first series of four numbers and the 9 in the second series of four numbers. This would be written out like 19TCG 3 9.

1,000-Meter Square

This is the scale that’s shown as grid lines on your 1:24,000 map. You’ll notice that once again the 1,000-meter square is separated into ten equal parts. 1,000 meters (or 1 kilometer) separates each grid line. The MGRS expression of this would be 19TCG 30 91.

As you can see we’re dialing it in. The last two numbers are what will bring you into the 10 square meters that you’re looking for. As you can probably guess, those numbers are referred to as the 100-meter identification 19TCG 306 919 and the 10-meter identification 19TCG 3061 9196.

For more information on how the UTM grid works check out an earlier article entitled “Understanding the Universal Transverse Mercator System.

Plotting

its-tactical-muster-3-plotting

Now that we have our 8-digit grid, we’re ready to plot a point on the map. Start by getting all of the tools you’ll need ready to go. First off, you’ll need a protractor that has a scale that supports the scale of the map, we used the protractors included in our ITS Land Navigation Starter Pack. Most protractors have both 1:24,000 and 1:50,000 scales available and many have 1:25,000 for military topo maps. You’ll also need a pencil that’s as sharp as possible, so that your point is as accurate as possible. Next you’ll need a couple pieces of tape.

I highly recommend putting tape over the scales that you won’t be using on your protractor. This advice comes from a Muster attendee who accidentally plotted a point using the wrong scale and traveled a great distance over a 3,000 ft. elevation loss before finding out that he’d made a painful mistake.

MGRS 09 - Plotting

Find the grid square that you’ll be working with by using the first two numbers from both sets. 19TCG 3061 9196 means that your grid square is 30/91. To find square 30/91, start at the bottom left corner of your map and working from left to right, find grid line 30. The grid square you’ll be working with is to the right (east) of the line marked 30. Now move up within that grid square until you intersect grid line 91. The grid square you’ll now be working with is above (north) of the line marked 91. Remember that all numbers in an MGRS grid read left to right, bottom to top.

Now that you’ve identified the correct square, put the two zeroes that sit at the center of the right angle of your protractor’s scale on the bottom left corner of the grid square that you’ll be working with. Now you need the last two numbers of the grid.

19TCG 3061 9196. Once again you’ll plot from left to right first. Move the protractor to your right until the left grid line is directly under the tic marking 61. Now move the protractor up until the tic mark of 96 is sitting over the bottom grid line of your square.

MGRS 08 - Marking Point

Note that this will take a couple of repetitions to feel comfortable with, so grab a few more points to plot. I firmly believe that unless you get your hands on the tools and practice the skill-set of plotting, you’ll probably never feel confident.

Distance

Once you have a couple points plotted, you’ll want to get the distance between the two. If your protractor has a distance scale then go ahead and use it. Just make sure that you’re marking your distance in kilometers, not miles. The way that I mark distance is to take a loose-leaf piece of paper and make tic marks based on the distance scale in the bottom margin of my map. This way I can mark four kilometers instead of being limited to the protractors one kilometer.

MGRS 01 - Distance

On the first 1 kilometer, I mark tic marks for every 100 meters. There are 10 total (remember that kilometer literally means “kilo meter” which translates to 1,000 meters). It’s nice to have smaller units for shorter legs of navigation. Now put the zero on your first point and mark where the second is on your home made scale. Log it in your notebook.

MGRS 10 - Distance Between Points

Bearing

The final piece of information that you’ll need before you hit the road less traveled, is the bearing that you’ll be walking. The easiest way to do this is to take a single gut from a piece of 550 cord and tie a 12 inch section onto the center hole of your protractor. You want the knot as small as possible, so the best thing to use is a Figure-8 Knot. It’ll be wide enough not to pull through, but not as bulky as a double overhand. You’ll also want the knot on the top of your protractor so that it won’t interfere with you moving the protractor around, check out the photo below for a visual.

MGRS 03 - Bearing Paracord Gut

Once it’s tied, place the center hole of the protractor on your first point and line the left and right edges as close to parallel with the grid lines on the map. This ensures that the compass is oriented to grid north before you take a bearing. Now pull the cordage to the second point insuring that there’s no kinks in the line. Where your cordage crosses the outer compass rose is your bearing from point 1 to point 2.

MGRS 02 - Bearing

I recommend logging the origin point, bearing and distance to the next point (as well as the second point itself) in both your notebook and on your map with pencil. This way the eggs aren’t all in one basket. and it gives you something to double check out in the field if you need to re-plot the point.

Navigating

Pace Count

The first step is to get an accurate pace count and to build a set of pace count beads, these will help you track your distance traveled, which is a crucial step in navigation. We have a great article on how to build your own pace count beads.

Pace Count Beads 01

Measure out a 100-meter line and walk it several times to get an accurate pace count. I recommend starting a meter behind the beginning of the line so that you’re already walking your natural pace when you begin your count. Another piece of advice is to only count each time your right or left foot hits the ground during your pace count. This will cut the number in half and make it much easier to keep count in the field.

its-tactical-muster-3-pace-line

If possible, get a pace on flat ground as well as walking both up and down a hill. You’ll find that your pace will change greatly under different circumstances. When a hill is incorporated, your number will rise compared to your flat ground count. Adding vegetation and trees will change your pace as well. It’s not an exact science, but any chance to get a count with a different terrain variable should be taken as it’ll help you out down the road. Your pace is really a lesson in knowing yourself and when you should add or subtract paces in your planning.

For more on pace counts, check out “Land Navigation: Calculating your Pace Count

Shooting a Bearing

Now that you’re out in the field and standing on your MGRS starting point, you’ll need to shoot a bearing to the point you’re traveling to. As a refresher, this step consists of turning the bezel on your compass to the bearing you’ll be walking, say it’s 090˚.You’ll line up 090˚ with the top indicator of your compass and then turn your body until “red is in the shed” or whatever way you remember to align the north facing needle into the red arrow of the bezel.

Once you have your bearing, put your compass in front of your face while keeping your arms in tight to your body and look through the top sighting notch of your compass. This is where the mirror comes into play on the top lid, adjust it down so you can see that the red is still in the shed and pick out an easily identifiable object as far away as possible. Although you won’t see your intended target you’re navigating to in the end, this is the object you can now walk to without having to continuously reference your compass.

its-tactical-muster-3-shooting-bearing

Now that you’ve chosen your point, perhaps its a large recognizable tree, put your compass down and begin walking in as straight a line as possible towards the tree. Make sure to keep track of your pace count as you walk and to keep your eyes on the target so that you don’t lose your way. When you arrive at the object, get to the other side of it and shoot another bearing to a new target and start walking again. Don’t forget to resume your pace count and do not just start again.

When you’ve traveled to your known distance, stop and mark that location with whatever you have available. I recommend stacking three stones on top of each other, though others recommend dropping your backpack, or placing a marking panel on the spot. The goal here is to not let your original stopping point become lost if you have to search for a marker that designates the point you’ve navigated to. Again, I recommend using rocks because I never feel comfortable separating myself from my backpack.

its-tactical-muster-3-walking-a-bearing

Accuracy is key here. It doesn’t take as much degradation as you think to throw you off your bearing and take you completely off course. In fact, if you were to walk for 10 miles and you’re even 1 degree off, you’ll have traveled 280 meters off course. If you’re off by 10 degrees on your bearing, you’ll have traveled an amazing 2,795 meters off course.

Circle Search

From your closest known point you’ll want to begin your search with a small circle. The size of the circle is always dependent on the terrain you’re dealing with. In fact, most questions about land navigation end with the answer, “it depends.” This is because there are so many variables that will change your technique.

MGRS_Navigation_Circle_Search

If the closest line of vegetation is far away and you can see that your target isn’t between you and the vegetation, adjust your circle to give you additional vantage points from varying angles. While the size of your target will also change the size of your circles, the circle itself will remain the same. If you complete one full circle and arrive back at your point then begin another larger circle, repeating larger concentric circles until you find the target.

Boxing

So what happens when there’s a large object between you and the target half way through your navigation leg? Since you’re dependent on the bearing and pace, you’ll need to find a way to get around it and wind up close to the same line of travel on the other side of the object in your way. This can be accomplished by using 90 degree turns and keeping a separate pace count for lateral lines of travel.

MGRS_Boxing_01

First take a 90 degree turn to the right (or left if applicable). Keep a pace count for the distance that it takes you to be free of the obstacle. Then take another 90 degree turn to your left. Now you resume your original pace count because you’re now walking in your original direction of travel. When you’re clear of the obstacle, make another 90 degree turn to your left. If your lateral pace count was 60 meters then you’ll need to travel 60 meters back in the direction of your original line of travel. When you get to 60 meters, turn 90 degrees to your right. Now you’re relatively close to your original line of travel. Take another bearing and resume your original pace count towards the target.

Offset Navigation

If you know that your next point is positioned next to a linear feature such as a road, river, power lines, or railroad track, you can deliberately offset your course to speed up your travel. For example, if your target is 200 meters away on a bearing of 050˚, then you can deliberately set a course of 045˚ so that you’ll hit the linear feature to the LEFT of your target. Now you can simply skirt the linear feature to the RIGHT until you find your point. This alleviates the need for a circle search. The reason why this tactic works so well is because it gives you two key pieces of information, it eliminates confusion and provides a backstop.

MGRS_Navigation_Offset

  • No Confusion – If you were to use the linear feature as a backstop and walk your true bearing, you’ll have a good distance, but once you reach the road you won’t know which direction the point is. It could be to the left or to the right. When you deliberately offset your course, you’ll know without a doubt that you should turn right (according to the example above.)
  • Backstop – You know you’ve overshot your point if your pace takes you across the linear feature. The linear feature will tell you “this far, but no further.”

Note that your degree of offset will be directly proportional to the distance of the leg. Meaning that if you’re traveling a 300-meter leg, you’ll use less offset vs. a 100-meter leg. Too much offset could take you too far off course and lead to confusion down the road.

Closing

its-tactical-muster-3-maps

With these tools and tricks you’ll be able to identify the correct map, use a proper MGRS plotting technique and find objects in the wilderness the size of a wooden stake in the ground. What a confidence boost! In a follow-on article, we’ll be discussing terrain association using the map and how to find your position when you become lost using a couple of different resection techniques.

Anyone figure out the location of the MGRS coordinates in the article?

Editor-in-Chief’s Note: Nick recently left the Navy after serving for 10 years as a Navy SEAL with multiple deployments, having been awarded the Bronze Star for operations in austere environments. Nick’s been with us since the beginning here at ITS on our Advisory Board.

Posted in Navigation | Tagged , , , , , , , , , , , , , , , , , , , , , , , , , , , | 14 Comments

Wishing You a Safe and Happy Thanksgiving from ITS HQ!

2014 Thanksgiving

We’re spending the next few days with our friends and families and we hope you’re doing the same. This is truly a time to reflect on what we’re all thankful for as no matter your situation, someone out there wants what you take for granted.

We’d especially like to recognize those that put their lives on the line each and every day for all of us and those within our Military, Law Enforcement and First Responders. Many of them are working, or are overseas and unable to enjoy a special meal with their family and we’ll be keeping them in our thoughts. It’s also important to thank all of you who are reading this, as we wouldn’t be here without the support that you’ve shown us over the years. Thank you all and Happy Thanksgiving!

While the ITS office will be closed, our online store is open 24/7 and orders will resume shipping on Monday, December 1st. Be sure to take advantage of our Black Friday Sale when you find downtime from family (usually after the main meal and nap, but before second and third meal) as stock is limited on certain products!

Posted in ITS Information | Tagged , , | Leave a comment

Avoid the Lines and Shop Online with the ITS Black Friday Sale!

2014 ITS Tactical Black Friday Sale

Hopefully you’re not reading this on your phone while standing in line outside of a big box store, because that’s just crazy. We appreciate a good deal as much as the next guy, but you have to draw the line somewhere.

With that being said, the ITS Store is open 24/7 and we’ve got some deals starting at Midnight Central Time on Friday, November 28th and running through Monday, December 1st at 11:59 p.m. Central Time. You can even take advantage of our sale without leaving your bed. We won’t judge you.

Black Friday Sale!

We’re offering 15% off nearly everything in the ITS Store and as a special bonus for our members (Plank Owners, Crew Leaders and Life Members), you’ll even save an additional 5% off your order by using the same membership discount code you already use for the store!

To take advantage of the 15% off discount, just use coupon code “tacticalturkey” at checkout starting at Midnight Central Time on Black Friday, November 28th and running through Cyber Monday, December 1st at 11:59 p.m Central time. Remember members, you’ll automatically see the increase in your existing coupon code found in your Membership Dashboard, so there’s no separate coupon code to enter. This means Plank Owners and Crew Leaders save 20% and Life Members save 25% all weekend long.

This deal won’t last long and neither will the stock of some items, so act quick starting on Friday!

Click here to head over to the ITS Store and save a bundle!

Starting today, we’ve also doubled down on our order gifts with new $250, $500 and $1,000 ITS Casino Plaques that we’ll include free in your order if your total before shipping meets these denominations. We’ve already been including the $100 chip for orders over $100, so now you’ll get that along with the corresponding plaque for larger orders!

ITS Store Casino Plaques

Please Note: Black Friday/Cyber Monday discounts are our lowest prices and cannot be combined with existing offers. Discounts are not valid on the purchase of a new membership, Gift Certificates, existing sale items, or the ITS Multi-Purpose Container. Sale prices are limited to stock on hand, sorry no rainchecks.

Posted in ITS Information | Tagged , , , , | Leave a comment

A Brief History of the Office of Strategic Services: America’s First Intelligence Agency

OSS Cia Museum Gallery

The Office of Strategic Services (OSS) was formed during World War II as a wartime intelligence agency to organize espionage activities behind enemy lines for the United States. While the idea of an American intelligence agency existed, there wasn’t a coordinated direction overall.

On the suggestion of the senior British intelligence officer, William Stephenson, President Franklin D. Roosevelt assigned William J. Donovan to develop a plan for an intelligence service. Previously, much of the intelligence gathered came from the United Kingdom, so it was no surprise that “Wild Bill” Donovan drafted his ideas based on the British Secret Intelligence Service (MI6) and Special Operations Executive; both of which laid the groundwork for a centralized intelligence program.

From its formation in 1942 and even through the 1970’s and 1980’s, the history and operations of the OSS remained secret. This was after being disbanded by President Harry S. Truman in 1945 as well.

“The concepts pioneered by General Donovan and the OSS continue to guide those in the contemporary intelligence and special operations fields.” – General David Petraeus, USA (Ret.), Director, CIA (2011-2012)

The roots of the OSS not only formed the Central Intelligence Agency, but also paved the way for the formation of U.S. Special Operations Forces. It was said that the ideal OSS candidate was described “as a Ph.D. who could win a bar fight.” In it’s time, the OSS was truly the tip of the spear that defended America and its influence is still seen today throughout the intelligence community.

Real Life Q Branch

During WWII, members of the OSS would conduct a number of missions that including spying, sabotaging and training local people to fight against enemy forces, but in order to perform these missions with success, operatives required a unique set of tools.

Some very specialized equipment and schemes were developed to give the Allied powers any extra edge they could. OSS Research & Development Chief, Stanley Lovell, knew that they needed to try every idea possible, even if some sounded comical: “It was my policy to consider any method whatever that might aid the war, however unorthodox or untried.”

ITS Security Products

OSS Sabotage Memo

OSS .22 Stinger

A Living History

While there is a gallery devoted to the Office of Strategic Services, it’s inside the CIA Museum and located on the CIA compound, which is not open to the public for tours. Currently there’s an effort to raise funds to build The National Museum of Intelligence and Special Operations and the video outlining what the museum will include is actually a great summary of the OSS.

Some of the more interesting artifacts on display at the CIA Museum include a miniature gasoline powered “insectothopter,” a Russian-made AKMS believed to be bin Laden’s personal rifle that was captured in the raid and a suppressed Hi-Standard .22 pistol that was test fired in the Oval Office by “Wild Bill” Donovan without President Franklin D. Roosevelt ever noticing.

Unfortunately, the closest you may get to seeing these items in person is the video tour that Yahoo News was able to go on, or the private tour from the Smithsonian.

For a great writeup of the British Special Operations Executive (SOE) and the American OSS, look for the December issue of SWAT Magazine. There’s an article by Eugene Nielsen that showcases the ITS Lapel Dagger and its history during the cloak and dagger days.

ITS SWAT Magazine Lapel Daggers

Further Reading

This brief article only begins to scratch the surface of the OSS and the early days of the CIA. While many of the stories, programs and tools are still protected from history today, there are a number of resources available if you’re interested in truly going deeper into the “rabbit hole.” One resource freely available is to search through the 1940-1946 records and documents declassified in the 2000’s.

Also available online, the book “Assessment of Men, Selection of Personnel for the Office of Strategic Services.” describes the account of how psychologists and psychiatrists assessed the merits of men and women recruited for the OSS. While the CIA still evaluates students based on methods recorded in this book, you can read it online in its entirety for free.

Among the numerous books published on the topic, these two are especially promising and worth a read.

Posted in History | Tagged , , , , , , , , , , , , , , | 2 Comments

Ultimate Radio Communication Guide: What to Look for in a Handheld Transceiver

ITS Handheld Transceiver

My previous article on radio communication was a primer that went into detail about why you’d want to learn about radios, the way they operate and what frequencies are available for you to operate on.

Today I’m going to address what kind of radios are out there for you to use with those different frequencies, the advantages to programming your radio, what kind of upgrades are available and even how to create your own comms, or frequency card.

I’m going to be referencing quite a bit of information from my last article when it comes to frequencies, so if you’re not up to speed yet on the difference between say, VHF and UHF, check out my first article.

What to Look for in a Handheld Radio

First off, my recommendations for radios are going to be primarily based on handheld applications. While there are certainly pros to having a larger base station transceiver, the handhelds have it when it comes to portability, ease of use, versatility and more. They can be used at home, in a vehicle, or even in the field.

What’s a Transceiver?

A transceiver, which I’ll be referring to frequently in this article, is essentially your radio. A transceiver is a unit which contains both a receiver and a transmitter. While these used to be separate units until the 1920s, most modern radios are transceivers. Occasionally you’ll see just a receiver, but this is mostly for shortwave listening and beyond the scope of this article.

What Radio to Buy?

This is a loaded topic and one that I mentioned I’ll be approaching from a handheld-only angle. I’m also going to keep this as budget conscious as possible, too. Like many of you that enjoy shooting, you’ve probably also amassed quite a collection of holsters, as you try different types out to find what works best for you. Handheld transceivers can be just as bad, but my hope is that with the info I’ll be providing, you’ll avoid amassing a box of radios that you no longer use like I have.

Some important considerations when looking at radios, are asking yourself some hard questions ahead of time. What do I want to do with my radio? What frequencies do I have access to and what are my power limits on those frequencies? My last article did a good job of laying out all the different frequencies available to you and which require a license to operate on. If you don’t already know which of the different frequencies you want to operate on, like FRS, GMRS, or MURS, reference that first article I wrote.

I hate to keep mentioning that first article, but I know there are some of you that are reading this that may think I’m breezing over important topics and I’m doing that for the sake of those that have the baseline info from that article.

Frequency and Power

Addressing each of these questions one at a time will give you a background of what essentials to look for. What you want to do with the radio is important, are you just talking outside within line of sight of another person? FRS radios are great for this application, but if distance is a concern, they’re not for you. FRS transmits and receives on UHF, which by nature doesn’t travel as far as VHF due to UHF’s shorter wavelength. This of course completely discounts obstacles you may encounter, which will decrease range even more.

Remember that more power equals better range, so the FCC legal limit of 0.5 watts on FRS is a real let down, when you can move to VHF and MURS frequencies and bump up to 2 watts of power. Pay your $90 to the FCC for a GMRS license and you can transmit at 5 watts to 50 watts. Have a HAM license? That changes things too.

Suffice to say, I’m trying to talk you out of FRS. FRS radio manufacturers like to inflate their range, which I got into on that last article. They make claims that seem to violate the laws of physics and the curvature of the earth. What I mean by FRS radios, are the two packs of walkie-talkie looking transceivers you commonly find at Wal-Mart and sporting goods stores.

ITS Tactical Handheld Radio

What you’re looking for in a good handheld is as much wattage as you can buy, while keeping in mind the legal limits you can operate on within your chosen frequencies. The frequency range the transceiver operates on is also very important. Obviously if your intent is programming MURS frequencies into your handheld, a handheld set up for CB with an operating range only in the High Frequency 27 MHz range, isn’t going to work with MURS and its 151-154 MHz range. The radios I’ll be recommend in this article are going to speak directly to versatility and can handle MURS, GMRS, NWR (Weather) and some HAM frequencies.

Typically, you’re only going to find a 5 watt max on handhelds, but what’s also important is ensuring they have different settings for power. Meaning that they have the ability to switch between a low power setting and a high power setting. This will ensure you have a handheld that can function well for GMRS and HAM wattage, but can also dial down for operating on MURS frequencies and not violate any FCC laws.

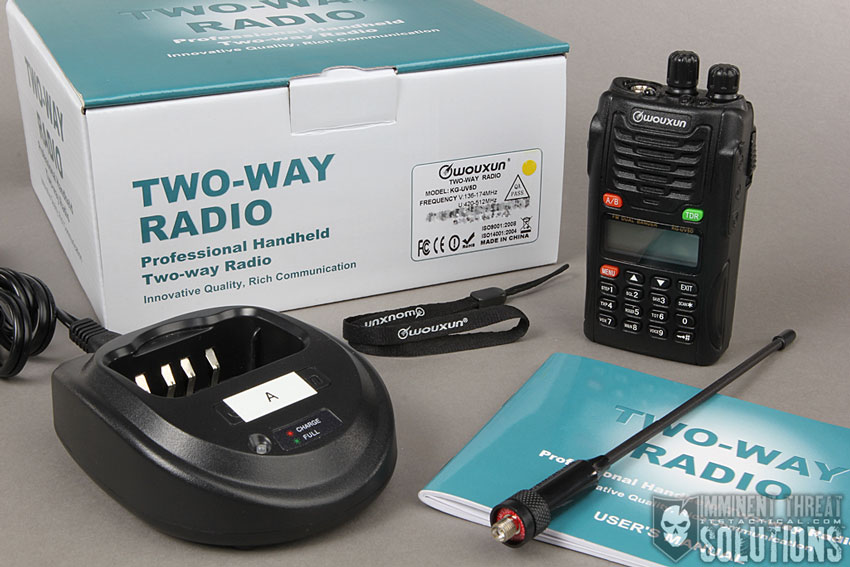
A good example of this is the Wouxun KG-UV5D radios we have here at ITS. They feature a selectable 1W low and 5W high setting for VHF and a 1W low and 5W high for UHF. By setting them to the low wattage setting, they’re able to be used with the FCC MURS requirement of not exceeding 2 watts of transmit power, yet with a programming change, they can be boosted to the high setting for GMRS or HAM frequencies at 5 watts. GMRS and HAM is obviously limited to licensed individuals only. More on those licenses and certifications here. While I could link to the KG-UV5D, the KG-UV6D is the newest version and is what I’d recommend if you’re buying one new.

Dual Band and More

ITS Handheld Transceiver

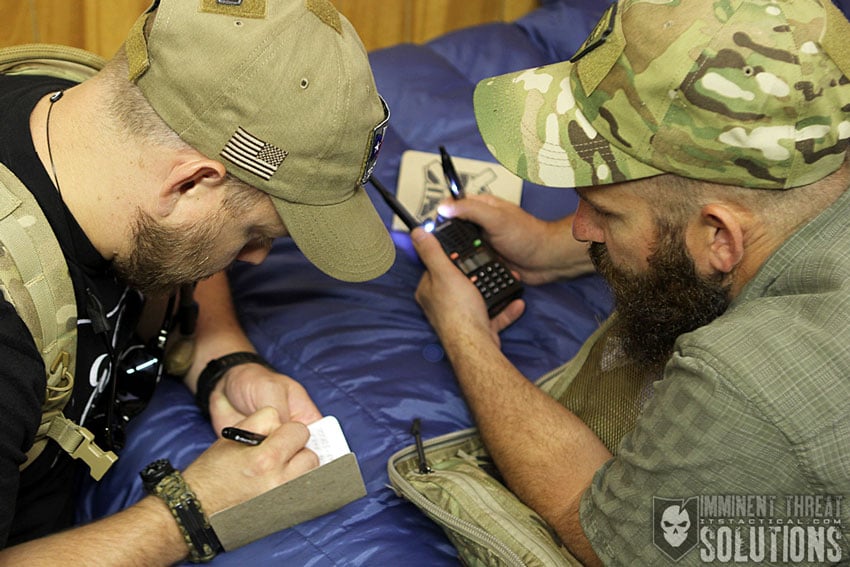
Having a dual band monitor feature on your handheld can be quite helpful. This feature will allow you to monitor two different frequencies at once. These can be VHF/VHF, VHF/UHF and even UHF/UHF. This might be hard to understand, so I’ll put it in the perspective of how we’ve used dual band before. During our recent ITS Muster, we assigned a radio to each of our squads and they had a designated main frequency to talk to the ITS staff on. The staff also had a frequency that we’d use to talk to each other on that the attendees didn’t have programmed into their radios. So we’d “monitor” both of these frequencies simultaneously with the dual band function of our radio transceivers and were easily able to select the specific frequency we wanted to transmit back on.

So in theory if the main frequency was channel 1 and our inner-staff channel was channel 2, we’d just have to make sure we were transmitting on channel 2 if we didn’t want the attendees to hear our conversation. One more thing about dual band is that you want to ensure your antenna can support dual band as well. If you’re buying a radio with dual band built-in, the antenna that comes with the radio will more than likely support it, it’s aftermarket antennas you have to worry about.

ITS Handheld Transceiver

Another important thing to look for in a radio transceiver its the ability to program it manually, as well as with programming software using a cable. More on programming in the next section. What I mean by programmed manually is that it has a keypad, a digital display and that all menu options can be set with that keypad and display. The display also provides visual feedback on what channel/frequency you’re operating on.

A few other considerations are as follows:

  • Does the transceiver have a memory bank to store your favorite frequencies?
  • What’s the battery type? Is it rechargeable? Is a charger included?
  • Is there an external mic/push-to-talk connection? This is likely also where you’d connect a programming cable.
  • Does it have an FM radio? (76-108 MHz) Do you need access to an FM radio?
  • What kind of antenna connection does it have? Is it SMA or BNC? (more on antennas later)
  • Does it have a manual channel adjustment knob? This can come in very handy.

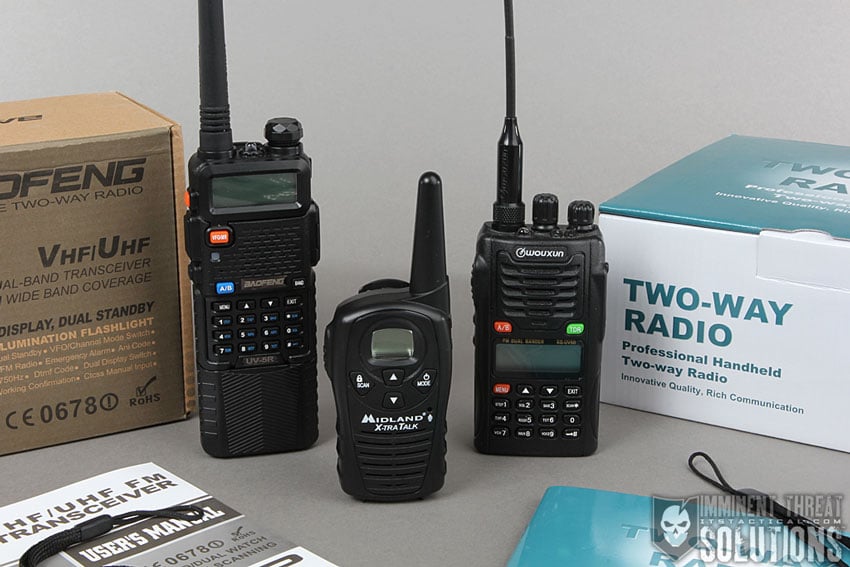
This is Great, but What Radio Do I Buy?

ITS Handheld Transceiver

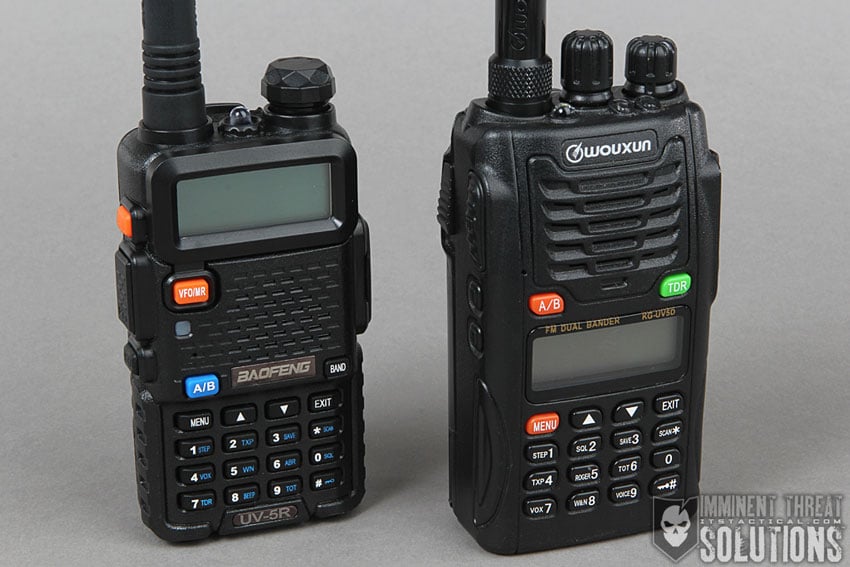
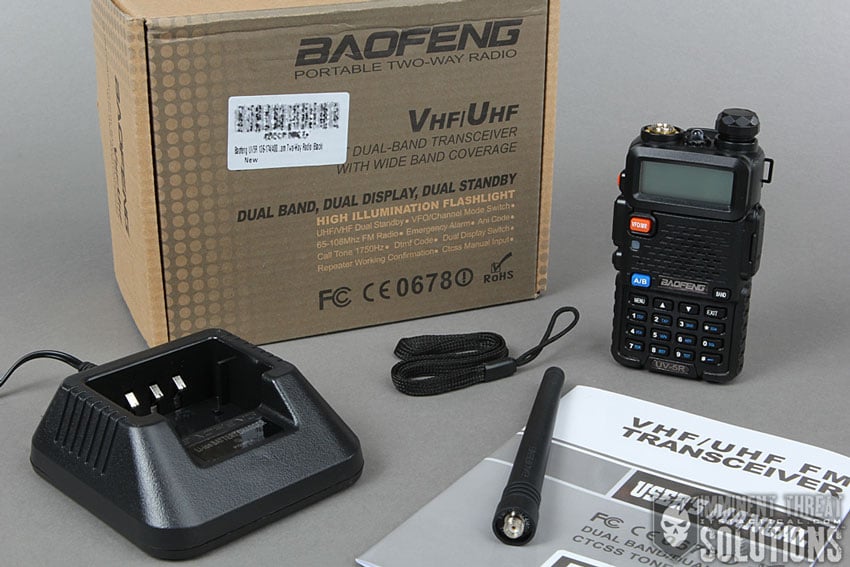
There are two transceivers I’ll put my name behind. My first choice is the Wouxun KG-UV6D and second is the Baofeng UV-5R. They’re both dual band monitor, programmable via keypad and cable, can handle MURS, GMRS, NWR (Weather) and some HAM frequencies.

Other notable features they share are multiple storage channels, digital backlit display (backlight can be disabled), channel lockout, 50 CTCSS / 104 DCS Tones, selectable low/high power settings and priority scanning. Each includes a rechargeable battery, desktop charger, belt clip and dual band antenna.

So what’s the difference? In my opinion, the Wouxun is a better made product. It feels more robustly made and they handled everything we threw at them during our last Muster without a hiccup. While I haven’t had the Baofeng in the same situations that I did with the Wouxun transceivers, there’s just something about the way they feel that makes me think they won’t last under hard conditions. I’m still testing the Baofeng’s out, but so far, that’s my opinion.

There’s a big cost difference between the units and that may push you one way or another. Let’s get into other things that separate these two radios and you’ll see everything lined out.

Wouxun KG-UV6D

ITS Handheld Transceiver

  • Frequency Range: 136-174 MHz, 400-480 MHz RX (receive) and TX (transmit)
  • FM Radio: 76-108 Hz (RX) automatic tuning and storing, radio frequency display, 18 FM memories in 2 banks
  • Selectable Power: VHF – 5W high/1W low UHF – 4W high/1W low
  • Selectable Step Sizes: 2.5, 5, 6.25, 10, 12.5, 25, 50 or 100 kHz
  • CTCSS/DCS: 50 CTCSS and 105 DCS Codes
  • Memory Channels: 199
  • Weather Resistant: IP55 Waterproof Standard
  • Programable: Via Keypad or Computer w/ Kenwood Style 2-Pin Connector
  • Scanning: Multiple Modes Including Priority Scan
  • Other Features: Keypad Lock (auto or manual), Flashlight Illumination, Optional Voice-Prompt Operation, VOX Function, Stopwatch Function, SOS Function, Selectable Transmit Over Timer (15-600 sec.), Wide/Narrow Band Capable, Independent Channel Adjustment Knob
  • Includes: 1700 mAH Li-ion battery, SMA Dual Band Antenna, desktop rapid charger (3-4 hrs.), belt clip, wrist strap, user manual
  • Operating Temperature: -22 °F to 140°F (-30°C to +60°C)
  • Dimensions: 2.3” wide x 4.1” height x 1.6” deep (with battery, without antenna)
  • Weight: 9.1 oz. w/ battery pack and included antenna
  • Made in China

CE & FCC Part 90 Certified
FCC ID: WVTWOUXUN07

Baofeng UV-5R

ITS Handheld Transceiver

  • Frequency Range: 136-174 MHz, 400-480 MHz RX (receive) and TX (transmit)
  • FM Radio: 65 – 108 MHz (RX)
  • Selectable Power: VHF/UHF – 4W high/1W low
  • Selectable Step Sizes: 2.5, 5, 6.25, 10, 12.5 or 25 kHz
  • CTCSS/DCS: 50 CTCSS and 104 DCS Codes
  • Memory Channels: 128
  • Programable: Via Keypad or Computer w/ Kenwood Style 2-Pin Connector
  • Scanning: Priority
  • Other Features: Keypad Lock (auto or manual), Flashlight Illumination, Optional Voice-Prompt Operation, VOX Function, Emergency Alarm, Wide/Narrow Band Capable, Timeout Timer
  • Includes: ANT5 SMA-J flexible antenna (male connector), 1800 mAH BL-5 Li-ion battery, belt clip, wrist strap, AC adapter and drop-in charging tray.
  • Operating Temperature: -4°F to 140°F (-20°C to +60°C)
  • Dimensions: 2.2” wide x 4.3” height x 1.2” deep (with battery, without antenna)
  • Weight: 6.8 oz. w/ battery pack and included antenna
  • Made in China

FCC Part 90 Certified
FCC ID: ZP5BF-5R

Part 90 FCC Certification

ITS Handheld Transceiver

Something additional you want to be on the look out for on a radio you’re considering purchasing, is that it’s FCC Part 90 Certified. This means the manufacturer has complied with the FCC and ensured their radios can be sold or imported into the US. There should also be a corresponding FCC ID that you can look up in the FCC online database to double check its authenticity.

Something to be aware of is that foreign manufacturers will only put this Part 90 certification label on radios they’re shipping to the US. Meaning that if you’re purchasing from an overseas dealer, your radio might be in compliance, but just not have a factory-installed label. According to the FCC, if there’s no label, it’s not legal for Part 90 Certification. Just make sure you ask if the label is installed and you’ll be fine.

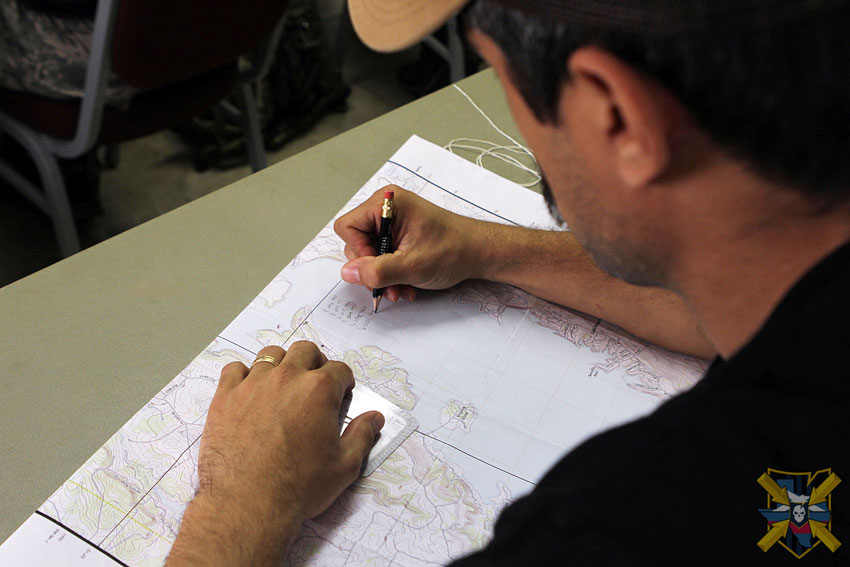
Radio Programming Basics

ITS Handheld Transceiver

Hopefully by now in the article, you’ve gotten a bit of the gist of programming and how it doesn’t necessarily take software and a programming cable to do so. Most modern radios that have a display and a keypad, are capable of being programmed manually through the menu options. When I say programming, I mean setting what frequency is on what channel and what menu options are turned on or off. You can even completely lock out the menu to prevent the radios from being reprogrammed accidentally.

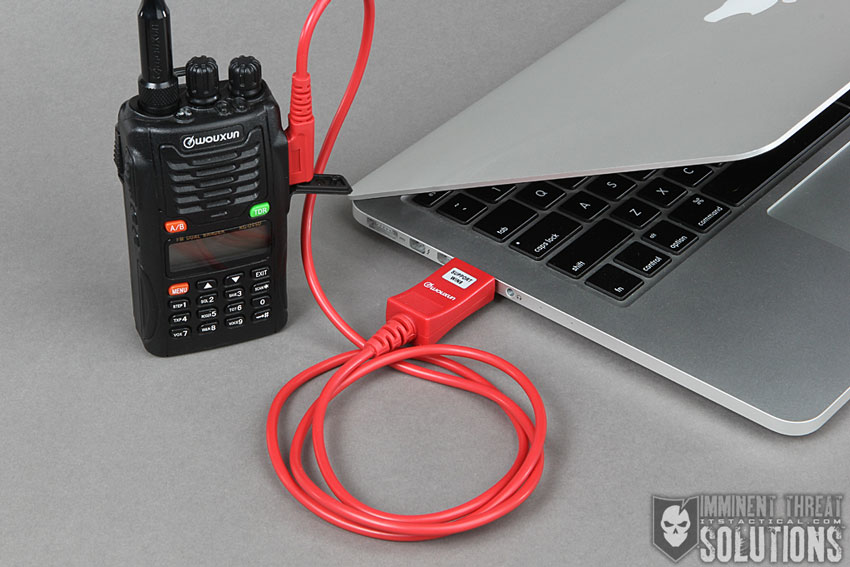
The benefits of programming a radio transceiver through a cable and software are saving time and the ease in which you can program multiple radios the same way. Programming software can differ based on what brand and model of radio you’re using too. I have my own recommendation below for software.

ITS Handheld Transceiver

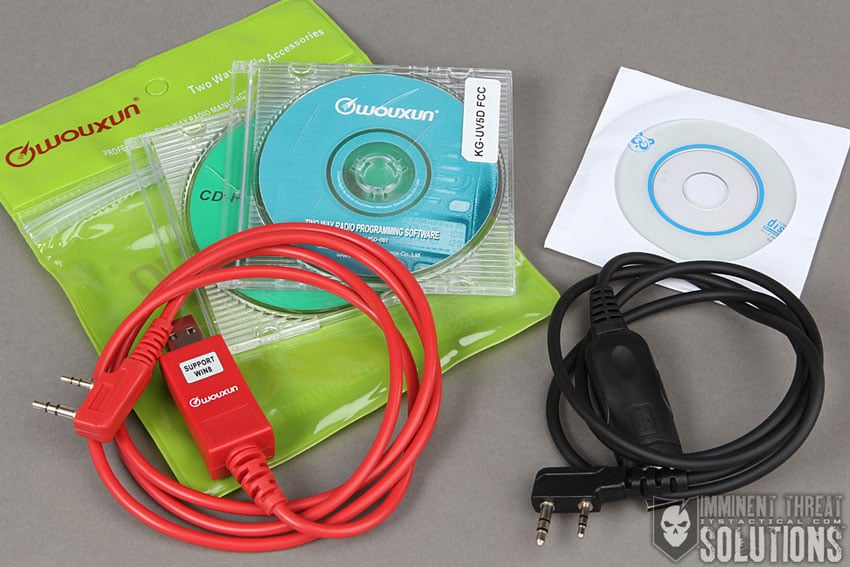
Always buy the programming cable made by the manufacturer if possible. This isn’t to say a generic cable won’t work, but it’s just one more variable you might be able to remove when you’re troubleshooting. Trust me, programming has kinks that have to be worked out.

Software I recommend looking into is CHIRP, an open source and free amateur radio programming software that provides a way to interface with multiple data sources and formats. It’s got installers for Windows (XP, Vista 7, 8), Mac OSX, Linux, Fedora and Ubuntu. We’ve had success using the software on both Windows 7 and Mac OSX.

ITS Handheld Transceiver

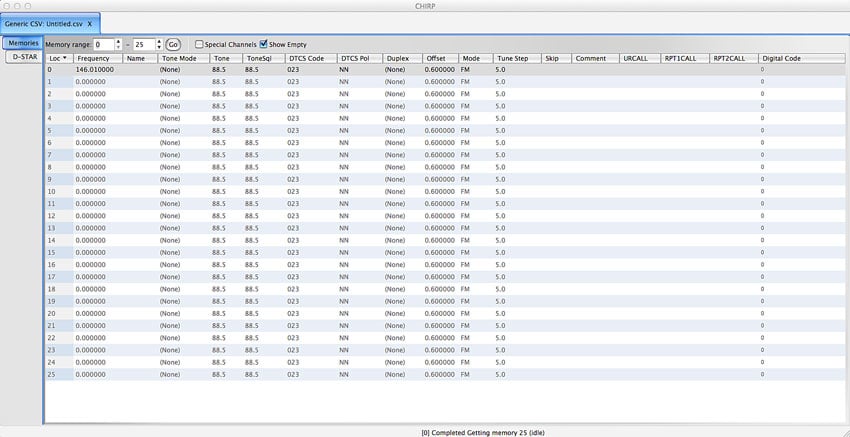
Both the Wouxun and the Baofeng radios mentioned in this article take a Kenwood Style 2-Pin Cable for programming, which can usually be purchased from wherever you’re sourcing your radio from.

Tuning Steps

Something important to mention in this section on programming is tuning steps. This is particularly important if you’re manually setting frequencies on a radio transceiver. If the tuning step isn’t properly set, you may notice that you blow right past the frequency you’re trying to set into your transceiver.

Common step sizes are 5, 6.25, 10, 12.5 and 25 kHz and represent the amount the frequency will change when manually tuning into to different frequencies. For instance, when you use the up/down arrow buttons to adjust frequency, the tuning step is the amount of frequency that will change for each press. 5 kHz is fairly standard and you should be able to get just about any frequency with this setting.

Creating a Frequency Card

ITS Handheld Transceiver

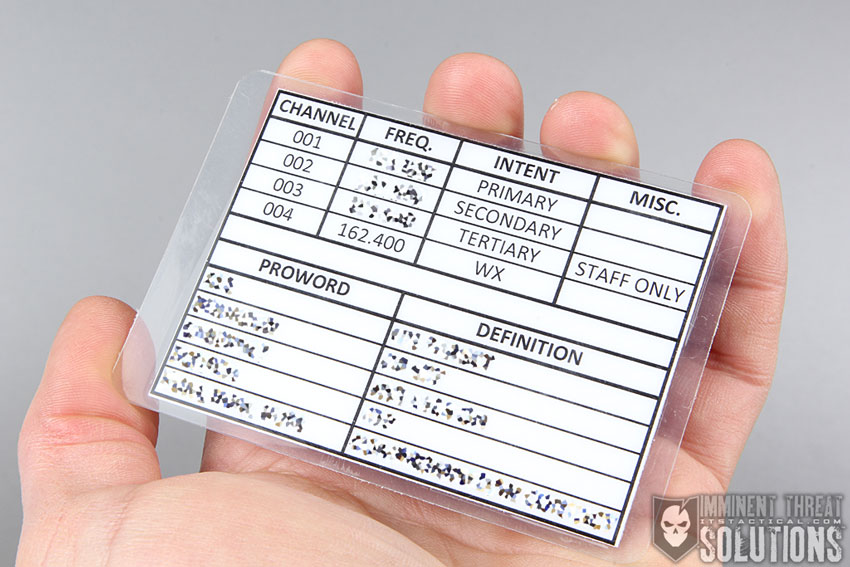
A frequency card, or comms card is a great way to have a quick reference to important channels you have programmed in on your transceiver. Not only to know what frequency a particular channel is, but what it’s for within your communication plan. It’s also a great place to store reference information like prowords, radio lingo and transceiver setting information.

For instance, I mentioned earlier that during the ITS Muster we had a designated main frequency that our squads would use to talk to the ITS staff on. The staff also had a frequency that we’d use to talk to each other on that the attendees didn’t have programmed into their radios.

ITS Handheld Transceiver

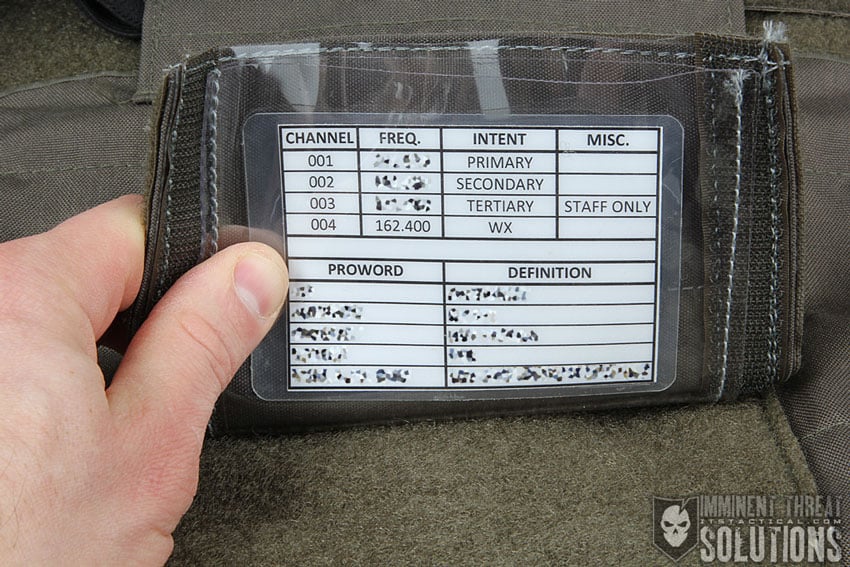
A comms card is a great place to keep track of this information and keeps everyone on the same page. A couple of channels isn’t too difficult to keep straight, but when you start dealing with even more channels, a comms card becomes a necessity.

The good news is that comms cards are easy to create with nothing more than spreadsheet software and a laminator. ID card size is a good goal to shoot for when you’re designing one, but index card size is good too if you have quite a bit of info. A tip here is to design the front and back of the card in one long layout, then simply cut it out, fold it in the middle and laminate it.

Prowords

Procedure words, or prowords, are easily pronounceable words or phrases that are given specific meanings to expedite message handling. They’re often condensed and designed to not be confused with other words.

While there are plenty of universal prowords, like Roger, Over, Out, Negative and Copy, there also might be internal prowords you need to keep track of within a group and a comms card is great for this. Just be sure that a comms card is treated as sensitive information if it’s deemed so.

One of the most famous prowords is probably “Irene,” which was the “go” proword from the Battle of Mogadishu in 1993. The operation was designed to capture two of Mohammed Farah Aidid’s high-echelon lieutenants and turned into a tragic firefight documented in the book Blackhawk Down.

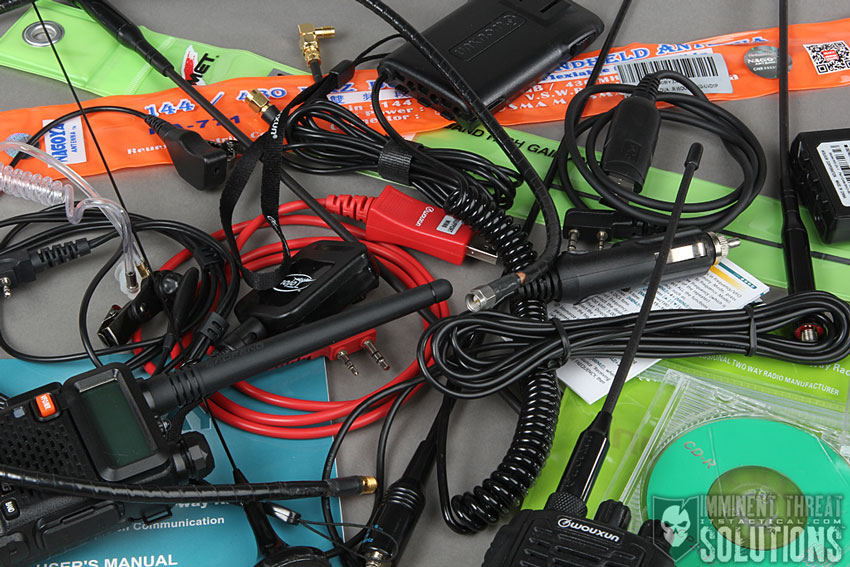
Radio Accessories and Upgrades

I’d like to use this section to go over a few accessories you might want to consider purchasing for your transceiver. While some don’t need much of an explanation, others include lessons learned that will hopefully save you some time when considering these options for yourself.

ITS Handheld Transceiver

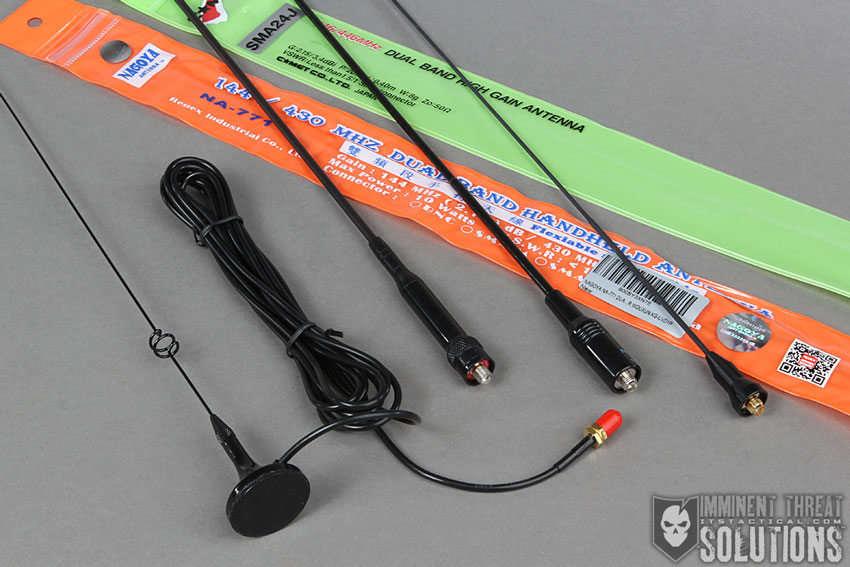
High-Gain Handheld Antennas

An antenna is an extremely important part of your radio transceiver and should be treated as such. Without it, your signal will suffer and it’s something you shouldn’t skimp on.

What you’ll want to look for in a high-gain antenna is its actual gain, which reputable antenna manufacturers will list in the product details. Antenna gain is a measurement of the effect the antenna has on the signal and is expressed in positive decibels (dB), antenna loss is expressed in negative decibels.

ITS Handheld Transceiver

I don’t usually quote Wikipedia, but there’s a good description written there on antenna gain that will give you a little more insight that I’ve included here:

Antenna gain is usually defined as the ratio of the power produced by the antenna from a far-field source on the antenna’s beam axis to the power produced by a hypothetical lossless isotropic antenna, which is equally sensitive to signals from all directions. Usually this ratio is expressed in decibels, and these units are referred to as “decibels-isotropic” (dBi). An alternative definition compares the antenna to the power received by a lossless half-wave dipole antenna, in which case the units are written as dBd.

Many things can affect antenna performance in the near field region, which refers to objects near the antenna that can positively or negatively impact it. One of the most common things that can affect a handheld can actually be you.

Other things to look for in a high-gain handheld antenna is that it’s dual band capable and covers the frequency and power you’ll be operating on. Here’s an example of how Nagoya lists their NA-771 Dual Band 144/430Mhz U/V SMA-F Antenna. The first part of the description tells you what frequency its operating at (144 Mhz VHF and 430 Mhz UHF) and you’ll also see Dual Band written there along with the type of connection, which in this case is SMA-F (SMA female).

Further in you’ll also see a max power of 10 watts, which is plenty, considering most handhelds max out at 5 watts. The antenna’s gain is listed as “144Mhz 2.15dBi 430Mhz 3.0dBi” which means that in the VHF 2 Meter Band (144 Mhz – 148 Mhz) you’ll get a +2.15 dB gain, which is almost twice the gain of a stock antenna. In the UHF 70-Centimeter Band (430 Mhz – 450 Mhz) you’ll get a +3.0 dB gain, which is exactly twice the gain of a stock antenna.

Just note that an antenna like this isn’t optimized for all the frequencies a radio like the Wouxun can handle, this antenna I’m using as an example is purely optimized for the 70-Centimeter and 2 Meter Bands, which are are the bands used by local emergency radio services such as the Amateur Radio Emergency Service, Radio Amateur Civil Emergency Service and Community Emergency Response Teams.

ITS Handheld Transceiver

Nagoya, Diamond and Comet are good names to look for in high-gain antennas when you’re out there researching them.

Relocating High-Gain Antennas

Something you’ll more than likely experience when replacing your stock antenna with a high-gain antenna is the length of your new whip-style antenna getting in the way. There’s a couple of things I can suggest for taming unwieldy antennas.

ITS Handheld Transceiver

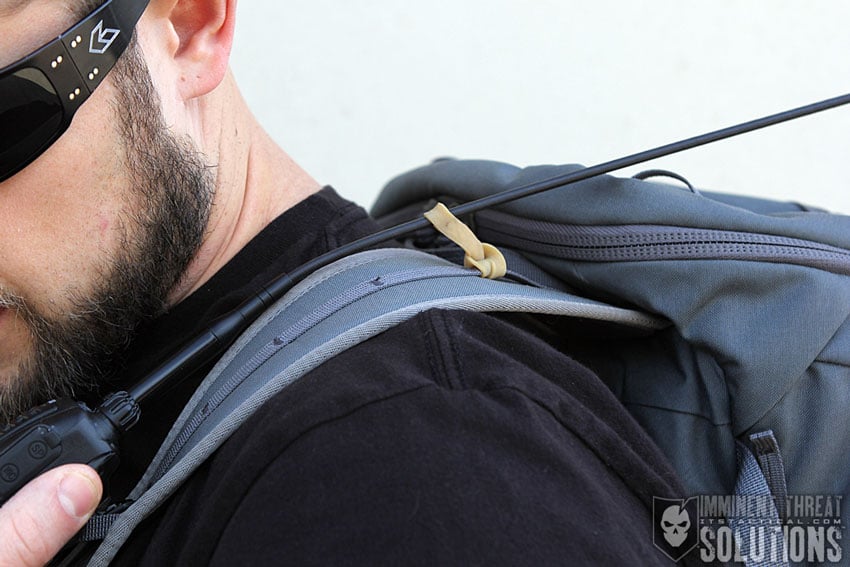
Depending on where you’re running your radio from will determine which of these techniques will be best for you. The simplest option is to run your radio from a backpack or chest rig strap and use a Rigger’s Rubberband to curve the antenna back towards you to reduce it getting in your way. You can always release it from the rubber band if you’re not getting a good signal, but you shouldn’t have to.

ITS Handheld Transceiver

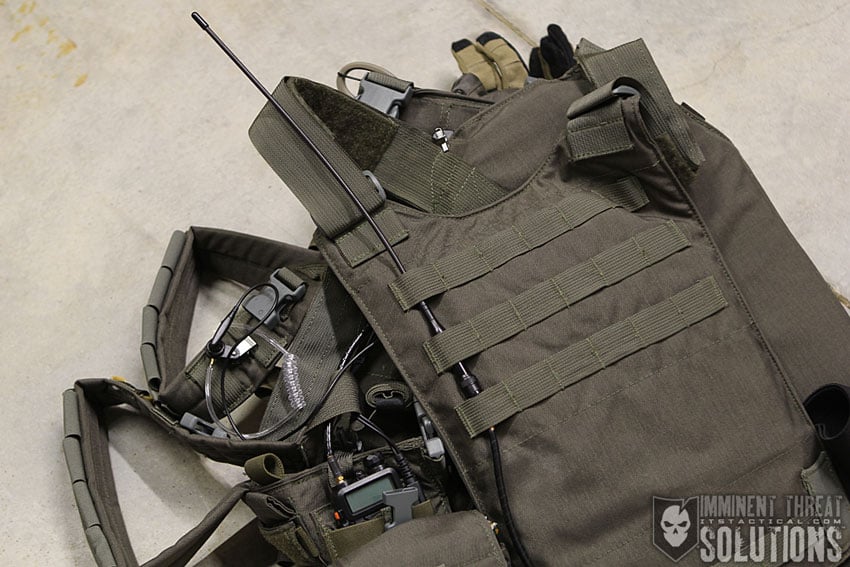
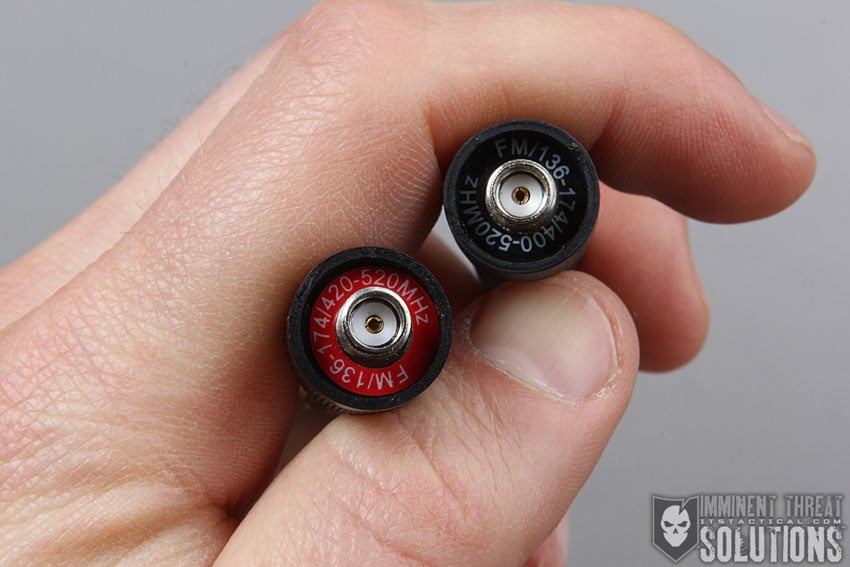
This of course might mean the radio itself is in your way though and you want to run it in a pouch on your belt or in a pouch on a chest rig. What you can do at this point is relocate the antenna if you have available MOLLE webbing to do so, or an attachment method to a backpack, etc. All you’ll need for this is an extension cable that’s set up correctly for your antenna attachment. Don’t skimp on the extension cable and ensure you’re buying quality connectors and a name brand cable, an inferior cable can cause a poor signal, no matter how good your antenna is. An extension cable can also attenuate, or reduce the signal strength and some companies will list how much reduction to expect in dB.

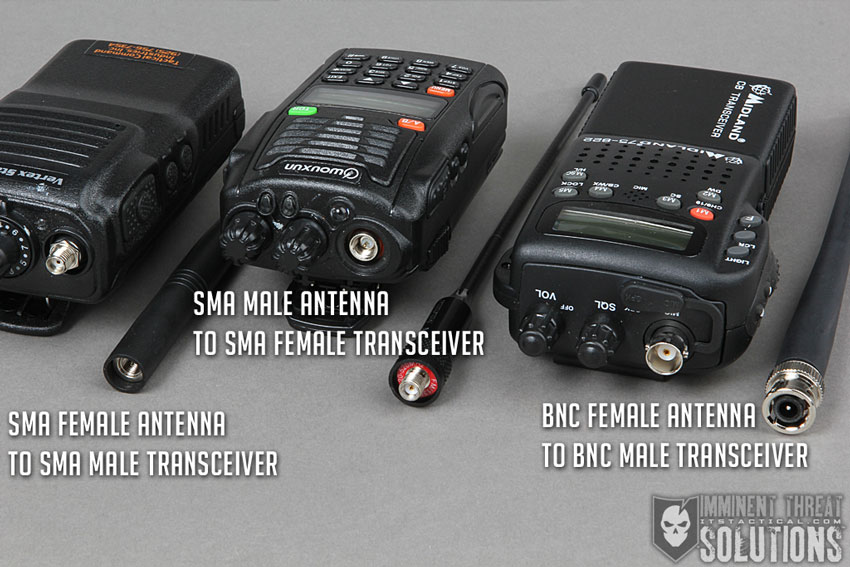
This is a good time to compare SMA connections to BNC connections. I’ve included a photo below describing Male SMA, Female SMA and BNC connectors. This is very important when buying extension cables and antennas in general. You need to know whether the transceiver portion of your radio is SMA or BNC, as well as whether it’s a male or female interface.

ITS Handheld Transceiver

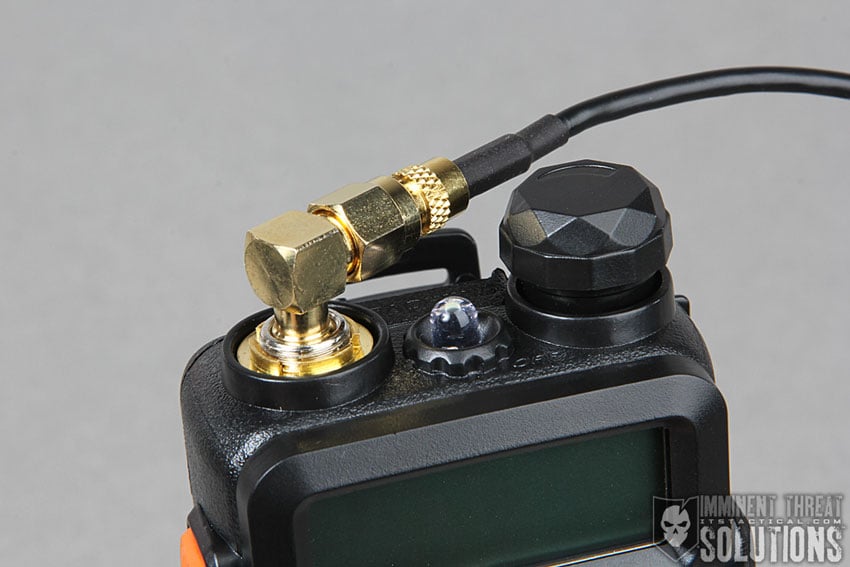
Another accessory you might want to consider if you’re running a radio from a chest rig or dedicated radio pouch is a right-angle connector. Using a right-angle adapter for your extension cable can prevent your cable from getting crimped as its routed around your equipment. Again, double check your connections to ensure you’re buying the right type of right angle.

ITS Handheld Transceiver

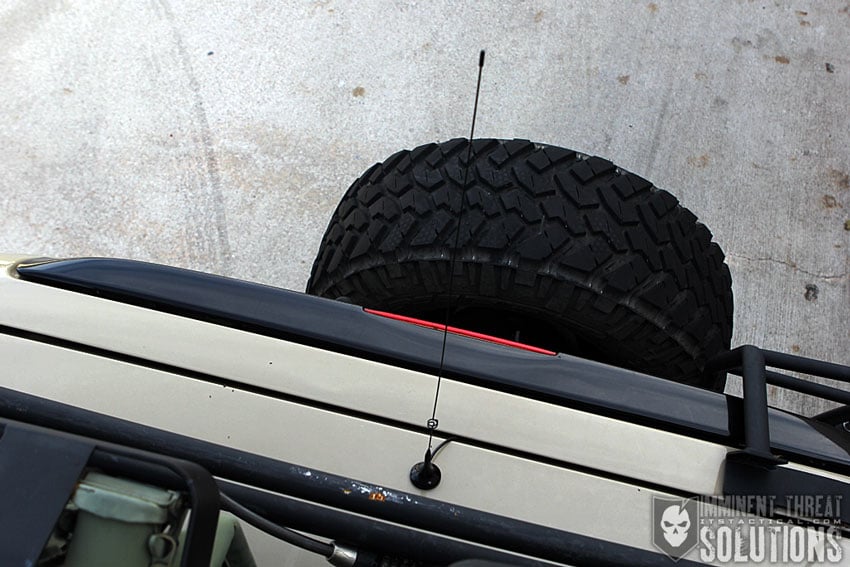
Many of the same companies I recommended to research for high-gain antennas make dedicated external antennas that either permanently mount on a vehicle, or utilize a magnet mount, making removal easy.

ITS Handheld Transceiver

Batteries and Adapters

I’ll quickly mention that extra batteries are an important consideration in your comms plan. You don’t want to run out of juice when you need it the most.

ITS Handheld Transceiver

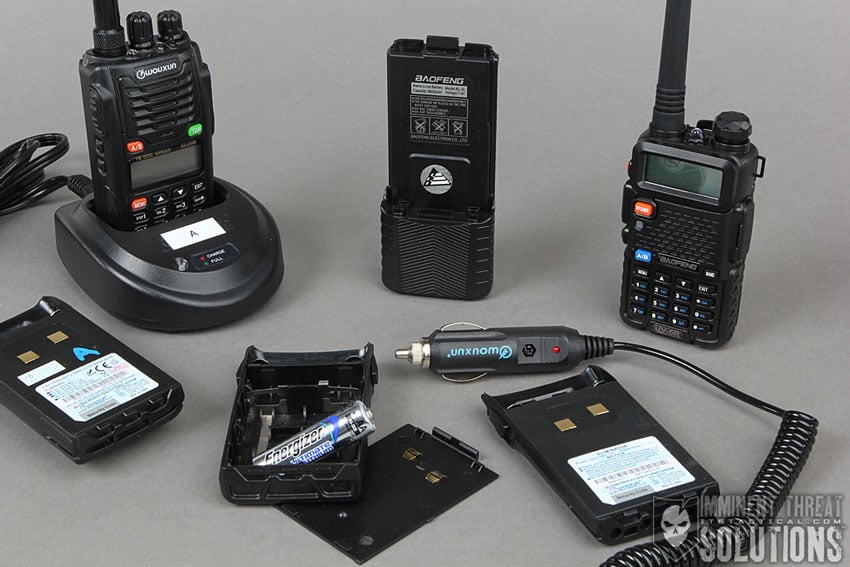
Rechargeable batteries are the most popular option and carrying a spare charged battery can be a good plan. Another option is purchasing an extended rechargeable battery, which are often taller in profile, but hold a longer charge than a standard rechargeable. Alway try to stick to OEM (original equipment manufacturer) batteries when possible. Aftermarket batteries might not list specs and you might not be aware of a compatibility issue until its too late.

I know that both Wouxun and Baofeng also have battery pack and cigarette lighter adapter accessories that might be a good option for you. The battery pack replaces the rechargeable battery and can be loaded with AA batteries in a pinch. The cigarette lighter adapter allows you to directly power your handheld in a vehicle for extended operation.

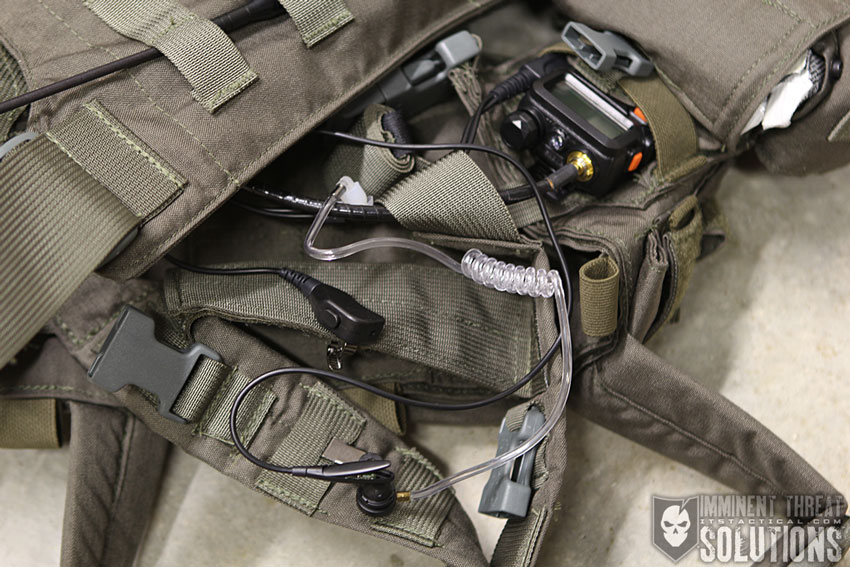
Microphones and PTTs

Depending on your usage, an external microphone like you often see Police Officers wearing might be a good option for you, but just like a handheld, everyone within earshot will hear everything coming over your transceiver.

ITS Handheld Transceiver

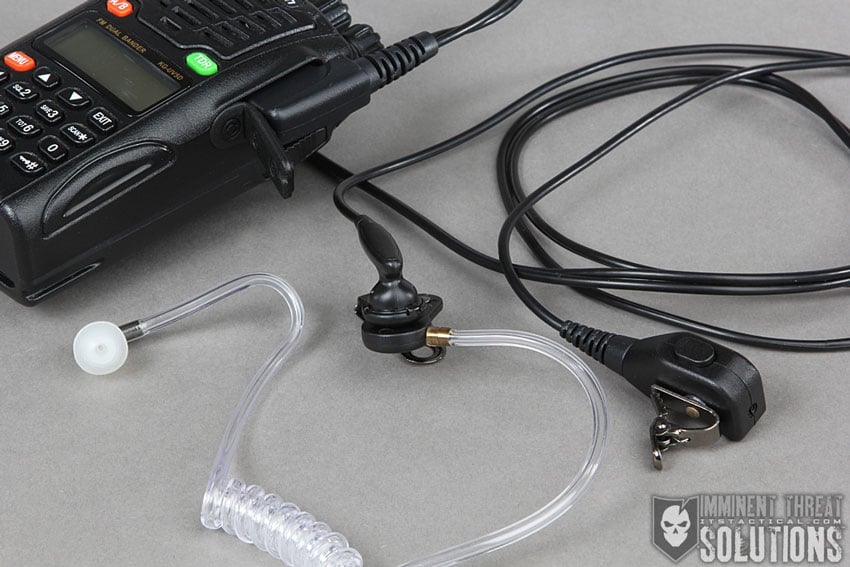
For a more discreet profile you might want to look into a push-to-talk headset, which includes an earpiece for monitoring audio transmissions and a small handheld microphone that’s actuated with a push button to communicate.
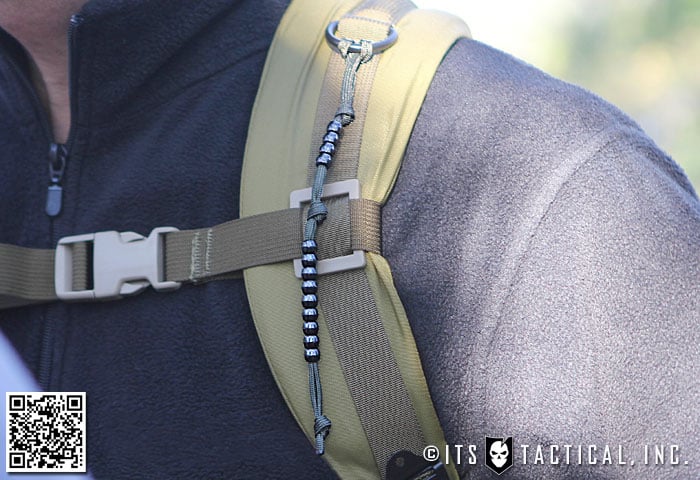
ITS Handheld Transceiver

Don’t be a Dummy

The last thing I’ll mention is that you should always ensure you have positive retention on your transceiver. A radio can be your lifeline in certain circumstances and treating it as a sensitive piece of equipment is important.

ITS Handheld Transceiver

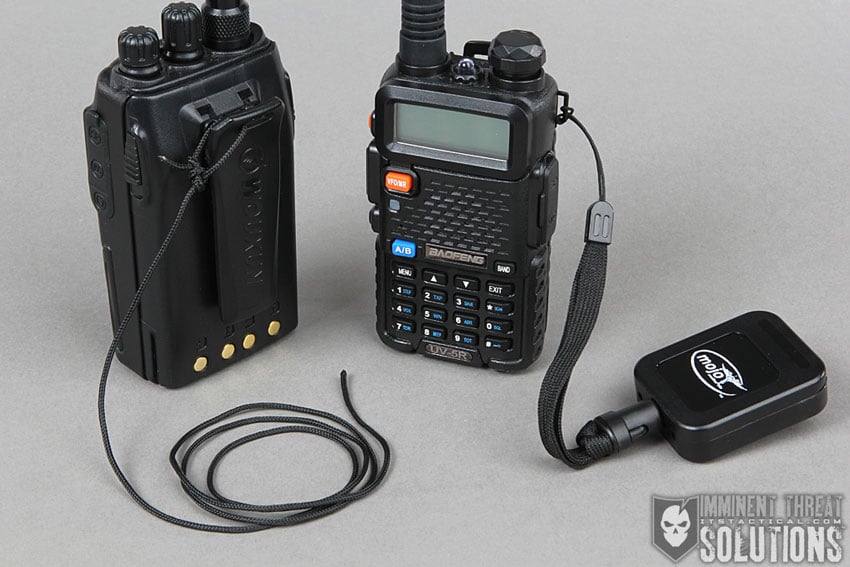
There’s a few ways of retaining your radio and it’s aways going to be what works best for you. The simplest method is dummy cording it in with a piece of cordage. I’ve found the best knot to tie in this scenario is a Bowline and you can refer to our Knot of the Week article on the Bowline to learn how to tie this knot.

The next option is a retractable lanyard that features some kind of quick disconnect that will allow you to quickly remove the radio from the retention if you need to pass it off to someone else.

ITS Tactical Handheld Radio

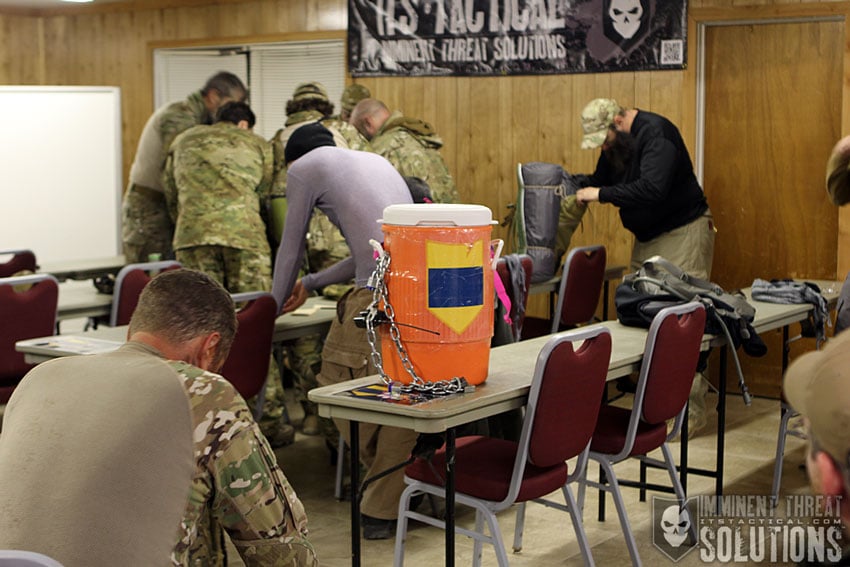
Whichever option you choose, just don’t lose your radio at night moving through the woods like Delta Squad did at our last Muster. Thankfully we had one of the best trackers in the world named John Hurth from TYR Group with us. After Delta reported their lost radio and couldn’t find it, John tracked the black radio down in the middle of the night. Delta had to pay the man a bit and along with their radio being tied into a water jug, they had a name change to Dora Squad.

Stay tuned for the next article in our Ultimate Radio Communication Guide series, where I’ll be going over repeaters, scanners and even more on antennas. Do you already own a dual band handheld? I’d love to hear about what’s working for you and anything additional you can add to this resource I’ve put together.

Posted in Comms | Tagged , , , , , , , , , , , , , , , , , , , , , , , , , | 142 Comments

Ridiculous Dialogue Podcast: Episode 14

Ridiculous Dialogue Podcast Episode 14

Episode 14

Just like you, we’ve always wanted to hear an interview with Lang, so we made it happen. You’ll hear all about Lang’s superpowers, his favorite foods, music and even the movies he’s been watching lately.

We were able to get in a few words of our own and talked about a D.C. Wheelchair Experience, ancient Chinese proverbs, what cookies are the best, Brewing Beer, Mike’s Drinking Journal and Rob’s early gift giving problems.

Don’t forget that we have a Movember team you can join to help raise awareness for men’s health issues. Check it out!

Be sure to pick up the new Ridiculous Dialogue T-Shirt from the ITS store!

Ridiculous Dialogue Podcast Cast of Characters

Ridiculous Dialogue was created to share the banter that takes place at Imminent Threat Solutions on a daily basis. It’s us; candid, unedited and talking about everything from what movies we’re watching to the general geekiness that keeps us laughing here at ITS HQ.

While we generally keep the vibe in our articles PG rated, be warned, it may not be safe to blast over your speakers at work. We hope you enjoy the insight into ITS and who we are behind the scenes as a company; pull up a chair and tune in to Radio ITS.

Posted in Podcast | Tagged , , , , , , | 1 Comment

Inspirational Manly Movie Quotes to Get You Fired Up

Top 5 Movie Quotes for Men

For eons now men have been carrying entire conversations with little more than well placed movie quotes. In fact, the “name that movie quote” game has become the method of choice for passing time on the road or in a line amongst men countrywide. But why are we so determined to remember movie scenes that we watch the same films time and time again? Why do we enjoy quotes more when they’re obscure and harder to recognize? Honestly, I’m not sure. What I do know is that I, like so many of you, love everything from Tarantino and Shyamalan to the Farrelly brothers and everything in between. Here are a few of the most manly movie scenes in recent history.

#5 True Romance

Click here if the YouTube video above doesn’t appear.

“You tell the angels in heaven you never seen evil so singularly personified as you did in the face of the man who killed you.”

This is one of Quentin Tarantino’s more gritty films which sets the stage perfectly for one of the best written verbal chess games of all time. A high ranking enforcer of a mob boss is looking for a boy who is being protected by his father. The man’s father knows that he’ll die whether or not he gives up the location of his son.

In an effort to keep his enemy from gaining information that will surely lead to his sons demise, he decides to insult the Sicilian mobster so badly that he’ll be unable to finish the interrogation. Accepting his certain death, the father takes a cigarette and conversationally inflicts blow after blow to the mob boss and his Sicilian heritage. This scene applies a very human connection to the crime world and is bound to leave you speechless. Just remember the context of the words being spoken. He’s addressing a man devoid of morality in a way that will be heard by such.

#4 Anchorman II

Click here if the YouTube video above doesn’t appear.

Wes Mantooth: Now here’s the thing. While I’ve been talking, my news team has emptied their gas tanks at your feet. I drop this smoke and every one of you goes poof.

Jack Lime: Well, you forgot one thing leatherman. You drop that smoke, you die, too.

Wes Mantooth: [Wes laughs] With the things I’ve done in my life? Oh, I know I’m going to burn in hell. So I sure as shit ain’t afraid to burn here on Earth.

Ron Burgundy: Oh my goodness, that’s the most badass thing I have ever heard.

The best thing about this quote is that it was the perfect ending to the outrageous news team fight sequence at the end of the movie. Vince Vaughn saved the day in the movie and for the audience. He captured a moment of Mafioso goodness in the midst of a convoluted mess with minotaurs, lasers and ghosts. Just don’t make fun of his mom, she was a saint!

My actual favorite quote in this movie is when Ron says “Best decision I ever made was putting this deep fryer in the RV”, but that’s only because I want to install a deep fryer in my RV.

#3 Good Will Hunting

Will pretty much destroyed Robin Williams’ character the night before by diagnosing a painting of his. For a brief moment you can see a glimmer of respect out of Will when Williams grabs him by the throat and slams him against the wall. Big dog mentality was obviously the best way to break through to a fellow resident of south Boston. What’s amazing however, is how Robin’s character was able to use reason and logic to appeal to Will’s senses the following morning. My personal favorite monologue of all time is what follows:

Click here if the YouTube video above doesn’t appear.

“You’re a tough kid. And I’d ask you about war, you’d probably throw Shakespeare at me, right: ‘Once more into the breach, dear friends.’ But you’ve never been near one. You’ve never held your best friend’s head in your lap and watch him gasp his last breath looking to you for help. I’d ask you about love, you’d probably quote me a sonnet. But you’ve never looked at a woman and been totally vulnerable. Known someone that could level you with her eyes, feeling like God put an angel on Earth just for you.”

The point is that knowledge is no substitute for experience. This quote really reminds me of the Internet and the millions of “geniuses” who think they’ve mastered a subject with a few keystrokes. Never forget, knowledge is not wisdom! The wise are forged through repetitive experience. It often involves loss, pain, regret and heartache but fortunately there’s a yin to the yang. Loss isn’t possible without first having possession. A heart can’t ache if it doesn’t beat and you can never regret if there was never a choice. Life is both tough and easy, hard and soft, painful and overwhelmingly sensational. This is the tragic beauty that is our joy.

#2 The Grey

Click here if the YouTube video above doesn’t appear.

“Once more into the fray… Into the last good fight I’ll ever know… Live or die on this day… Live or die on this day…”

A great friend of mine used to say, “there’s freedom in losing all hope.” He would only say it right before surf torture at BUD/S, which made it freekin hilarious! I love both of these quotes because of what they mean, not what they say. Our entire lives we’re taught self-preservation and that staying healthy and safe is paramount to risk. But is this really true? Is safety more important than risk? I ask this because triumph can only come about when risk is accepted, mitigated and overcome. There are very few times in life when we’re allowed, or even expected, to throw caution to the wind and say Fuck It, Lets Do It (FILDI*).

When self-preservation becomes impossible, I want to see what I am when all that’s left is skin and bone. I was afforded such an opportunity in the first phase of BUD/S when Bryan Black and I entered into the much dreaded Hell Week. Let me just say, it was exactly as advertised. For the first time in my life, I was able to see what and who I was behind the curtain of super ego. I wasn’t the biggest, fastest, or strongest guy there but figured out quickly that I could tell a well timed joke when things got tough. I also learned that gratitude was more powerful than anger because it lasted longer and that humor was more effective than silence because it made light of things, the ultimate defense mechanism. While the training was a great example of how positive an FILDI attitude can be, real world applications are always more powerful.

There are times in life when reason, logic and good intentions aren’t enough. This movie demonstrates this beautifully. The Alpha wolf was upon him and it was kill or be killed. It’s in those dire times that we should rise to the occasion and accept the freedom found in losing all hope. Meet your end well and deal as much pain as possible. “Into the last good fight I’ll ever know.”

*Note: My good friend Mike Petrucci showed me a fantastic video by Ze Frank called, “An Invocation for Beginnings.” This video is where I got FILDI from. Here’s another great quotes from that video: “Let me remember that my courage is a wild dog. It won’t just come when I call it, I have to chase it down and hold on as tight as I can.”

#1 300

Persian Emissary: “No, not slaves. Your women will be slaves. Your sons, your daughters, your elders will be slaves, but not you, no. By noon this day, you will be dead men! The thousand nations of the Persian Empire descend upon you! Our arrows will blot out the sun!”

Stelios: “Then we will fight in the shade.”

Click here if the YouTube video above doesn’t appear.

The reason why this is probably the most bad ass quote of all time is because it actually happened, although it wasn’t Stelios who said it. Dienekes was arguably the best soldier to have fought alongside Leonidas at Thermopylae. The famous historian Herodotus wrote, “the Spartan Dienekes is said to have proved himself the best man of all, the same who, as they report, uttered this saying before they engaged battle with the Medes.”

Stephen Pressfield captured the person of Dienekes beautifully in Gates of Fire. He lied and cheated his way into being among the 300 Spartans by claiming to have a son when he didn’t. He was safe and secure to practice the art of self-preservation for the remainder of his life but instead chose to unleash his FILDI. In the face of certain death, with his brothers at his side, he taunts the most dangerous military power in his history. He brought levity to an impossible situation which fueled the hearts of the men. The hot gates weren’t about victory, they were about uniting Greece in time to take a strategic approach to the coming Persians. Time was the Spartans real enemy and stalling was their only weapon.

Gates of Fire is one of my favorite books and I highly recommend the read!

What are some movie quotes that get you amped up?

Posted in Humor | Tagged , , , , , | 18 Comments

Deceive a Mugger with a DIY Decoy Wallet

ITS Diversion Decoy Wallet

Revisiting the Mugging Diversionary Device, or Decoy Wallet, has been on my mind lately. With ITS releasing the Hypalon Concealment Wallet, a few people remarked that a wallet would be the first thing a mugger would take and keeping entry/escape tools inside might not be the best course of action.

I certainly understand the hesitation, but why would you even let a mugger take your real wallet? That’s where having a good plan and a decoy device comes into play.

Decoy Wallet

ITS Diversion Decoy Wallet

I first wrote about my Decoy Wallet back in 2009, which I’d only recently started carrying on a regular basis. It’s certainly not handy to carry two wallets, especially considering I carry one of our ITS EDC Trauma Kits daily as well.

That being said, I can’t honestly say I carry my Decoy Wallet each and every day, but when I can, I do. Even if it’s the primary wallet in my back pocket and my real wallet is in a jacket pocket.

How Does a Decoy Wallet Work?

The premise behind a Decoy Wallet, or Giveaway Wallet, is that in the event of a mugging and the old “gimme your wallet” routine, you’d reach for the ringer. To the criminal, they got what they wanted and their eyes should now (in theory) be affixed to the Decoy Wallet.

They’re also more than likely going to want to leave the area in a hurry and this is also the point where the most danger lies. Do they truly just want your wallet or are they bent on doing you harm or ensuring they don’t leave any evidence?

It’s ultimately for you to decide if lethal force is justified, but throwing the wallet or just taking it out makes for a pretty good diversion if you need to use the other hand to access a defensive weapon. This is why I try to keep my Decoy Wallet in my back left pocket. Being right handed, this gives me more options to access my tools.

Something that was taught to me long ago was that I should always be looking for three things: Buddies, weapons and options. Where are my buddies or people that can help me, where are their buddies, or backup, if any. What weapons are available, both on the bad guy, on me, or what’s around that can be used as an improvised weapon. What are my options? Can I escape, or is lethal force justified? What are the bad guy’s options? Knowing his next move might give you the upper hand as well.

What to Carry in a Decoy Wallet

ITS Diversion Decoy Wallet

More than likely, a criminal is never going to see what’s in your Decoy Wallet, as they’ll want to get off the X as soon as possible. If it does open up, you’ll at least want to have some items inside that give the appearance of credit cards and cash. The idea is to make the illusion plausible.

First off, I recommend never putting anything inside that has your name on it, or can be tied back to you, your home, or your family. You don’t want some mugger getting pissed off that all he got was a couple of bucks and coming after you.

The idea is to start collecting a bunch of those credit card offer blanks that look like the real credit cards. You know, the ones that say “your name here.” You’ll want at least 3 or 4 of those to visually look like the typical variety found in a wallet.

ITS Diversion Decoy Wallet

The wallet is also an important part of the illusion. It has to look worn. An old wallet is perfect for this, as it will have true wear. Just make sure it’s nothing you wouldn’t mind losing.

The last thing is to put a couple of real bucks inside. 3-4 one dollar bills are sufficient. Just in case a mugger’s goal is to take the cash and run, he won’t feel play money and request your real wallet.

Live to Fight Another Day

Just like you I don’t ever want to be the victim, but if this simple diversionary technique can give me the upper hand or allow me to fight another day, then I feel it’s all worth it.

Is it an inconvenience to have to keep up with one more thing in your pocket? Sure it is, but not every solution is a gun solution. Why not carry a cheap insurance policy that can buy you important time and not have the mental dilemma of “should I give this scumbag my wallet?” Throw it at him and transition, or get the hell out of dodge.

Have options, that’s what’s important.

Posted in DIY | Tagged , , , , , , , , | 13 Comments

ITS + The Feed = Fuel for Adventure

ITS + The Feed

The Feed wants to make sure you have the exact food you need for whatever adventure that may lie ahead. It doesn’t matter what type of athlete you are, The Feed is there for you by providing both the best products around as well as one-on-one nutrition coaching. Their goal is not only to educate customers about sports nutrition but also make it easier to eat healthy by shipping their hand-picked, hand-packed boxes to your door each month.

We’ve teamed up with our friends at The Feed to offer a box of goodies we put together, based on items that have fueled us on our adventures here at ITS. What’s great is that you can modify and customize this box any way you see fit! We won’t hold it against you if you want to substitute a few items, but don’t go crazy.

Many of the products we’ve selected for our ITS Box include personal favorites of our Staff and as mentioned, are items which keep us fueled and ready for adventure. We’ve also added a couple of fun items that we think you’ll enjoy.

Shop Different

You can shop The Feed in a couple different ways:

  1. Hand-pick your own individual boxes
  2. Order or customize a collaboration box, like the ITS Box

You can also save some money and sign up for their monthly service to get your custom box delivered every 4 weeks.

We had to get one of our own ITS boxes to try everything out and we’re happy to see that the team over at The Feed prides themselves in customer service. Specifically awesome was the personal hand written note in the box and some contact information in an included pamphlet:

“We are your personal nutrition coach. You’ve taken a big step towards fitness, and we want to make sure you keep on track, have the best nutrition available, and know when to use what and why. Training for a specific event and want nutrition advice, call us (877) 780-8957 or email us anytime with questions, we are here to help! [email protected]

It’s really great to see them take customer service to the next level and we can certainly appreciate this as a customer.

What’s in our ITS Box of Fuel for Adventure?

ITS + The Feed

  • Peanut Butter Cookie Lärabar Alt
    • The Lärabar Alt is a higher protein based version of the traditional Lärabar. True to the Lärabar way, each bar has no more than 9 ingredients and is made exclusively from organic, gluten-free, non-GMO ingredients.
  • Vanilla Honey Stinger Waffle
    • Certified Organic, these waffles are the perfect ride snack. They are great tasting, chock-full of fast-acting carbs and easy to digest. In Europe, waffles have been making their way to jersey pockets for years. Now Honey Stinger has created their own take on this classic treat.
  • Fruit Punch Nuun Hydration Tablets
    • Nuun is an electrolyte-enhanced drink tablet that will keep you optimally hydrated. It’s great to use during workouts, the electrolytes will replenish what you lose when you sweat and the extra sodium will help keep your muscles from cramping.
  • Sriracha Chili Sauce
    • Sriracha sauce?! Why would you ever need this for sport nutrition? Well, Siracha sauce, also known as Rooster Sauce is one of the greatest foods of all time. It adds that special flavor and the perfect kick to anything. It will make you happier and happy athletes = better athletes.
  • Steve’s Paleo Jerky
    • All Steve’s Paleo Jerky’s are made from free-range chicken and beef, raised without antibiotics, or added hormones, with absolutely no MSG, soy or sugar. That means this jerky is 100% clean, nutritious protein.
  • Triberry Gu Gel
    • Gu gels provide your body with the essential nutrients it needs to ride for hours and hours. This gel has a unique blend of amino acids to combat muscle fatigue, electrolytes to prevent cramping and a complex carbohydrate blend that’s easy to digest. Gu Gels have 100 calories per packet.
  • The Bootlegger Bottle
    • This bottle is inspired by backroads, bootleggers and prohibition. XXX White Lightning, or as it’s better known, moonshine was consumed by outlaws on the lam.
  • Cranberry Almond Kind Bar
    • When you have a craving for something to crunchy, salty, sweet and satisfying Kind Bars are the best bet. They come in a great variety of flavor combinations like Peanut Butter Dark Chocolate + Protein, Cranberry Almond and Antioxidants and many more. There is no surprise to what’s in one of these bars because you can not only pronounce all the unprocessed all natural ingredients but you can see them.
  • Mountain Berry Shot Bloks
    • In great flavors, these bite sized chews deliver the quickest form of energy and electrolytes to your body during races and training. The 33 calories cubes make it easy to track calories and electrolyte intake. Shot Bloks are made of the highest level of organic ingredients.
  • Tasty Kill Cliff
    • Kill Cliff is a functional recovery drink made up of B, C, and E vitamins, electrolytes, and plant extracts including ginger root, green tea extract, and ginseng root powder as well as a unique enzyme blend. It has no sugar, no artificial colors, no artificial flavors and only 15 calories. Use it as an alternative to unhealthy sodas or energy drinks, or grab one after your next workout to instantly begin your recovery process so you can get back to being awesome.
  • Justin’s Peaunut Butter
    • We love Justin’s as a real food alternative before, during or after our workouts. Mixing the highest quality ingredients to create amazing flavors (like Vanilla Almond Butter, or Chocolate Hazelnut Butter) makes Justin’s a great snack at anytime.

With free shipping on all orders over $49, we highly recommend you add another item or two to your ITS box and you’ll actually save a few dollars!

Click here to order the custom built ITS box from The Feed!

Posted in ITS Information | Tagged , , , , , , , , | 2 Comments