Sandbags: Unconventional Tools for Functional Strength

Sandbag Training

Not every athlete has the luxury of having a professional coach train them multiple times a week. Location, cost, work and family can all hinder one’s ability to train consistently. The lack of a world class training center and a professional coach is no excuse not to be fit. 3-4 hours a week and a few simple tools can get you to a fairly high level of fitness.

One of the most most amazing tools you can acquire if training solo is a sandbag. They’re cheap, easy to come by, easy to build and their awkward size and shape make them great training tools for the real world. They’re a great piece of equipment if you are on deployment and have limited access to more conventional training tools too.

The best thing about a sandbag is how amazingly hard they are. I’ve seen more then one elite-level garage gym coach or fighter walk into a session and get absolutely crushed by these things. They truly are amazing training tools.

How to Build a Sandbag

Sandbag TrainingThe first thing you’ll need is a good old military duffle bag. We strongly suggest using the cotton canvas ones that you can find at most any surplus store vs. the nylon blend type with the back pack straps. The older cotton canvas ones will take the abuse better and are generally more durable.

The first thing you’ll need to do is cut anything metal and sharp off the bag, such as the hook that closes the bag. You really don’t need to cut out the eyelet, but can if you really want to. If you’re looking for a nicer bag we suggest buying the bag from MilitaryAthlete.com – they run $50 and are well worth it, this is what we use exclusively in our gym.

Once you get your bag you’ll need to fill it with something. If you live in a cold place the best thing you can use is wood pellets for a stove, down here in Texas it’s a little warm for stoves, so we use a rubber mulch that’s available from Home Depot. We’ve also had good luck with deer corn. Avoid fillers such as pea gravel because they have a tendency to wear holes in the bag from the inside. Absolutely never, ever, use dog food – trust us on this one.

Sandbag Training

We suggest that male athletes start with a 60 lb. bag, females with a 40 lb. bag. As you get stronger you can gradually add more filling and increase the size of the bag. Our stronger males here use the 100lb bag and usually put on a weighted vest or plate carrier to increase the load. Eventually you’ll get to a point where no more material will fit in the bag. ITS Tactical did a great article a while back on how to make a “pill” for weighted rucksack runs, using one of these is a great way to increase the weight of your bag quickly. A 20lb dumbell also works well.

Once you have your bag loaded up with 60lbs of filler it’s time to close it up. Gutted parachute cord works the best. Take a 20” piece of cord, make a loop and then tie an overhand knot. Make sure you have at least a 5” tail on the short side.

Sandbag Training

Sandbag Training

Sandbag Training

Take the longer running end, go around the bag into the loop, then double back on it ensuring it’s tight. You should be able to really crank on it to keep the filler from trickling out. Keeping it tight, wrap the long end several times around the bag then tie it to the other tail with a simple square knot. If you want, you can use 100 mph. tape to double it up. Now you’re ready to play.

Training with a Sandbag

Almost anything you can do with a barbell you can do with a sandbag – cleans, presses, squats, you name it. The great thing about a sandbag is how unwieldy it is. If you ask me, that makes it an even better training too,l since things in the real world are not always perfectly balanced like that shiny new $300 barbell.

  1. The first and most important thing to learn, is how to pick one up correctly.
  2. Straddle the bag with the pigtail facing to the rear.
  3. Set your back by lifting your chest and hinging at the hips.
  4. Squat down and grab the bag keeping your back flat.
  5. Pick the bag up and once it passes your knees explode at the hips.
  6. Receive the bag in the position appropriate for the exercise.

Once you can pick up your bag safely, the fun begins.

Sandbag Training

Sandbag Exercises

Like I mentioned earlier you can do almost anything with a sandbag that you can with a barbell, below is a list of some of the exercises we do here at our facility. We once had a team competition where teams had to transport a 80lb bag 5 miles over uneven terrain so your imagination is the limit.

Here’s a quick video demonstrating the sandbag exercises outlined below:

  • Sandbag Cleans
  • Sandbag Clean Squat and Press
  • Sandbag Front Squats
  • Sandbag Walking Lunges
  • Sandbag Getups
  • Sandbag Burpee
  • Sandbag Curtis P
  • Sandbag Drag

Storage and Maintenance

If you live in a warm climate, your bag will get pretty sweaty every session. Always leave it out to dry or place it in front of a fan. We also spray our bags with a light dose of Lysol to keep the funk off. Every month or so, empty out your bag and run it through the washer. If you bag gets a hole in it, a local sew shop can patch it for you for a few bucks.

Editor-in-Chief’s Note: Please join us in welcoming Jake Saenz as a contributor on ITS Tactical. Jake is a former Special operations soldier that lives and coaches in Austin, Texas. His gym, Atomic Athlete, is a performance based strength and conditioning company that focuses on making athletes stronger, faster, and harder to kill. Their training focuses on outside performance and uses well thought out programming and periodization to get athletes of all types to elite levels of fitness. As a partner gym of Military Athlete, Jake has the opportunity to travel across the nation assisting Rob Shaul in preparing soldiers for combat deployments and missions.

Posted in Functional Strength | Tagged , , , , , , , , , , , , , , , , | 33 Comments

An Awesome Infographic on Why You Should Embrace the Beard

Thanks to  http://onlinephd.org/ for the awesome infographic!

Posted in Humor | Tagged , , , , , | 27 Comments

Introducing the ITS Tactical ETA Trauma Kit (INERT)

We’ve now taken the proven design from our ETA Trauma Kits, along with feedback from our end users and created an inert version of our kits. The ETA Trauma Kit (INERT) was made with the sole purpose of providing a lower cost option of our kits to train with.

The components you’ll find in the inert kit are all the same items you’re used to seeing in our kits, with the exception of the Combat Gauze Inert Moulage Trainer. This blue packaged Combat Gauze is for simulated training only and not for medical use. It’s the same z-folded Combat Gauze in our ETA Trauma Kits, but it lacks the hemostatic agent necessary to stop real bleeding. The inert Combat Gauze also features a resealable closure, so you can repack it and train with it again.

[flickr id=”6950282362″ thumbnail=”medium_640″ overlay=”false” size=”medium” group=”” align=”center”]

[flickr id=”7096353555″ thumbnail=”medium_640″ overlay=”false” size=”medium” group=”” align=”center”]

With these Inert ETA Trauma Kits, there also may be expired components included. It’s important that this kit is not used to “refill” another of our ETA Trauma Kits, as this inert kit was designed with the sole purpose being used in a dedicated training environment. Along with the bright blue tell-tale pack of inert combat gauze, we’ve also stamped our insert card in blue with “INERT.” Again, this kit is for training ONLY!

The reason we’ve chosen to include an inert version of every component from our ETA Trauma Kits, is to ensure you’re training with the identical items you’ll be using in a real life situation. In the event you have to use an ETA Trauma Kit, you don’t want it being the first time you’ve ever had exposure to the components. Train like you fight.

Pick up an ETA Trauma Kit (INERT) in the ITS Tactical Store today!

Posted in Medical | Tagged , , , , , , , | 4 Comments

Grab Your Helmet, Cause It’s About to Get Retarded

What started as an internal joke here at ITS, has manifested itself into our newest morale patch. While our Grab Your Helmet Patch is definitely not for the easily offended, we feel it’s perfect for those situations where it really has reached that level.

These 4″ tall x 3.5″ wide Grab Your Helmet Patches feature the kind of helmet you’d most likely grab when things get retarded, a ballistic-rated one! The subdued patch features hook velcro sewn on the back to stick them anywhere you want!

Pick yours up here today in the ITS Tactical Store!

[flickr id=”6950265334″ thumbnail=”medium_640″ overlay=”false” size=”medium” group=”” align=”center”]


Posted in ITS Information | Tagged , , , , | 13 Comments

Sign Cutting and Tracking Methods Employed by the US Border Patrol

“There’s always sign.”

Sign is the physical evidence of any disturbance of the environment left behind by animals, humans or objects. The detection of this sign is called sign cutting. A person (or animal) cannot traverse ground without leaving some sort of telltale sign. This sign is what we’re trying to find and track.

When most people think of tracking, they usually think of following footprints. But a trained tracker looks for more. He looks for kicked-over rocks, soil depressions, clothing fibers, changes in vegetation, changes in the environment, ambient noise or lack thereof, etc. Basically, the tracker looks for the disturbance — the sign — left behind by the person or persons being tracked.

Origin

Sign cutting and tracking has been around for millennia. It is a natural extension of hunting, both animals and people. On our continent, Native Americans perfected the art of sign cutting tracking both men and animals. To this day, there are special units of Native American law enforcement trackers protecting this nation. Many other rescue and law enforcement entities in the United States use tracking to locate people. Today, the tradition of tracking persons for law enforcement purposes is usually associated with the men and women of the United States Border Patrol.

The U.S. Border Patrol currently trains its agents in sign cutting, and even after the adoption of modern technology, sign cutting remains one of the most effective tools at its disposal to locate persons and gather intelligence. Sensors and cameras can be fooled and rendered ineffective, but as one of our seasoned agents likes to say: “The sign never lies.”

In this article, I will touch upon the basics of sign cutting. I have to admit that I am by no means a master in this field. I do, however, use it on a daily basis as an enforcement tool. I take responsibility for mistakes in this article.

Applications

Sign cutting and the tracking of persons have multiple uses. These uses include, but are not limited to:

  • Search & Rescue / Missing Person
  • Perimeter / Property Security
  • Intelligence Gathering
  • Locating & Interdicting Subjects for Law Enforcement or military operations.

Who Are You Tracking

When you are sign cutting, it is important to identify your target. Are you looking for a lost or missing person? If not, are you looking for poachers or criminals? Your target determines what other precautions are needed. If it’s a lost child or hiker, consider bringing food, water and an emergency blanket along to assist a person exposed to the elements.

If you’re tracking poachers or criminals, then you have to factor in your security. Poachers and criminals do not want to be found, and will sometimes attempt to hide their sign or improvise countermeasures to avoid detection. For this scenario, it is advised never to track alone. At a minimum, communications gear (cell phone, radio) is advised, in addition to some form of self protection.

Sign Cutting Tools

Sign cutting and tracking actually require very little as far as gear goes. At the very least, you want to have a good flashlight and spare batteries, even when working during daylight hours. Tracking operations can drag for hours in some areas, and what began as a morning look-see can easily become a night tracking operation.

Before you go spend some serious cash on your tracking torch, consider the following: Modern LED flashlights with bazillion-candlepower ratings are actually not as effective as a plain old incandescent bulb flashlight. The brighter, whiter beam of the LED flashlights tends to wash out most footprints and other details. A regular incandescent bulb flashlight allows for more contrast when viewing the sign at night. Of course, if you are following sign at night, you should have two flashlights. Two is one, one is none.

When you cut for sign from a vehicle, you want to have a spotlight, or cutting light. As with the flashlights, avoid the ones that can be seen from Venus. You want to keep it at a low angle, for better contrast. This might make your arm go numb from hanging it from your car or truck window, but nothing says you can’t tape it to a stick to make the task more comfortable for you.

Since tracking operations can drag for hours, you should bring basic sustenance items with you. Water, some food, a first aid kit, extra batteries, communications gear and anything else you might need for the next few hours. This I where you want to keep it light. Adjust your load depending on your needs. That cool pack or tricked out rifle can get really heavy after a few hours.

Sign Interpretation and Tracking

As mentioned before, tracking involves following footprints, among other sign. Footprints give you an idea of who you’re following. You must be able to read the footprints.

The size of the footprint usually determines if you’re following a man (larger, wider footprint), a woman (smaller, narrower footprint), or a child (small print). The number of footprints also lets you know how many you are following.

The type of sole helps you stay on track when crossing other footprints, and helps you identify the person being tracked. The sole can be anything from a running W, a cowboy boot (plain with separate heel), a work boot or Vibram-type lug sole, a cross-trainer or Chuck Taylor or a waffle pattern (Mr. Peanut), among others.

Tracking Signs

Tracking Signs

The depression of the footprint can tell you if the person is large/heavy or if he or she is carrying a heavy load. The angle or dig determines the direction. When all you have is toe digs (half-moon shapes), then the person was running. When a person walks backwards, the dig is towards the heel.

Terrain & Enviornment

Depending on the terrain, a person may leave clear footprints or no footprints at all. Hard-packed terrain, and areas with good drainage, makes it difficult for a person to leave clearly defined footprints. This is when you look for other sign. Are there scrapes on the soil, similar to scrapes by coarse sandpaper? Are there rocks kicked over, with the moist (darker) area exposed? Is the vegetation disturbed in any way — broken branches, snapped twigs, crushed or stomped plants and leaves?

Another form of sign is clothing fibers stuck to vegetation. Don’t limit yourself to specific forms of sign. You always want to look for other disturbances. In the early morning, if you look at the vegetation from an angle (towards the sun), is the dew disturbed in any way? Did it rain earlier? Disturbances on moist terrain stand out because the color or shine changes. Fresh prints on moist soil are not as ‘shiny’ as the rest of the soil.

Brush and Broken Twigs

Rocks Kicked Disturbance

The freshness of the sign or prints helps determine time. Are the prints sharp and very detailed? You might try stepping next to the print, and comparing it to yours. Does it look just as sharp? Usually, sharper prints are fresh, laid within an hour. Keep in mind that prints can look fresher or older than they are based on a number of factors. Prints in low areas and washes usually look fresher than they are, while prints exposed to rain and wind will look older.

Fresh Footprint

Old Footprint

If you’re protecting a ranch or any other property, it is a good idea to walk it to determine how long it takes to traverse the area. When you find sign, this helps you determine whether to get out and track the sign on foot or trying to leapfrog the sign and cutting for it at another location, once you have determined a direction of travel. People sometimes guide off structures or natural terrain features, making it easier to determine the person’s travel route. Get to know the ranchers and property owners in the vicinity. They know the area and can provide invaluable intelligence.

Being familiar with the environment helps in many ways. Insects and animals help too. Are the crickets chirping away at night as they normally do? If they stopped, this usually indicates the presence of animals or people. Animals can indicate the presence of humans by their reaction. Most people think about barking dogs as an indicator, but other animals can also help you detect a disturbance.

One of our best trackers, a former Marine we call The General, was once on the trail of a group of illegal aliens at night when he lost their sign in a pasture. After walking for a few minutes in the direction the group was traveling, he came upon an open field with fresh sign for cattle, but the cows had moved about fifty yards away. He knew from experience that cows don’t usually move at night. They like to hang out in the same spot. The only reason for the herd to move was to avoid something: the group. The General was able to reacquire the sign on the other side of the field where the cows had been, and eventually found the group. Know your environment.

Conclusion

There are tracking courses currently offered in many areas if you’re interested in learning this skill. There’s also a ton of information available in books and the web, but this is a skill that has to be practiced outdoors. This is the only way to understand it and gain experience to become proficient at it.

The U.S. Border Patrol sometimes provides sign cutting and tracking courses to law enforcement and search and rescue agencies, as well as civilians. We also assist other agencies with tracking operations when called. If you live in a border state, contact your nearest Border Patrol sector HQ for more information.

As with any skill, practice and patience makes for a better tracker. Good luck.

Editor-in-Chief’s Note: Please welcome Jose J. Soto as a contributor on ITS Tactical. Jose has been a U.S. Border Patrol agent for 15 years and previously served for six years as a U.S. Army Infantryman. We’re looking forward to more of Jose’s expertise here on ITS Tactical.

Posted in Navigation | Tagged , , , , , , , , , , | 24 Comments

Are You As Fit As a World War II GI?

WWII GI Training

Editor-in-Chief’s Note: This post was written by Brett and Kate McKay and originally ran on The Art of Manliness.

Have men these days “gone soft?” Is our generation less manly than past generations? Are we less tough than our grandfathers?

I see guys debate these kinds of questions all the time. Of course it’s hard to quantify “toughness,” but there is one area where we can definitively say we’ve slipped—the Army fitness test isn’t as hard as it used to be.

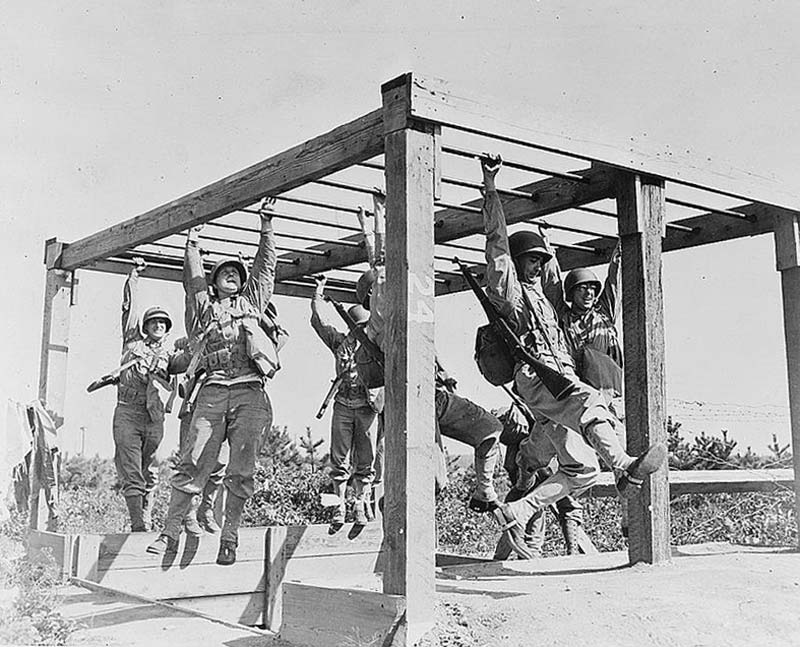
The Army first introduced a formal fitness test to the troops in 1942. Millions of men were being called up to fight in World War II and not all of them were prepared for the rigors of combat. To get the men in fighting shape, the Army implemented a systematic physical development program as part of the Combat Basic Training course. The Army Ground Forces Test was designed to assess whether the program was having its desired effect. The test included squat jumps, sit-ups, pull-ups, push-ups and a 300-yard run. The emphasis was on functional fitness and giving American GI’s the strength, mobility and endurance they would need to tackle real tasks on the battlefield.

In 1946, a Physical Training School was created at Fort Bragg with the mission of exploring how to take the goal of functional fitness farther. The training program developed at the school and the fitness test were codified in the 1946 edition of FM 21-20, the Army’s physical training manual.

Basically, Grandpa was doing Cross-Fit before it was cool.

In 1953, the Physical Training School closed and its focus on combat readiness was lost; in the ensuing decades, the military began to concentrate more on general fitness, focusing on aerobic over anaerobic exercises. The fitness test was revised several times during the 60s and 70s and standards began to be assessed on a sliding scale based on age and gender.

In 1984, the Army Physical Readiness Test was introduced and it continues to be used today. It has only three elements: sit-ups, push-ups and a two-mile run. In 1987, General Schwarzkopf became concerned that only 5% of soldiers were able to achieve the highest score on the test, so the standards were eased and more provisions were made for age and gender.

Also, whereas soldiers who failed the test used to be discharged, this rule has been greatly relaxed.

For the past couple of decades, many critics have said that the physical fitness standards for the troops are too easy and more importantly, don’t assess the kind of skills soldiers actually need in our current conflicts. In a time of new equipment like body armor, men are humping large loads for long periods and are much more likely to be sprinting and crouching than running for miles at a time.

When Dr. Edward Thomas, an instructor at the Army Physical Fitness School, re-discovered the WWII fitness test and administered it to soldiers in the 1990s, he was surprised at the result: soberingly low scores. While the numbers of required repetitions for things like push-ups are higher in the modern test than the WWII version, the standard for the precision with which the repetitions must be completed has been relaxed. Consequently, when Thomas tested the modern soldiers, they could only do a fraction of the repetitions required of WWII GIs.

In the last several years, the Army has been changing its physical training program to concentrate more on functional fitness and is currently developing a new fitness test which will be rolled out in the future and incorporate things like a shuttle run and long jump.

_______________________________

Well all that interesting history aside, I thought readers, civilians and soldiers alike, would enjoy seeing how they stacked up against their grandfathers by taking the WWII fitness test. Why take the test? Well as the introduction to the original test itself says, “Tests motivate the men to improve their physical condition. Frequently men do not realize what poor condition they are in. When the tests reveal their deficiencies, they are much more receptive to an intensive physical training program in order to remedy their shortcomings.”

So maybe taking the test will inspire you to get in shape (or inspire you to feel awesome about how in shape you already are). If you’re a coach, it might be fun to have your guys take the test—seems like it would be a great team-building exercise for your own little band of brothers. Before we get to the test, let’s go over a couple of guidelines:

  • As mentioned above, the WWII test requires that the exercises be done with strict precision. To get an accurate assessment of how you did, don’t sacrifice quality for quantity!
  • In the chart below, you will see two batteries of tests—one for doing outdoors, one for doing indoors. Pick one of the other—not both. The fifth test in the indoor battery includes two variations—choose one or the other.

The WWII Fitness Test

OUTDOOR TESTS INDOOR TESTS
1.   Pullups 1.   Pullups
2.   Squat Jumps 2.   Squat Jumps
3.   Pushups 3.   Pushups
4.   Situps 4.   Situps
5.   300-yard Run 5A.   Indoor Shuttle Run
5A(1).   60-Second Squat Thrusts

TEST 1: PULLUPS

This event requires a horizontal bar. This may be made of a pipe or gymnasium horizontal bar, or other rigid horizontal support which is not over 1 ½ inches in diameter. The bar should be high enough to permit the performer to hang at full length without touching the ground. A height of 7 feet, 9 inches to 8 feet is recommended.

Starting Position. Hanging at full length from the bar with arms straight. The forward grasp is used with the palms turned away from the face.

Movement. Pull up until the chin is above the level of the bar. Then lower the body until elbows are completely straight. Continue for as many repetitions as possible.

Instructions. The men should be told that it is permissible to raise the legs and flex the hips when pulling up but not to kick or execute a jerking motion with trunk or legs. The body must be kept from swinging. The chin must be raised above the bar. The arms must be completely straight at the bottom of the movement.

Administration and Scoring. Each time the performer pulls his chin above the bar in correct form, he is given credit for one pullup. He is not credited with a pullup if he fails to raise his chin above the level of the bar or if he stops to rest.  If the performer does not straighten his arms at the bottom of a movement, if he kicks or jerks, only half a pullup will be counted. If there are four half-pullups, the performer should be stopped and retested later. If the performer starts to swing, the judge should stop the swinging with his hands. Some such aid as a resin-bag or a cake of magnesium carbonate should be available to prevent the hands from slipping.

TEST 2: SQUAT JUMPS

Starting Position. Squatting on right heel with fingers laced on top of head, palms down. The feet are 4 to 6 inches apart with the heel of the left foot on a line with the toes of the right foot.

Movement. Spring upward until both knees are straight and both feet clear the ground. Jump just enough to permit straightening the knees without touching the ground. Do not jump any higher than necessary to accomplish this purpose. Keep the upper body erect. While off the ground, reverse the position of the feet bringing the right foot in front. Then drop to a squat on the left heel. Keep the knees pointing forward. Spring up again and continue for as many repetitions as possible.

Instructions. The men should be told that the most common errors are: getting the feet too far apart, forward and backward and failing to squat down on the rear heel. The correct position should be demonstrated clearly and the men should be given sufficient practice to master it. The action must be continuous throughout. Before beginning the event, the men should be told that it requires courage almost to the same extent as it requires strength and endurance and that they should not give up until they cannot make another movement.

Administration and Scoring. The performer is credited with one squat jump each time he springs up from the squat to the erect position and returns. The movement is not scored if he fails to descend to a complete squat, if he does not straighten his legs completely and reverse his feet while he is in the air, if he removes his hand from his head, or if he discontinues the movement and comes to a stop. If he loses his balance and removes a hand from his head momentarily, or falls but immediately recovers and continues, he shall not be penalized. If the performer gets his feet too far apart but comes to a squat on the rear foot, there is no penalty. Some men cannot squat all the way down on the heel. If they go down as far as possible they should not be penalized.

TEST 3: PUSHUPS

Starting Position. The performer assumes the front leaning rest position with the body straight from head to heels. His palms are directly underneath the shoulders and elbows are straight. Fingers pointed forward. The judge sits on the ground beside the performer, with one palm down on the ground underneath the lowest part of the performer’s chest.

Movement. Lower body until chest touches the ground (in informal practice), or touches the hand of the judge (in formal testing). Elbows must point directly to the rear. Return to the original position by straightening elbows. Keep the entire body in a straight line throughout. Repeat as many times as possible.

Instructions. The performer is told: that the arms must be straight at the start and completion of the movement; that the chest must touch the judge’s hand; and that the stomach, thighs, or legs must not touch the floor. Hands and feet must not move from their positions. He is also told that the whole body must be kept straight as he pushes the shoulders upward; that is, the shoulders should not be raised first and then the hips or vice versa. The judge uses his free hand to guide the man in case he is raising his hips too much or raising his shoulders first. In the first instance, he taps the man on the top of the hips to straighten them out; in the second case he taps underneath the abdomen to make him raise his abdomen with the same speed as his shoulders.

Administration and Scoring. The performer is credited with one pushup each time his arms are completely straightened and the exercise is performed in acceptable form. There is no penalty for the hips being slightly out of line if the whole body is moving upward at about the same speed. The men may proceed but may not stop to rest. If a man violates any of the instructions given above, he is credited with a half-pushup. If and when the performer is no longer able to hold a correct front leaning rest, the test is terminated.

TEST 4: SITUPS

Starting Position. Performer lies on his back with knees straight, feet approximately 18 inches apart and fingers laced behind head and elbows on the ground. The scorer kneels on the ground at the performer’s feet and presses the performer’s ankles firmly down against the ground.

Movement. Raise upper body rotating it somewhat to the left and then forward far enough to touch the right elbow to the left knee. The knees may bend slightly when sitting up. Lower the body until the back and elbows again touches the ground. Again sit up, but this time rotate the trunk to the right and touch left elbow to the right knee. Again lower the body until the back touches the ground. Perform as many situps as possible in two minutes. Rest pauses are permitted during the test but count toward the 2-minute period.

Instructions. The performer should be warned that he must keep his knees straight until he starts to sit up; that he must touch his knee with the opposite elbow; and that he may not push up from the ground with his elbow.

Administration and Scoring. Performer is given credit for each situp completed within the 2-minute period. No score is given if he unclasps his hand from his head, if he pushes up from his elbow, or if he keeps his knees bent while lying back on the ground. He is not penalized if the elbow misses the knee slightly. He must, however, sit up far enough so that the elbow almost touches the knee. Time should be announced every 20 seconds. At the end of 2 minutes, the timer calls: STOP and the judge counts the full number of situps completed before the stop command.

TEST 5: 300-YARD RUN

course2
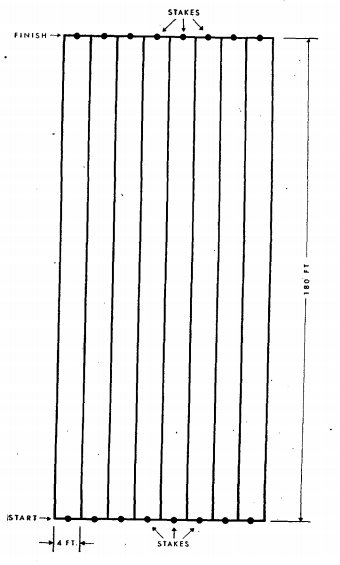
A course 60 yards long is laid out on flat level ground with lanes 4 feet wide for for each runner. Both ends of the course have cross-marks at right angles to the lanes. The cross-mark at one end serves as a starting line; the one at the other end, as a finish line. In the middle of the cross mark at either end of each lane is a stake which is at least 1 ½ feet high. If possible the lanes should be marked out in lime. If there are no lanes, it is recommended that the stakes be numbered or painted different colors. Each performer must run around his stake without grasping it.

Starting Position. Standing behind the starting mark in the lane with rear foot braced by another man’s foot placed crossways behind it.

Movement. At the starting signal, run to the stake at the farther end of the lane. Run around the stake at the finish line. Then return and run around the stake at the starting line. Continue until five lengths of the course, or 300 yards have been run. Make each turn from right to left. The run will finish at the opposite end of the course from which it started.

Instructions. The men should be told to run about 9/10ths full speed, to run straight down the lane, to turn around the far stake from right to left without touching it and to return running around the stakes one after another until they have traveled five full lengths. The men should also be instructed to walk around slowly for 3 or 4 minutes after completing the run. Recovery will be much more rapid if they walk than if they lie down.

Administration and Scoring. Each runner has one inspector, or judge, who stands at the finish line. The judge watches his runner to see that he makes the turns properly and observes all the rules. This inspector also holds the man’s card and records his performance. A timekeeper stands on one of the lines in the middle of the course, 20 feet away from the finish line. The men are started by the starter with ordinary signals of: “Get on your mark; get set; go.” Since the timer starts his watch by the “go”, the starter should also use a hand signal. When the first runner is about 30 yards away from the finish line, the timer begins to count the seconds aloud using “hup” for the half-seconds. For example, he counts “44, hup, 45, hup, 46, hup, 47, hup, 48, hip, etc.” The judge for each man listens to the count and at the same time watches his runner. He then records the last full second or half-second, which was counted before the man reached the finish line. After the inspector records the time on the man’s scorecard he returns the card to him.

TEST 5A: INDOOR SHUTTLE RUN

A course 25 yards long is laid out on the gymnasium floor with a lane 4 feet wide for each runner. The lanes should be marked on the floor with water-solvent coloring, chalk, paint or adhesive tape. Turning boards are placed at both ends of the course. Each turning board is placed at a 45 º angle, facing inside the lane and toward the runner. The turning boards must be firmly braced and made of heavy material. They should be from 12 to 16 inches in width. The lower edges of the turning boards are flush with the end of the lines of the running area. The number of each lane will be painted on the face of its board.

Starting Position. Ready for a sprint start, with one foot braced against a turning board and the other foot and the hands extended into the lane.

Movement. On the starting signal, run to the turning board at the other end of the lane. Touch board with foot or feet. Turn and continue running until completing ten shuttle trips or laps (for a total of 250 yards). Touch the turning board at the end of each lap, except the final one. At the end of the final lap, the runner will continue across the turning board. Any footwork may be used in making the turn provided the foot or feet touch the turning board each time.

Instructions. Each runner must stay in his own lane. Any method may be used in making the turn, although it is recommended that the forward foot touch the block on the turn. In the event a runner falls or is hindered by another participant entering his lane during the progress of the run, he may be permitted to repeat the run later in the same period.

Administration and Scoring. This event is administered and scored as the 300-yard run. The time of the run is taken as the runner’s body passes beyond the turning board on the final lap.

TEST 5A(l): 60 SECOND SQUAT THRUST

When it is not possible to employ the indoor shuttle run as a substitute for the 300-yard run the 60-second squat thrust should be used.

Starting Position. Attention.

Movement. Bend at knees and hips and, squatting down, place hands on ground shoulder width apart. Keep the elbows inside the knees. Thrust feet and legs backward to a front leaning rest position. Keep body straight from head to heels. Support weight on hands and toes. Recover to the squatting position. Then recover to starting position.

Instructions. The men should be told that in executing this movement for speed the shoulders should be well ahead of the hands when the legs are thrust backwards. Extending the legs too far backward, so that the shoulders are behind the hands, makes it difficult to return to the original position with speed. On the preliminary practice, the performer is told he will score better if he does not make a full knee-bend, but bends his knees only to about a right angle; and that he should keep his arms straight. It is not a failure if he bends his arms but the performer will not be able to score as well.

Administration and Scoring. A score is given for the successful performance of each complete squat thrust. No score is given if: the feet start backward before the hands are placed on the ground; the hips are raised above the shoulder-heel line when the feet are back; or the performer does not fully recover to the erect position on the fourth count. The judge should not count aloud as this is apt to confuse other nearby judges. If the man is performing the event incorrectly, the judge should coach him, or stop him and have him repeat the test after more coaching.

How Did You Do? Check the Score Sheet.

Editor-in-Chief’s Note: The Art of Manliness is a fantastic Website dedicated to uncovering the lost art of being a man. It features articles on helping men be better husbands, better fathers and better men.
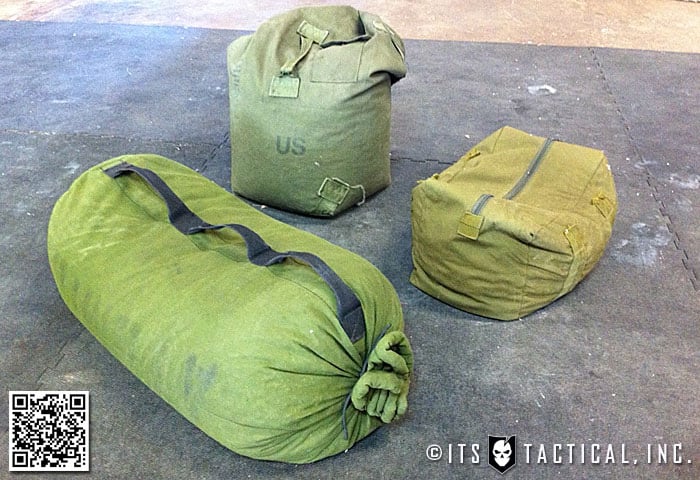
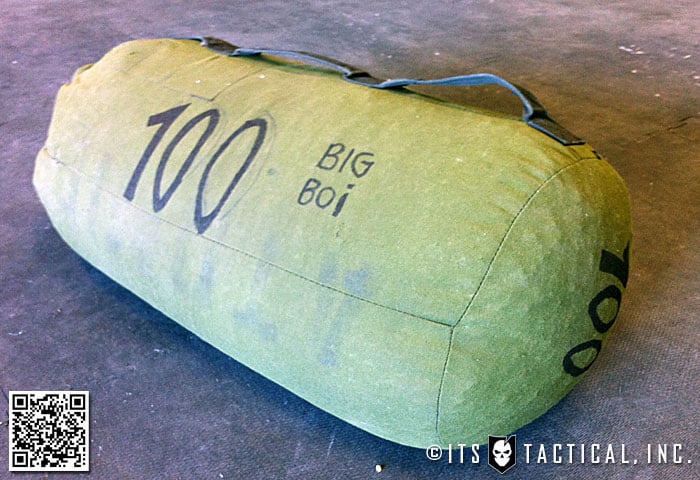
Posted in Functional Strength | Tagged , , , , , , , , , , , , , , , , | 8 Comments

ITS Tactical Colossal Giveaway Announcement!

UPDATE: Congratulations to the winners! 1st place winner: Adam Z. (Facebook), 2nd place winner: Ben G. (YouTube), 3rd place winner Dan B. (Twitter).  Please contact us within 48 hours to claim your prizes! Thank you to all who participated and to everyone for their continued support! A huge thank you to all the companies who made this giveaway possible!

In celebration of our third anniversary here at ITS and the amazing milestones we’ve reached with our Facebook, Twitter and YouTube accounts, we’ve put together a colossal giveaway to say thank you with the help of a few of our friends in the industry.

The past three years have been amazing and we’ve got each and every one of you to thank for our continued growth and success.We receive thousands of visitors each day to ITS along with nearly 50k Facebook fans, 25k YouTube subscribers and 7,000 Twitter followers.

Starting Friday April 13th and running through Sunday April 15th 2012, we’re pulling out all the stops and running our biggest giveaway ever with the support of some awesome companies! Before we go over the details, here’s what you can win! Continue reading

Posted in ITS Information | Tagged , , , , , , , , , , , , , , , , | 20 Comments

How to Use Technology and Get More Out of Your Running

I’m not a professional runner by any stretch of the imagination but I do thoroughly enjoy lacing up my shoes and getting some run time in. I find running to be a great stress reliever in addition to the obvious health benefits.

With technology today, most people become obsessed with their stats when they really should be running more like a dog. Dogs are simple. They don’t care when they run. It could be night or day, rain or shine. They are just happy to run.

That said, it is still a good idea to keep track of your running so you can measure growth and performance. There are a number of apps and websites out there that enable you to get more out of your running but won’t distract you from enjoying the great outdoors.

Continue reading

Posted in Running | Tagged , , , , , , , | 12 Comments

5 Important Lessons in Preparedness from the 2012 Dallas / Fort Worth Tornadoes

No less than 16 tornadoes ripped through the Dallas/Fort Worth Metroplex on April 3, 2012 damaging hundreds of homes and throwing tractor trailers hundreds of feet into the air like they were toys. While dozens were injured, no fatalities have been reported. I feel extremely fortunate that neither our home or business were affected by the twisters, but having them within just a few miles of both has made me change my thinking of just how prepared I really am.

Whether you live in an area of the country that’s susceptible to tornadoes or not (most are), I hope that the lessons I’ll share in this article will be able to help you solidify your preparedness plans. Let’s face it, no area of the country is immune to natural disasters and while the likelihood of them impacting you personally is low, take a tip from the motto of the Boy Scouts of America and always be prepared.

I have friends that were affected by the tornadoes, but thankfully no more than external damage to their homes in the worst cases. Throughout this article I’ll share a few stories of what they experienced as a way to hammer home a few important lessons to take on board. Continue reading

Posted in Mindset | Tagged , , , , , , , , , , , , , , , , , | 12 Comments

Please Welcome Survival Resources to ITS Tactical

I’m very excited to introduce Survival Resources as our newest advertiser on ITS Tactical. John D. McCann, who owns and runs Survival Resources, has been a contributor here on ITS and written some excellent books on survival that I’d highly recommend you check out.

Survival Resources is an online resource that provides survival kits, components and emergency preparedness products that are designed to enhance your ability to survive in any emergency situation. I’ve personally purchased many components from John over the years and can’t recommend Survival Resources highly enough.

John has the unique attention to detail to keep up with a multitude of small kit components that you need to keep your kits fully stocked. Back when I started ITS, one of the first articles was going over the pocket survival kit I’d built after reading his book, Build the Perfect Survival Kit.

Make sure you head over to Survival Resources and see all the awesomeness they have to offer!

Posted in ITS Information | Tagged , , , | 4 Comments