Swim for Fitness and End Monotonous Lap Counting with a SportCount

Sportcount Lap Counter

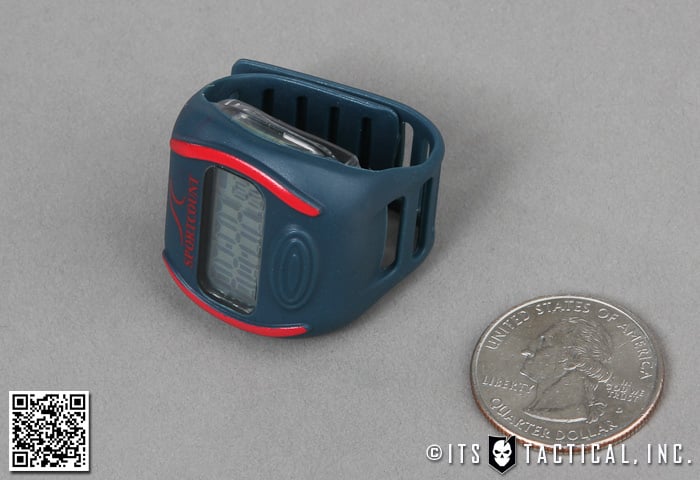
I wanted to talk a little about swimming for fitness today and highlight a tool that’s quickly become mandatory when I’m swimming. I was gifted a SportCount Lap Counter for Christmas a few weeks back and I don’t think I’ll ever swim laps again without one.

I’ve always had issues with trying to remember what lap I’m on when swimming and seem to zone out to the point where I quickly forget if I was on 10 or 11. Typically this isn’t important if you’re not trying to establish some kind of baseline time for your laps or an overall time for swimming a mile.

Zoning out while swimming can be very beneficial and I’ve had some of my best ideas while thinking about nothing during my laps. With a SportCount lap counter it’s made swimming laps much more enjoyable and rewarding.

SportCount Lap Counter

Sportcount Lap Counter

While I often simply swim to swim and don’t worry about counting laps, it’s also important to have some kind of benchmark to measure yourself against to check progress.  I do this with a 1-mile swim.

In a 50-yard lap pool, it takes a little over 35 laps to complete a mile and I don’t know how many times I’ve attempted this and mis-counted. I usually wind up doing extra laps, as I never give myself the benefit of the doubt.

Sportcount Lap Counter

Thanks to this simple SportCount lap counter, all I have to do now at the end of every lap is remember to press a button once on the tiny finger-mounted lap counter. With the Chrono 100 model I have, that simple press of the button is all I need to record overall elapsed time, total lap time, lap count, fastest lap, slowest lap and even average lap time.

The SportCount is also water resistant to 50 meters and can be used for many other applications as well. From split times during marathons or triathlons, to counting people coming into an event. This particular SportCount Chrono 100 runs $39.95, but other models with less features can be purchased for as low as $24.95.

Swimming for Fitness

Consider adding swimming into your fitness routine, it’s a fantastic full-body workout that provides one of the lowest-impact ways to strengthen your body, yet still provide a great cardiovascular workout.

There’s no reason you can’t start swimming, even if you don’t know how. Many places like your local YMCA offer beginning swim lessons to adults and youth alike. Starting small is the name of the game with swimming for fitness and a great way to start is to just swim for 10 minutes. You can even start by aqua jogging or keeping your face out of the water with a kickboard.

Swimming provides more resistance overall than running against the wind, yet when you’re gliding along it certainly doesn’t feel like it. It can also be very therapeutic and allow you to zone out as I mentioned above. It’s just you and the water; everything else seems to fade away.

I’ll be talking about swimming for fitness even more in upcoming articles, so stay tuned!


Posted in Swimming | Tagged , , , | 4 Comments

ITS Hosts Haley Strategic for Adaptive Handgun One and Adaptive Carbine One

ITS Tactical is excited to announce that we’ll be hosting Travis Haley and  Haley Strategic Partners  for Adaptive Handgun One and Adaptive Carbine One at The Best of the West Shooting Sports in Liberty Hill, TX.

The courses will run Tuesday, March 27, 2012 thru Thursday, March 29th for Handgun One and Friday, March 30th thru Sunday, April, 1st for Carbine One. Seats will be on a first come, first served basis and each class is capped at 24 students. You can register for one or both of the courses with the downloadable application below.

Courses will run from 8 a.m. to 5 p.m. each day with an hour for lunch. Range fees include a catered box lunch, as food isn’t available within a short driving distance from the range. Below you’ll find registration, travel information and course details. Continue reading

Posted in ITS Information | Tagged , , , , , , , , , | 49 Comments

Support the 2nd Amendment and Stick it to the National Gun Victims Action Council this Valentine’s Day

A few people, including our friends at The Survival Podcast, have brought an issue to our attention that we all need to support and supporters of the 2nd Amendment.

The National Gun Victims Action Council has decided to start a movement for all anti-gun supporters to boycott Starbucks this Valentine’s Day, February 14th, 2012. In response to this boycott, a few bloggers have started a Starbucks Appreciation Day “buycott” to counter the NGVAC’s rally.

To participate in the Starbucks Appreciation Day, the call-out is to grab a few $2 bills (which justly portrays the signing of the Declaration of Independence on the reverse of the $2 bill) and head to Starbucks on Valentine’s Day to buy a few cups of coffee. Even if you can’t source $2 bills from your bank, make your presence known!

How do you do that and why all this pressure on Starbucks? Glad you asked! Continue reading

Posted in News | Tagged , , , , , , , , , , , , | 13 Comments

Quick Release Paracord Bracelet for Emergency Deployment

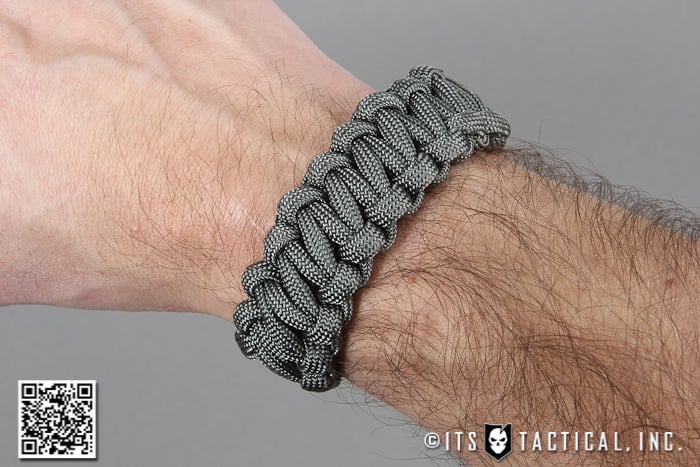
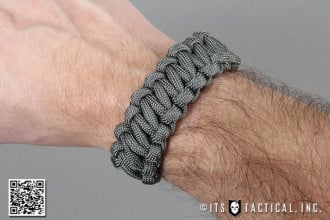
DIY Paracord Bracelet

How many of you have either purchased or made your own Paracord Bracelet and ever had to unravel it to actually use the paracord? If so, you’ve probably realized how much of a pain it is to untie each part of the Solomon Bar Knot that’s used to tie these bracelets.

Today on our latest Knot of the Week, we’ll show you how to use a Chain Sinnet knot concept to tie a Paracord Bracelet that will allow you to quickly pull apart your bracelet for immediate access to your continuous 10 feet of paracord for emergency use.

This method will take a bit longer to tie than a normal Solomon Bar Paracord Bracelet, but if quick access is what you need out of your bracelet’s paracord, then this is the answer.

ITS now offers Mil-Spec Type III Paracord in our store!

Paracord Bracelet » Decorative

(Strength: 4/Secure: 4/Stability: 3/Difficulty: 4)

**Ratings shown are for Solomon Bar Knot, not the Quick Release Paracord Bracelet**

Please refer to our Knot of the Week introduction post for a description of what these ratings mean.

Uses:

  • Decorative Bracelet
  • Carrying Paracord for Immediate Access in Emergencies

Tying Instructions:

Pay particular attention to the beginning steps of this instruction in the video, photos and description below. If the beginning doesn’t get started correctly, it won’t tie right as you progress through.

This method of tying was first discovered by a Dan, a reader who sent in this YouTube video of a Chain Sinnet Square Knot tied by Andy Smith. In Andy’s video he actually ties this so that the buckles fall off as the bracelet is pulled apart. We’ve chosen to tie this as shown below so that the buckle is retained as the paracord is unraveled.

Note: The buckle we show is a National Molding Weinerlock buckle. These contoured buckles are definitely nice to have when you’re wearing your bracelet all day. You also don’t have to use a buckle and this can be ended in this configuration shown on our Twisted Solomon Bar Paracord Bracelet.

ITS now offers Mil-Spec Type III Paracord in our store!

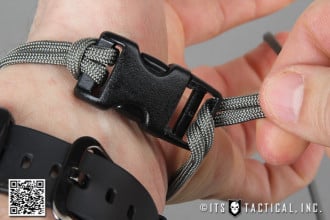
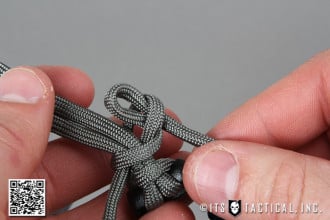
  1. Find the middle of a 10-12 ft. section of Paracord and halve it
  2. Take the middle and girth hitch it into the female portion of the buckle
  3. Thread the two working ends through the bottom bar of the male portion of the buckle
  4. Now place what you’ve created around your wrist and tighten the working ends until you have the desired size
  5. *You’ll want it snug, but not tight, as the pattern we’ll be creating will add some girth to the bracelet
  6. Once the size is determined, you’re ready to start the pattern.
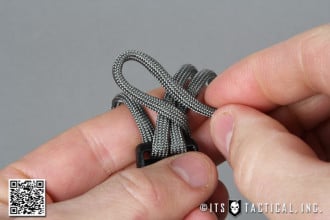
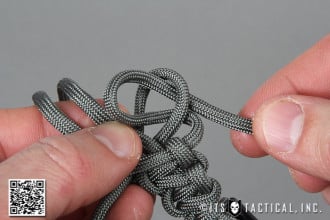
  7. Take the right side working end and create a bight (loop) and bring it over the standing center part
  8. Take the left side working end, create a bight and loop it through the loop you just made with the right side working end
  9. Ensure the new bight passes through your initial bight from the top, not the bottom
  10. Pull on the standing right hand strand to tighten the loop that’s now holding your second bight
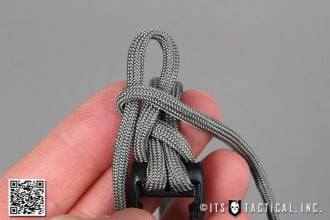
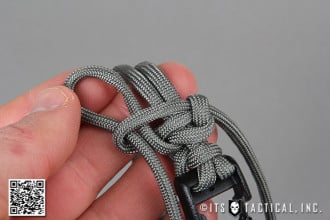
  11. Take this secondary left side working end bight and take it under the standing center part
  12. Repeating the same type of work you just did, you’re now going to create a new bight with the standing right side line
  13. This bight now passes through the bottom, rather than the top as you just did with the last side
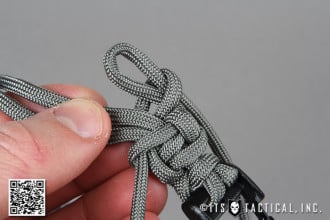
  14. Now you’re just repeating those steps, alternating from the right side going over the standing part and the left side going around the back of the standing part
  15. Remember to tighten and push the “knots” down as you go
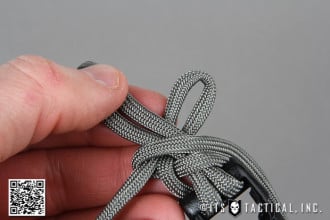
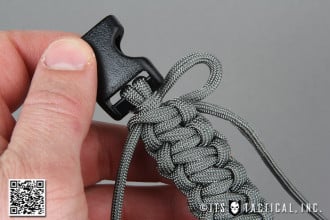
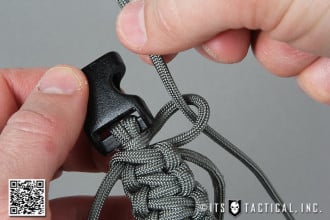
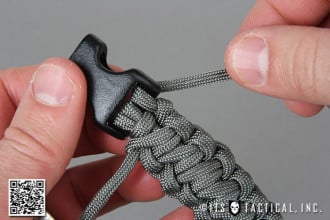
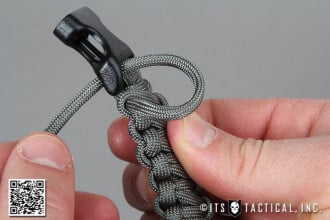
  16. As you pull through your last bight near the male buckle, you’ll actually pull this side all the way through and into the female buckle (see photos)
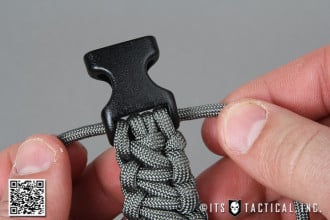
  17. The opposite strand you’re left with will be also threaded into the male buckle
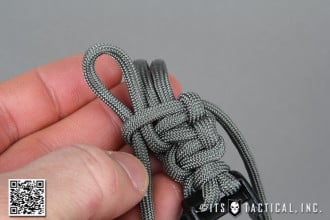
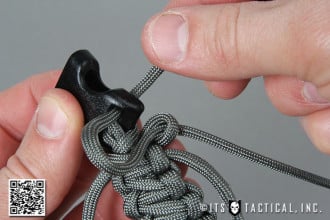
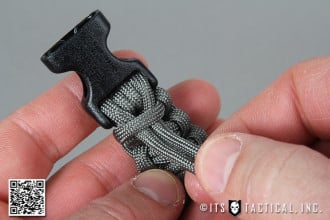
  18. Now that both strands are out the backside of the male buckle simply tuck them behind the topmost loop of the solomon bar type wrapping
  19. Tighten them up and trim to your desired length, in the video you can see that we’ve melted these ends together slightly so that they’ll stay together until pulled apart, but not so much that these ends won’t pull apart
  20. To quick release your bracelet, simply untuck the ends from the loop and pass them back through the male buckle and unlock the side you pulled through the bight
  21. You can now pull the two sides of paracord apart quickly to deploy your paracord!

View the gallery or YouTube video below and follow along with the steps above, be sure to let us know in the comments if you have any questions!

Posted in Decorative | Tagged , , , , , , , , , , , , , | 32 Comments

Lock-n-Load Java: Premium Coffee for You and the Troops

We’d like to take this opportunity to introduce you to our newest sponsor, Lock-n-Load Java, a veteran owned and operated coffee company that we know you’re going to like as much as we do.

ITS Tactical HQ has been fueled by Lock-n-Load Java for some time now and it’s some of the best coffee we’ve ever had. After trying our first bag of “Charlie Don’t Surf,” we were hooked and the Starbucks went into the circular file. Honestly, how can you not love a coffee company that not only donates $1 to military charities for every order shipped, but named their roasts with titles like “Double Barrel Black,” “Double Tap,” and “Smooth Operator?”

Lock-n-Load buys only the best beans from reputable coffee farmers, on sustainable small farms with a track record of growing consistently high grade coffee with unparalleled taste. By buying only the best, perfectly ripened coffee beans from farmers they know and trust, they pay a premium — but the results speak for themselves.

You can also purchase coffee directly for the troops in discounted packages and Lock-n-Load will cover the shipping. This can be for a particular unit of your choice, or leaving it up to Lock-n-Load to decide. Make sure to check out their Hot Cocoa while you’re there too!

Check out Lock-n-Load  Java today and tell them ITS Tactical sent you! Don’t forget to check out the ITS Vendor Discount Codes if you’re a member too, there’s a nice discount available with your first purchase and some freebies as well!

Posted in ITS Information | Tagged , , , | 7 Comments

Simple Shoulder Workout for Strength and Recovery

Here’s a quick video I made going through a simple shoulder routine that I try to do as a cool-down after every taxing shoulder workout; like pull-ups, push-ups and dips. I also go through pyramid workouts in the video and why they’re a great thing to throw into your routines.

Adding in this simple and lightweight routine can not only help you save and strengthen your shoulders, but also help you recover from a shoulder injury!

Posted in Functional Strength | Tagged , , , , , , , | 10 Comments

EDC Trauma Kit Now Available for your Back Pocket

EDC Trauma Kit

We’re excited to release our Every Day Carry Trauma Kit today and feel it’s truly something you’ll never leave home without. No longer will you have the excuse of not being able to carry lifesaving equipment with you wherever you go!

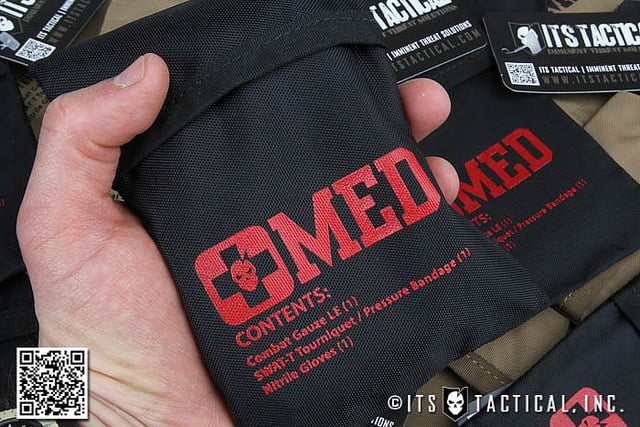
We wanted to design a minimum bare-bones trauma kit, smaller than our ETA Trauma Kits, that would not only be comfortable enough to throw in a back pocket, but also be capable of treating the number one preventable cause of death in the field according to the TCCC; extremity hemorrhage AKA bleeding out.

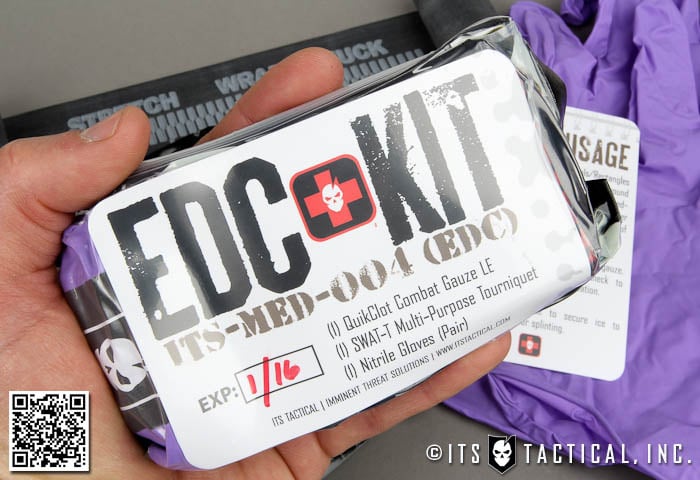
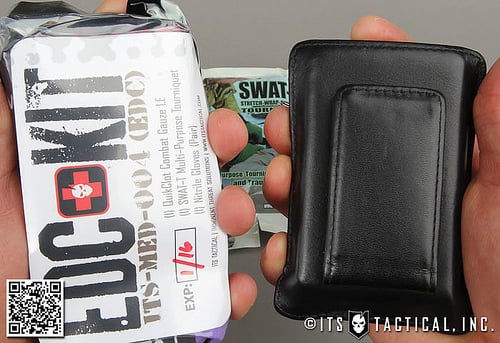
The EDC Trauma Kit is literally the size of an average wallet and even smaller in some instances, especially if you carry a Costanza. It can be stuffed in a back pocket and only weights 6 ounces with the included pouch!

EDC Trauma Kit

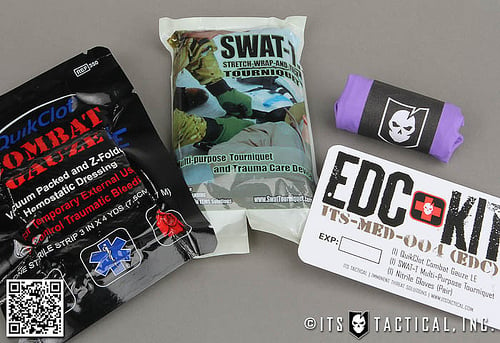
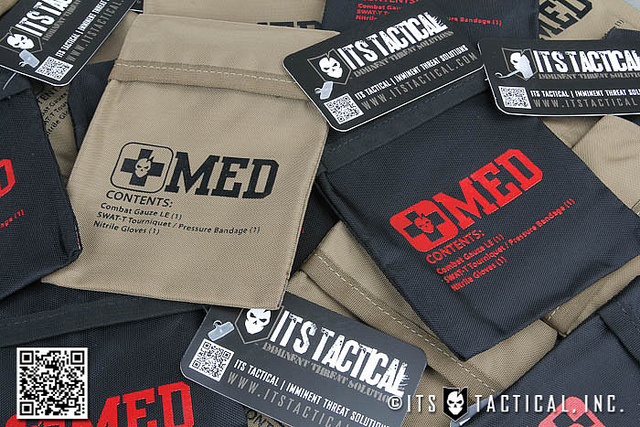
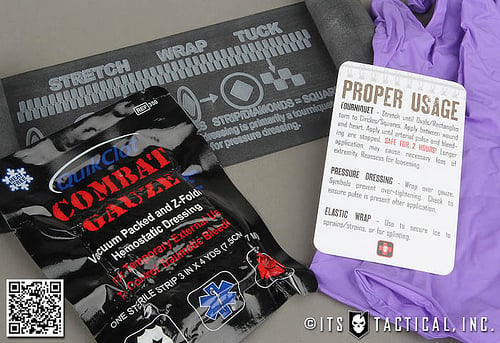
The EDC Trauma Kit contains (1) Combat Gauze LE, (1) SWAT-T Tourniquet / Pressure Bandage, (1) Pair of Purple Nitrile Gloves and your choice of a Coyote Brown or Black EDC Trauma Kit Pouch. The kit is also vacuum sealed and completely latex-free. Our EDC Trauma Kit Pouch is nothing more than a lightweight slip cover to protect your EDC Kit against damage and puncturing the vacuum seal while being carried in your pocket or bag.

ITS EDC Trauma Kit

Included with every EDC Trauma Kit is our insert card which lists the contents on the front and includes the directions for using the SWAT-T on the reverse. These directions come directly from the manufacturer and are also printed on the bag that we’ve left on each SWAT-T we seal in a kit. We’ve also taken the time to cut a large slit on the bottom of each wrapped SWAT-T we use so that it’s easier to open when seconds count!

Please keep in mind that while the SWAT-T is described as a Tourniquet and Pressure Bandage, we’ve found its use better for a pressure dressing to wrap over a packed wound then for a dedicated tourniquet. Can it be used as a field expedient TQ? Absolutely, but if you have the option to carry a dedicated tourniquet like the SOFTT-W, we highly recommend it. The purpose of this kit is every day carry and the components in the EDC Trauma Kit are certainly suited for that.

ITS EDC Trauma Kit

Click here to purchase your EDC Trauma Kit!

Manufacturing

The pouches for our EDC Trauma Kits are sewn in Chicago by Zulu Nylon Gear, making them completely made in the USA. The EDC Trauma Kits are hand assembled by ITS Tactical in Fort Worth, TX using nearly all made in the USA components.

ITS EDC Trauma Kit

ITS EDC Trauma Kit

The Combat Gauze, SWAT-T, glove wraps, vacuum seal bags and insert cards are all made in the USA. The gloves are the only component made overseas, which we’re working to change.

ITS EDC Trauma Kit

Pick up your EDC Trauma Kit today and don’t let the excuse of not having the room to carry life-saving equipment ever happen again!

Posted in Medical | Tagged , , , , , , , , , , , | 18 Comments

Bugging Out with Personal Information

A copy of your personal information should always be included as part of a bug-out bag or evacuation kit. I have often been asked why we need this information and have had people say that they have this information secured in a safe in their home.

Is that information actually safe? Are you certain that your safe will survive a major fire? What if a tornado destroys or removes you house and it just can’t be found? A nuclear emergency, such as the one in Japan, might mandate an evacuation where you are not allowed to return.

There are many reason to carry important personal information when you evacuate. I like to carry a backup of my personal information on me at all times, as well as in my bug-out bag. The real problem is securing that information. I have seen it often recommended that all your personal information be placed in a file folder and kept in a large zip-lock bag. Obviously, if this file is found or stolen, you have a real potential identity theft problem. So what do you do?

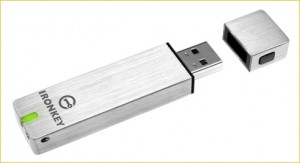
The IronKey

I used to carry my personal information on a USB flash drive. Unfortunately, for years, I could only find software encryption, which is not always as secure as it is made out to be. Some software encryption can be easily broken, leaving your information vulnerable.

I was limited to this solution until I met a reader of my book, Build the Perfect Survival Kit, who worked for a large bank. For work, he used a product that was designed to meet the most demanding military, government, and enterprise security requirements. Needless to say, I was very interested. It was just what I was looking for!

The device is the IronKey, an extremely secure USB flash drive, ready to protect data everywhere it goes. There are various models of the IronKey, but the basic model, the S200, is more than adequate for the purpose of carrying confidential information. They are available in 2 GB, 8 GB, and 16 GB. The other models provide features more for business applications, which are unnecessary for my needs.

So what is so great about this USB flash drive? The IronKey is the only USB flash drives validated to meet the stringent Level 3 requirements of FIPS 140-2, a U.S. government computer security standard. The S200 protects data with strong AES 256-bit hardware encryption. It has “always-on” data encryption, whereby all user data is encrypted with AES CBC-mode hardware encryption. Unlike software-based encryption, this “always-on” protection cannot be disabled. Since the IronKey Cryptochip generates and stores strong, random encryption keys, encryption routines run faster and more securely than on any software-based encryption system.

Practical Applications

This all sounds good, although a little technical, but it was some of the other security features that sold me. This device is really physically hardened. Its rugged metal casing protects it against physical damage, and the internal components are sealed to protect against tampering. It far exceeds military waterproof requirements. No one can access files stored on an IronKey drive unless they authenticate with the correct password. All encryption and password verification are performed in the hardware, and cannot be disabled by malware or a careless user. Self-defending IronKey drives also provide hardware-level active protections against the spread of malicious code.

When an IronKey drive is plugged into a laptop or desktop computer, the user must authenticate with a password before encryption keys are enabled and data and applications are accessible. Unlike software-based encryption, the IronKey protects against cold-boot and malware attacks by not exporting AES encryption keys to the host PC. IronKey Basic protects against brute force password guessing attacks by using non-volatile access-failure counters stored on the Cryptochip itself. If a thief tries to break into an IronKey drive and enters 10 incorrect passwords, the Cryptochip securely erases all encrypted data with patent-pending Flash Trash technology. This ensures no data can be recovered from the device. If the IronKey detects a physical attack, it will initiate a self-destruct sequence (kind of reminds me of Mission Impossible). It is nice to know that if you lose this device, the information on it will not get into the wrong hands!

There is a lot more information I could provide in regard to the IronKey USB flash drive, but I think you get the idea that this is a great way to securely carry personal and confidential information. Both my wife and I carry one on our key ring, and have an extra for the bug-out bag.

Personal Information

What type of information should be kept on such a device? Although not a complete list, the following is information that might come in handy:

  • A file containing actual scans of important identification and documents, such as: drivers license, passport, social security card, pistol permits, birth certificate, marriage and death certificates, the deed to property owned, vehicle titles, contracts, insurance policies, wills, and medical prescriptions.
  • A file containing emergency phone numbers: personal contacts, doctors, dentist, healthcare provider, insurance companies, and central station security provider.
  • A file with credit card information: card numbers, expiration dates, security codes; and information to contact the provider, should a card be lost or stolen.
  • A photo or video inventory of valuables in your home, to include: computers, firearms, pantries and other areas where emergency supplies are maintained (you might have to prove to an insurance company that such items existed). I also like to show the actual house from various sides, outside, as well as the contents of each room, inside. Don’t forget garages, out-buildings, tools, etc.

Obviously, there is other information that can be contained on such a secure device. By carrying a copy of your personal information on a secure device, you will always have a backup, even if you lose your home or wallet. As always, be prepared to survive, and always have a backup!

Editor-in-Chief’s Note: Please join us in welcoming John D. McCann as a contributor on ITS Tactical! I’ve been a longtime reader of John’s work and his first book,  Build the Perfect Survival Kit  helped me design the kit I EDC. John is also the owner of  Survival Resources, a company that specializes in survival kits, survival kit components, and outdoor skills courses. He’s just released a new book too that I’m currently reading, called  Stay Alive! Survival Skills You Need.

Posted in Privacy | Tagged , , , , , , , , , | 21 Comments

Lightweight Backpacking Step 1: Weigh Everything!

2 of 4 in the series Lightweight Backpacking

If you read my previous article, an Introduction to Lightweight Backpacking, you’ll remember that I only touched on the basic principles of lightweight backpacking such as how to get started, weighing gear, taking less, multi-use gear and some of the benefits of reducing your pack weight. In the following series of posts I’d like to focus on each of the core principles in more detail. Let’s start with weighing your gear.

In order to know how much weight or gear you need to eliminate, you first have to understand what you currently have and how much you carry on a regular trip. One of the most common mistakes that people make with a gear list is that they forget to maintain it, refer to it and adjust it. Having a detailed list of your gear is great, but keeping track of what you use and don’t use will provide you with valuable insight into areas where you can reduce or eliminate weight.

Another common mistake is not breaking your gear down into their individual components, for example don’t just weigh your first aid kit, weigh all of the pieces individually.

Weigh Everything!

It’s possible that you may be able to get started with this using scales that you already have. But eventually you will want to have a digital scale that can weigh up to 8lbs in pound, ounce, and gram increments. They are not very expensive, usually under $20, and can be used for all sorts of things other than just weighing your backpacking gear.
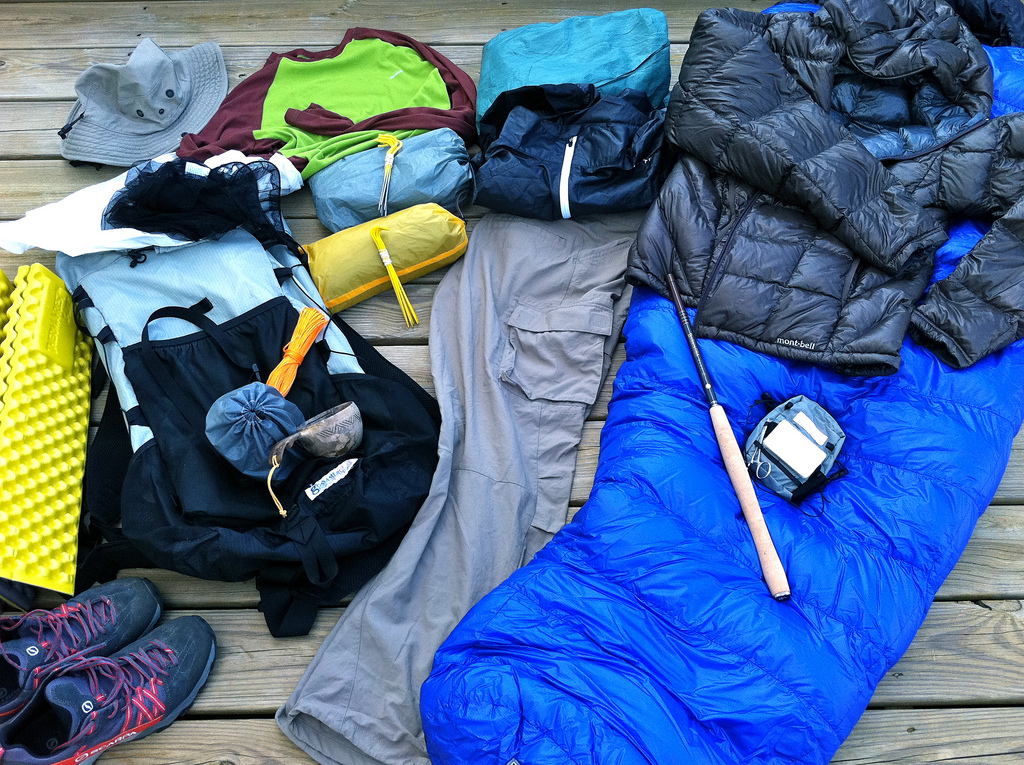
Lightweight Backpacking Step 1

Assemble all the gear that you typically take or might take on a trip. You are going to weigh every piece of gear, and write down the weight, an accurate description of each piece and a note so that you’ll know exactly what it is and whether it needs any attention the next time you refer to your gear list. Make sure that you weigh all the individual components of your gear. A great example of this is your first aid kit. Don’t just weigh the whole kits and write down 9oz, weigh all of the pieces so that when it comes time to eliminate, you can be very granular in your approach. Your tent or shelter is another good example, separate out the tent poles, ground sheet, tent body, and the fly sheet. Be sure to break everything down into its component parts.

Using the Gear List

Now that you are ready to accurately weigh all of your gear, it’s time to start filling out a gear list. You can download a sample (blank) gear list template here, that I created for my own use. It was made using Microsoft Excel and will let you take advantage of the pre-formatted gear categories and automatic formulas (sections in yellow) that will sum up the weight of each section. If you do not have Excel check out OpenOffice.org or any of the other Microsoft-compatible solutions that are readily available and free. If you want to just print out a blank gear list and do it manually, here is a PDF version.

Editor-in-Chief’s Note: Brian’s template was instrumental for both Mike and myself when we undertook climbing 14’ers with the GORUCK Ascent!

In addition to using a gear list to track the weight of your gear and help you identify areas for improvement, it can be used as a checklist tool to help you gather, inspect and pack all of your gear before a trip. There’s nothing worse than getting a few miles into a hike and realizing that you left a critical piece of gear at home on the kitchen table. Your gear list can will you to avoid that from happening. The three check box columns on the left of the spreadsheet have been designed to walk you through the steps you need to perform as you start this process.
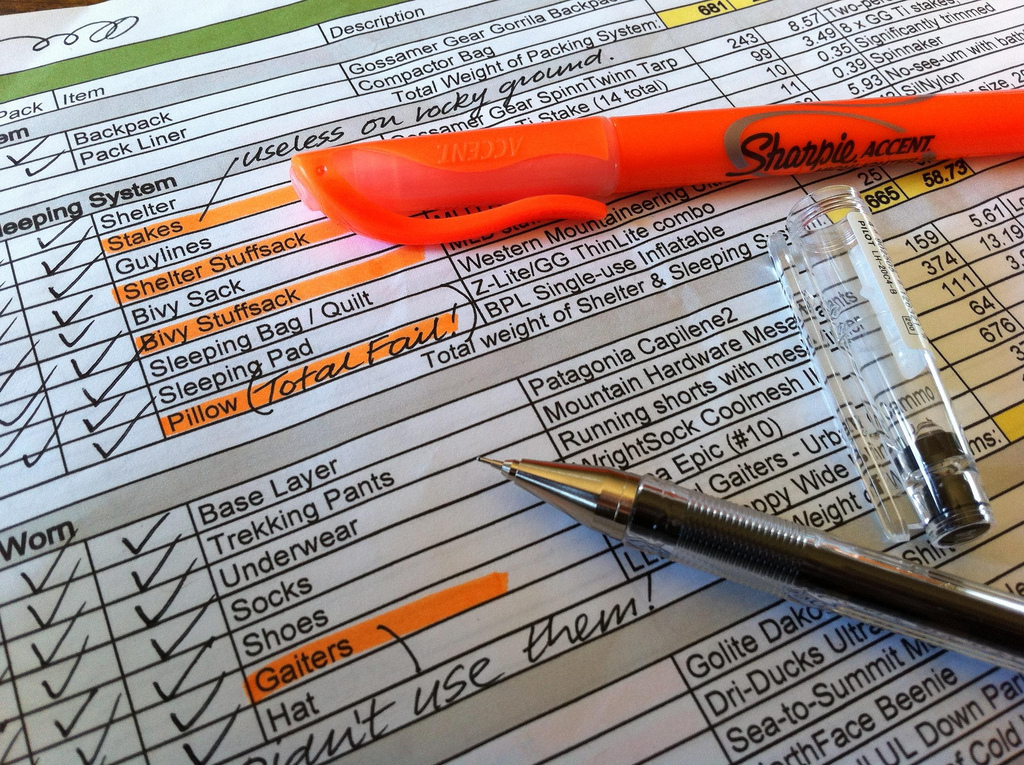
Lightweight Backpacking Step 1

Using the template provided, check off each box as you find, inspect and pack each item of gear. As you get ready to weigh each individual piece of gear, first inspect it to make sure that it is functioning and that it doesn’t require any maintenance or resupply items. If it does be sure to make a note of that on your gear list to remind you.

Add a meaningful description for each item as you complete the gear list. Weigh your item of gear making sure that whether you use ounces or grams that you are consistent throughout your entire list. Use the notes section for maintenance issues or reminders.

Continue to weigh all of your gear and complete the list as much as possible. The template lists out most of the common pieces of gear that would be taken on a backpacking trip, but if you do not see a placeholder for a particular piece of gear you can add a row if using the electronic version, or simply use the blank line at the bottom of each section. Make sure that where possible you list the right items of gear that belong to each section. This will be especially important as you start to summarize the weight of each section in order to calculate your base (dry) weight and weight of consumables.

Weight Summaries

Once you have completed filling out the gear list, it’s time to start doing some calculations. If you are using the Excel version the weight summaries at the bottom of the gear list will have been automatically calculated for you. If you are using a printed version you will need to add up the weight for each of the list sections and then write them in the summaries section at the bottom of the form.

Your Base (Dry) Weight

Underneath the weight totals for the individual sections of the gear list you’ll see a summary labelled “BASE (DRY) WEIGHT OF PACKED GEAR”. Base weight definitions can sometimes vary from one gear list to another, but as a general rule of thumb your base (dry) weight is the total weight of your pack excluding items worn while trekking (such as clothing and footwear) and consumables (such as food, water and stove fuel). The gear list template provided calculates your base (dry) weight using this calculation and also includes any containers used to carry your consumables, assuming they are listed in the cooking section on the list so make sure you don’t miss them off.

Your Total (dry) Weight is the combination of your base weight plus all of the items worn while trekking (clothes and shoes). If you then add the weight of your consumables (food, water and fuel) you will end up with your total weight of all gear and supplies. This is not the same as the FSO or “From Skin Out” weight. See below for more information on how and when to use the FSO method.

The final calculated summary on the gear list template subtracts the weight of the items worn while trekking to end up with your maximum pack weight at the beginning of your trek.

From Skin Out (FSO) Method

The gear list template provided should guide you through all of the necessary steps to accurately determine your base weight, total dry weight and total maximum pack weight. But if for some reason you are unable to use that, there is an alternative method that you can use called the From Skin Out or FSO method. The difference between base weight and your FSO weight is that the FSO includes all of your gear, clothing AND fuel, but not your food or water. Or put another way, it is everything that you are carrying excluding food and water. Both methods are commonly used and are a matter of preference, but you need to understand the definitions of both in order to be able to compare your results with those of other backpackers if that is something you intent or want to do.

Analyze

After you understand how much all of your gear weighs you can begin the process of finding ways to reduce your base weight or maximum pack weight and work towards your lightweight goal. If you are familiar with spreadsheet software, you’ll find that using it is extremely useful to help sort and organize your gear list. It can be extremely useful to be able to sort your list sub-categories in descending order of weight. In this way your gear list not only shows you how much total weight you are carrying on a trip, but you can also see how much each of the items of gear in a given category weighs in relationship to the total for that category.
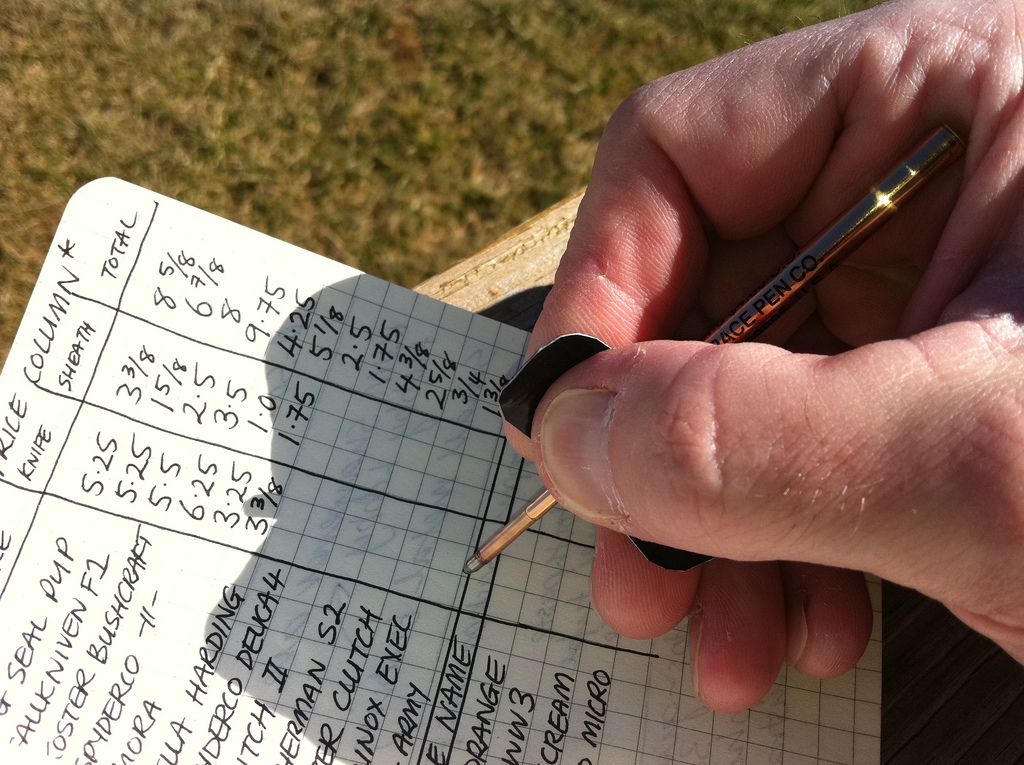
Lightweight Backpacking Step 1

Update and Assess

Now that you know how much gear and exactly what items you are carrying, it’s time to start keeping track of what works, what doesn’t work and what doesn’t even get used on the trail. There’s only so much elimination and weight reduction that can be done at home, so at some point you are going to have to validate this by getting outside and using your gear. Keep accurate notes using your notepad so that you don’t have to rely on memory to recall what it was that didn’t work and you thought could get left behind. Getting into the habit of good note taking will help you in the long run.

After each backpacking or hiking trip, use your notes to assess your gear list and make determinations on what you can adjust for next time. You may need more of one thing but less of another. Practice, practice, practice!

Conclusion

A gear list can be a powerful tool for helping you understand, manage, and reduce your overall pack weight. Your gear list needs to be constantly updated and tweaked as you adjust the items you carry and make notes along the trail. It serves as the reference point to where you are and where you want to get to with regards to pack weight. careful observation and experimentation both on and off the trail are key. Reducing your pack weight won’t happen over night, but your gear list can help you track your progress and keep you on the right track.

Editor-in-Chief’s Note: Brian is an avid lightweight backpacker and author of the popular Brian’s Backpacking Blog. Originally from Southampton, England, Brian has lived in the US for over 14 years, finally settling in North Carolina. His love of the outdoors started at a very early age, almost as far back as he can remember. Now he spends as much time backpacking as his work schedule and family life will allow. Be sure to check out his blog for other great backpacking tips & tricks and gear reviews.
Posted in Load Bearing | Tagged , , , , , , , , , , , , , , , , | 4 Comments

The Hard Way

Editor-in-Chief’s note: This post was written by Schaefer  and originally ran on The Art of Manliness.

“The essential thing “in heaven and earth” is…that there should be a long obedience in the same direction; there thereby results, and has always resulted in the long run, something which has made life worth living.” —  Friedrich Nietzche,  Beyond Good and Evil

In 1989, Wyoming-native Mark Jenkins set out with three Americans and four Russians to become the first to bicycle all the way across Siberia, starting at the Pacific port town of Vladivostok and ending 7,500 miles later in Leningrad. Battling mud, wind, injuries, and sub-zero temperatures, the 5-month journey took them through hundreds of villages, an 800-mile swamp, the Ural mountains, and a culture permanently hardened by the savage taskmaster of communism.

The trip planted the team in the  Guinness Book of World Records, but what made it remarkable was not that it was long, but that it was hard — brutally, numbingly, painfully… hard. Continue reading

Posted in Mindset | Tagged , , , , , | 13 Comments