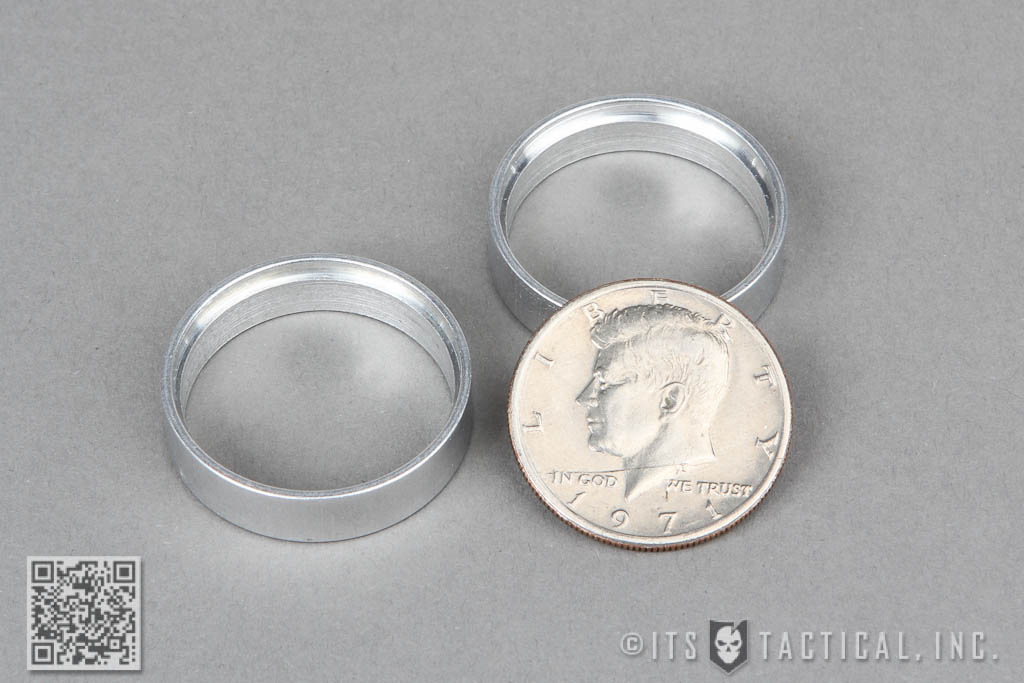
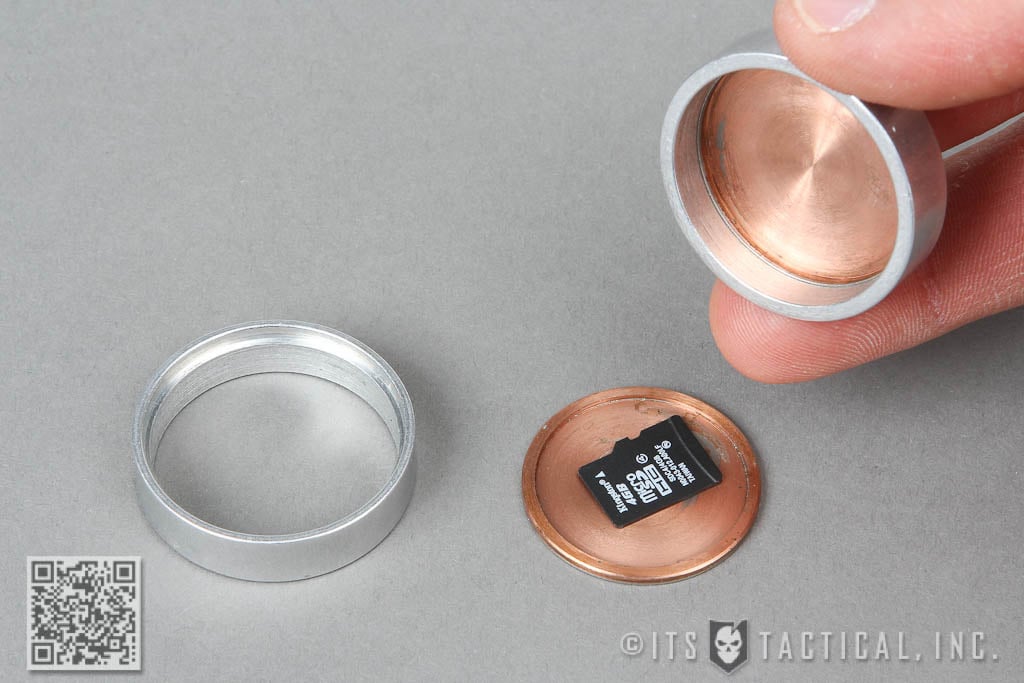
During the Cold War, spies used hollow coins to pass secret messages, hide suicide poisons and smuggle microfilms without detection. While we don’t expect you to use this for anything like that, being discreet with personal information is just one of the many uses for these Hollow Half Dollars.
By using one of the two included machined unlocking rings, a simple slam on the table is all it takes to open the two halves of the coin. The interior reveals a recessed area that perfectly fits a MicroSD Card! (not included)
The second ring is perfect to give to a counterpart if you need to trade information back and forth with the Hollow Half Dollar. While a bit more normal looking than our Spy Coins Edition ITS Challenge Coin, it’s still larger than most pocket change. Just be careful not to spend it!
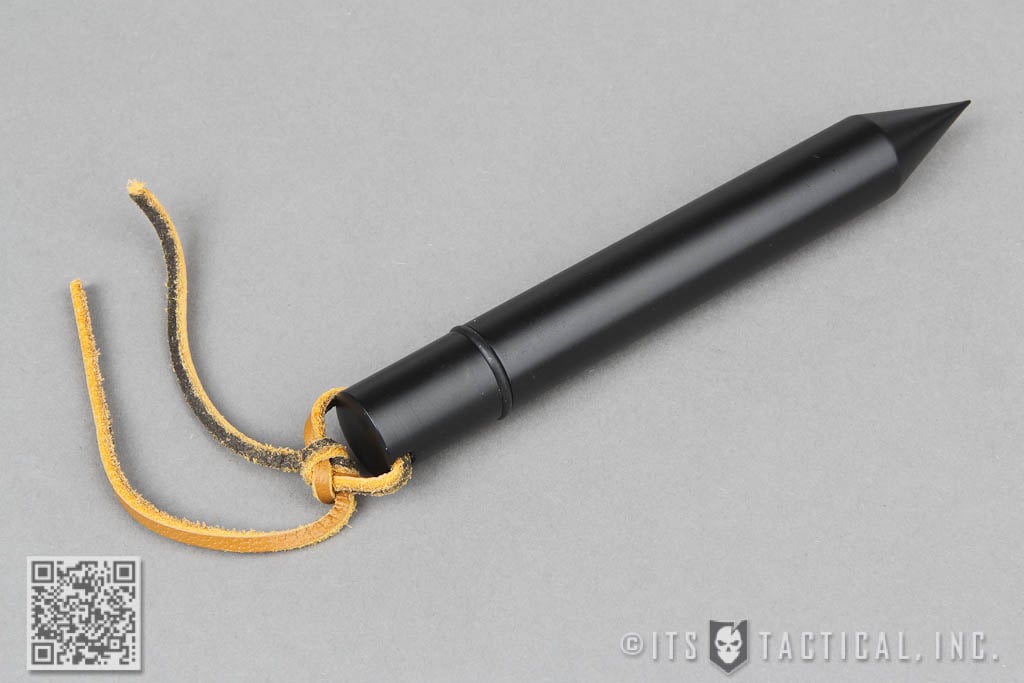
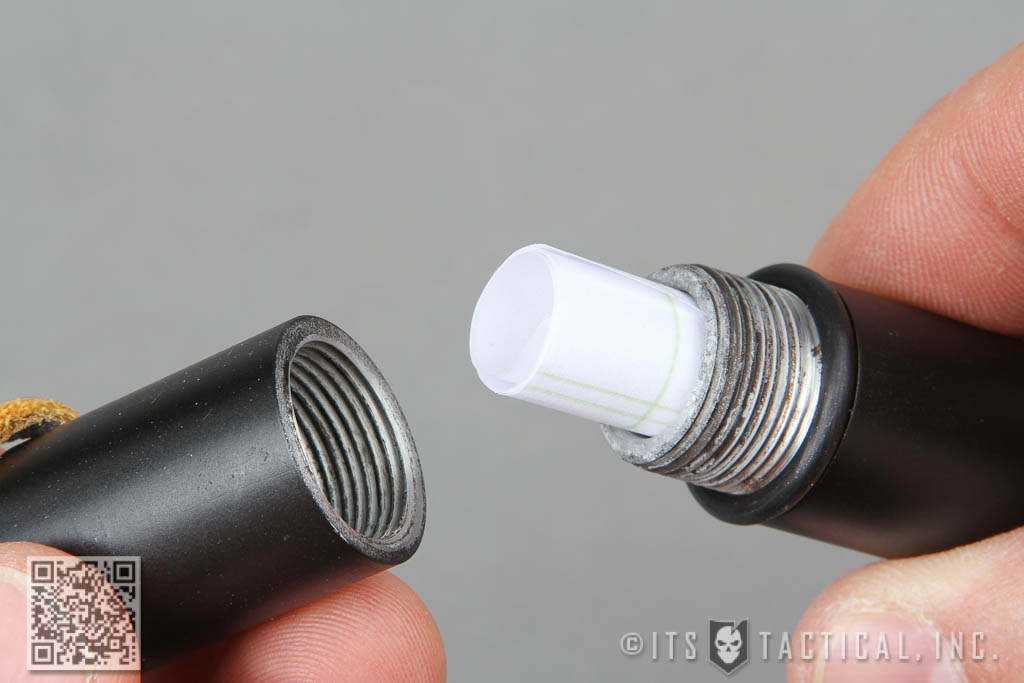
Dead Drop Spike
A Dead Drop is simply an agreed upon spot where you and your contact can leave a message for one another without actually meeting in person. They’re typically used in conjunction with a “Signpost,” or a place where a signal is left which conveys the drop has been loaded.
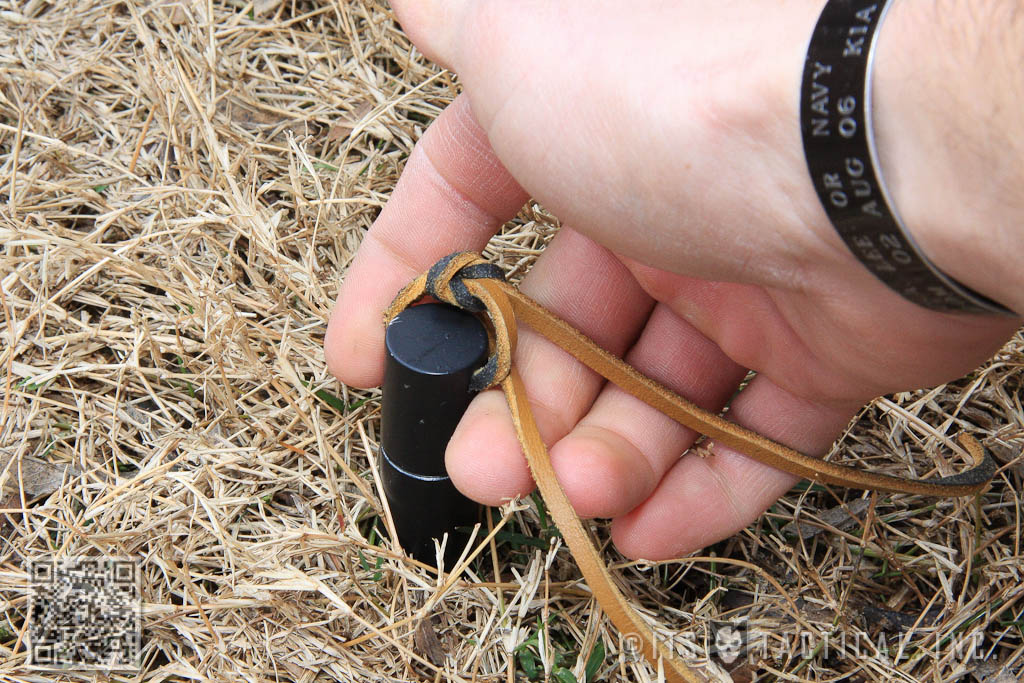
The Dead Drop Spike is what’s referred to as a Covert Dead Drop, which would be concealed from the everyday line of sight. Machined from a solid billet of 3/4″ diameter aluminum, the Dead Drop Spike features a threaded top and o-ring seal to keep the contents waterproof. It can be pressed into soft ground to later be picked up, using the leather pull handle to aid in recovery.
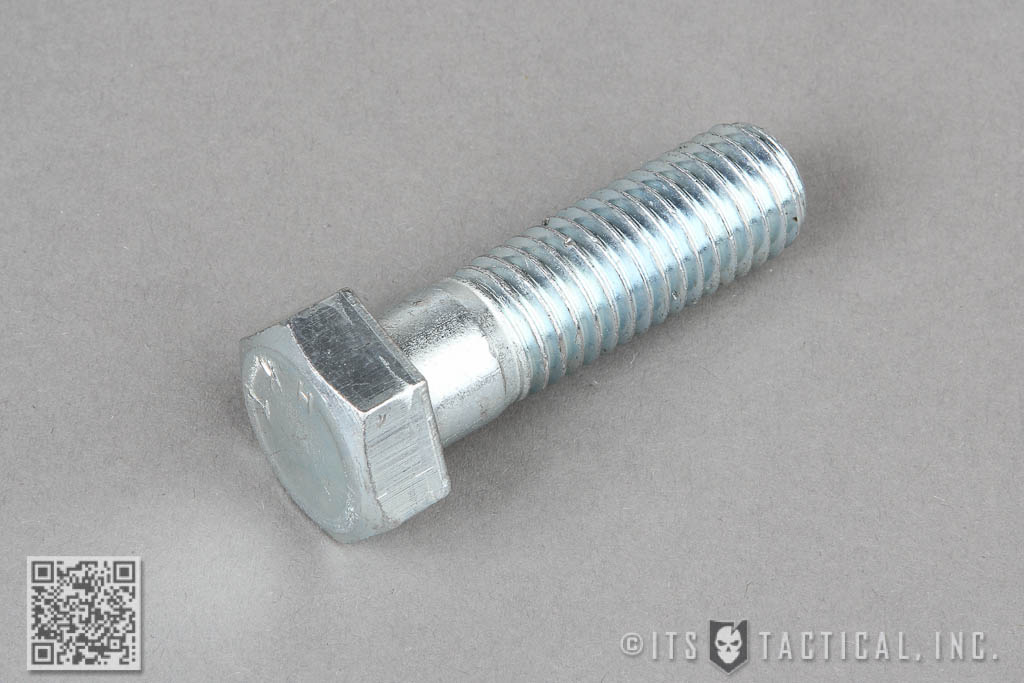
Hollow Spy Bolt
The Hollow Spy Bolt is what’s referred to as an Overt Dead Drop, which would be disguised as an everyday item that could be left in plain sight. The hope is that no one would give it a second though if it was properly placed in its environment. With a simple counter-clockwise twist, the bolt head opens to reveal a hollow compartment.
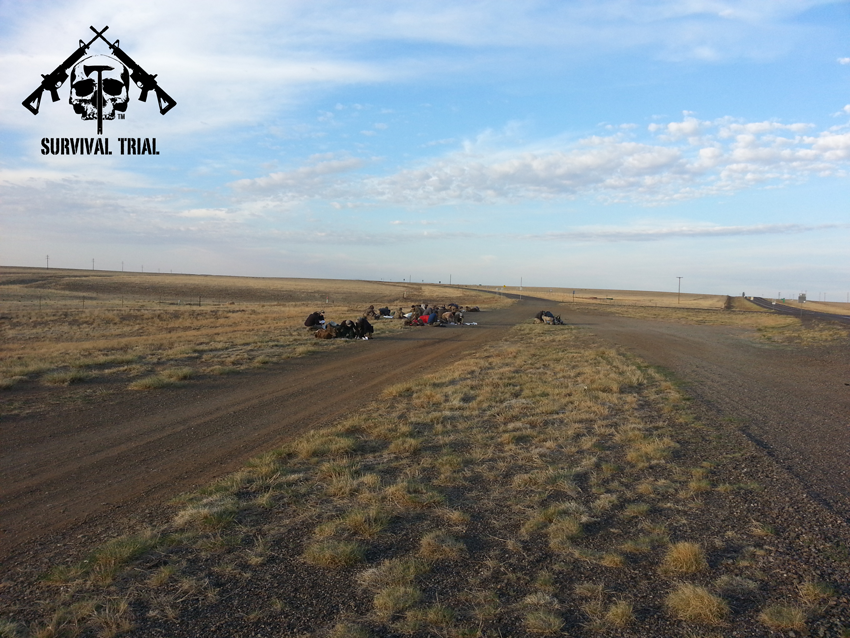
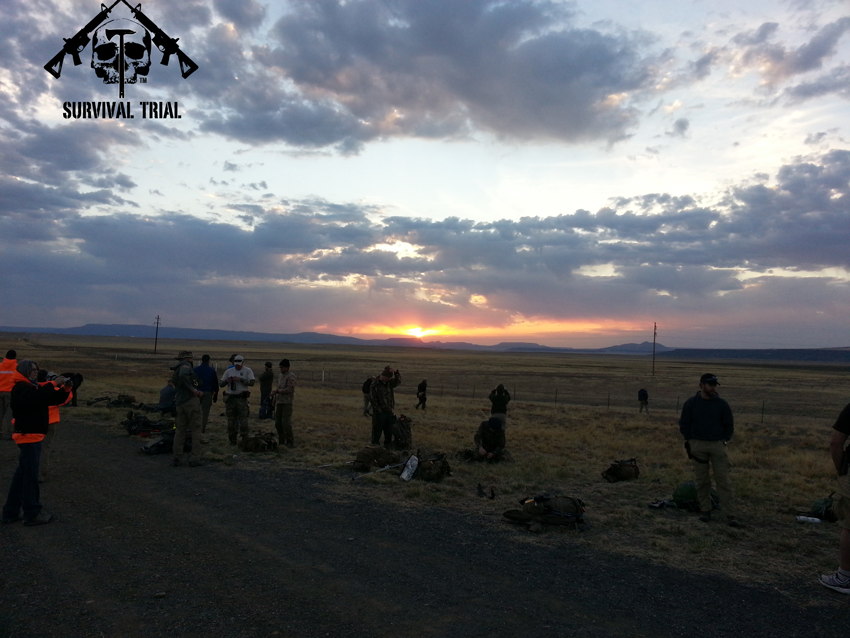
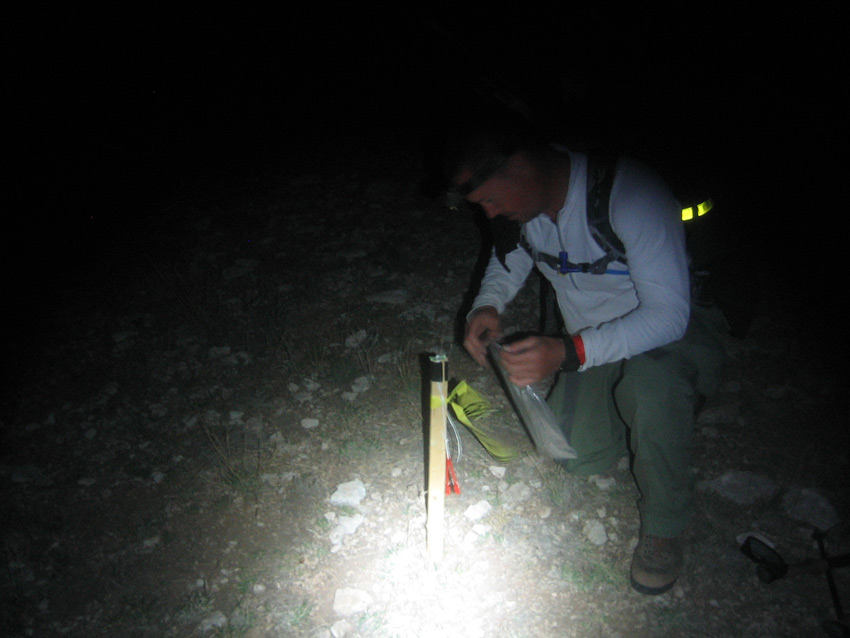
“Adventure Year 40” continued this May as my buddy Brian and I competed in the Survival Trial IV, an event held at the NRA’s Whittington Center in Raton New Mexico. Kindled at ITS Tactical’s Inaugural Muster event and fueled by the panic of turning 40, our fire for adventure and physical accomplishment is burning bright with little signs of stopping (hours 21 to 24 of STIV on Sunday May 19 aside as those hours found us moving fairly slow).
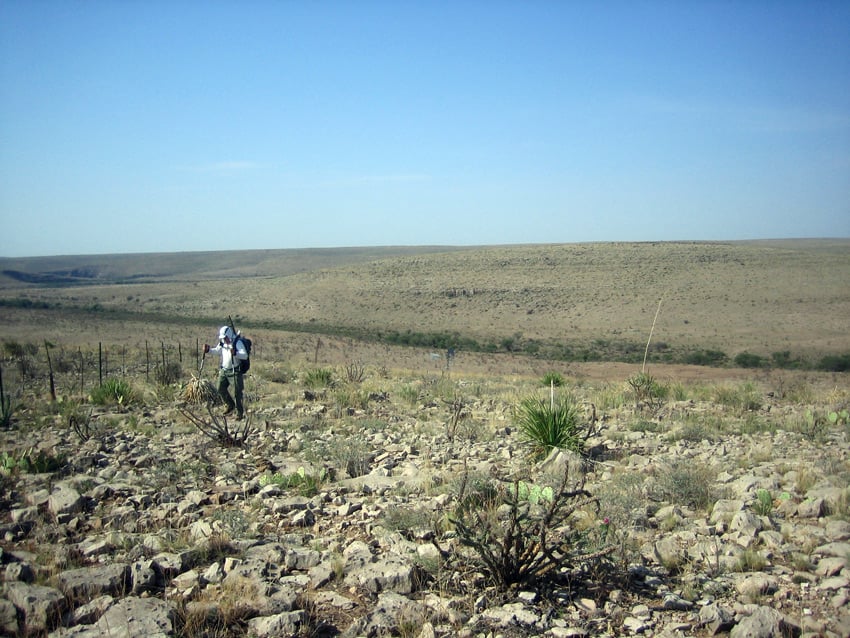
The Survival Trial is billed as a 24-36 combination Adventure Race and Shooting Competition focused around real world survival-based events. While the event certainly met those criteria, I can tell you it was mainly a daunting ruck-fest. We covered approximately 35 miles of scorched earth over the 24 hour period with an emphasis on scorched as 9 of 10 cactus encountered were dried up and dead.
The event coordinators did a fantastic job making water available and we never had a situation when we were without. We didn’t see many evaluators but the ones we did were helpful (within the rules) very pleasant and they provided positive motivation for us as we negotiated the Arena. The event founder, Jon Weiler, moved around all night and seemed almost omnipresent as he was at every manned checkpoint we hit. They all did a great job.
To say the Arena was slightly larger than we anticipated is a tremendous understatement. I had visited the area a few weeks before to obtain some local maps and “boots on the ground” experience which certainly would have paid off had we actually made it to the Whittington Center during the event. Yeah, the event is billed to be there and half of it was, but covering more than half of the Arena is damned near impossible. So, if you are preparing for this event, you certainly can recon some, but Jon does a heck of a job keeping you off balance.
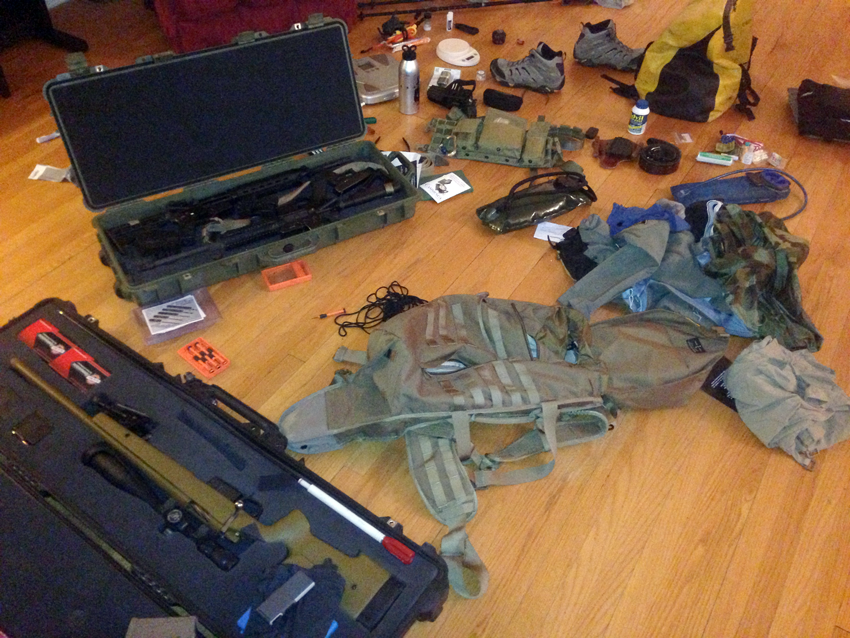
Preparation and Gear
Nothing that I have done to the point has put as much stress on my gear and my body as this event. Any lapse in good gear sense paid immediate penalties. For example, Brian chose to run a set of poly-blend athletic socks at one sock change. He went from a toe blister to long blisters on the outsides of his feet. Thankfully we did have a solid foot repair kit that kept us moving along.
Our physical preparation included a couple of rucks each week, building up gear to our anticipated competing weight, over the span of couple months. We had this event on the schedule before we competed in the Mammoth Sniper Challenge in January so our training never really stopped from last November save for a couple of weeks recovery after Mammoth. This really paid off for both of us as we made fantastic time on our feet throughout the event.
Along with rucking, Brian and I both continued our strength training. I stuck with my P90x workouts and Brian did a mixture of functional strength and traditional weight-lifting.
I’m still working to shed those last few pounds accumulated from 15 years of neglecting my fitness, Brian is in damned good shape at optimal body fat.
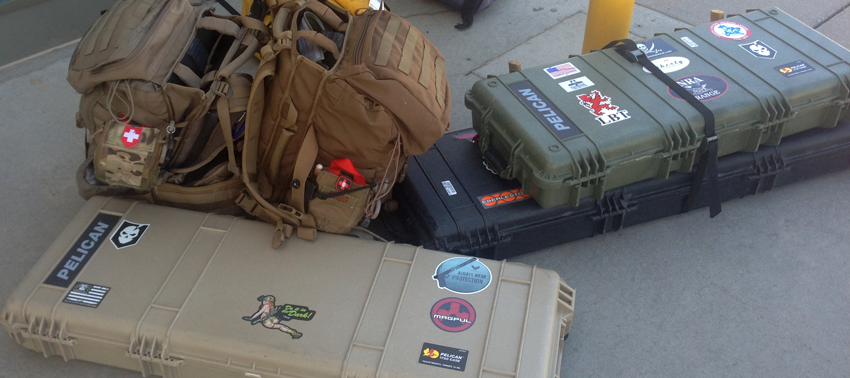
Gear shortfalls were few and far between as Brian and I don’t buy junk. As you could have guessed, weight was the number one concern and we certainly will do better next time keeping our gear light and to a minimum.
We did have one very important gear revelation that Brian and I both agree caused his initial foot issues. DIRT. Our first sock change revealed Brian’s toes were filthy with dust and dirt.
The same boots that performed flawlessly at Mammoth under similar load were not optimal for the New Mexico environment. The vented mesh toe tops had allowed dirt to breathe in and through his socks, sticking to his feet like tar and feathers. We all know the basic contributors to blisters: heat, friction and moisture. Throw in an aggregate and you have a recipe for disaster. Even with the blisters, Brian finished this race on his feet, making good speed and even dispatching the ‘Ssault Shaker in hour 22. He was a real trooper.
I learned why boots have heavier ratings than others. I completed this event wearing AKU’s NS-564 boots. They held up great and were comfortable during the event but caused some issues afterwards. I had pretty severe foot pain during the last few hours of the event but I figured that was from covering so much ground in such little time; afterwards I had numbness followed by tingling and overall nerve issues in my toes on both feet. These symptoms lasted about a month and were undoubtedly caused by having too much load on the soles of the NS-564 hikers. I have since purchased the higher load rated Pilgrim boots by AKU as they have a much stronger sole for handling the 50 pounds or more encountered in Survival Trial. I’m looking forward to the next event so I can see how much of the pain I suffered at the end was due to improper footwear load rating. So far I have not encountered the nerve sensations wearing the Pilgrims on heavy rucks!
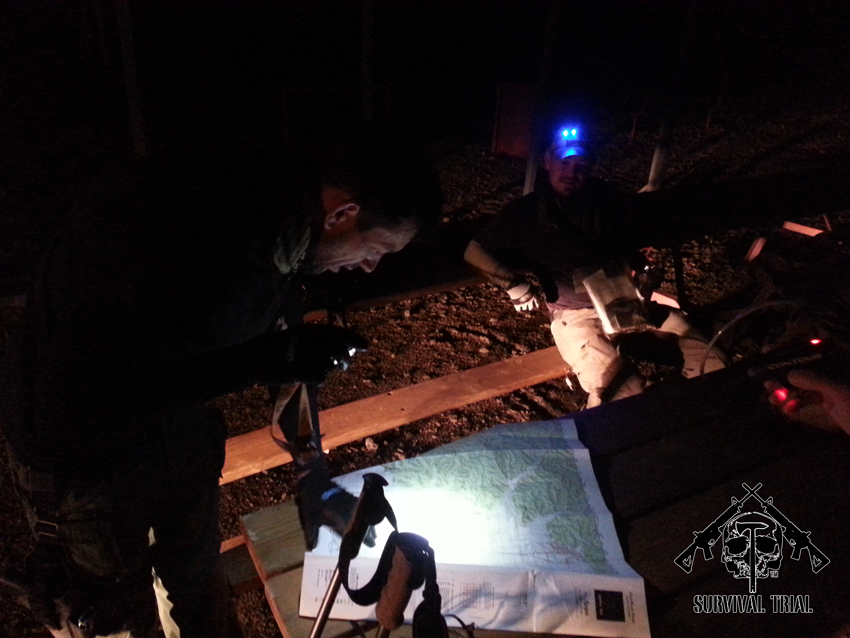
The Start
After check-in, the ST crew loaded us into 15 person vans and headed towards the entrance gate. When the van turned right onto the highway, my hopes of actually having recon and good maps on the Arena blew right out of the window. It was pitch dark and any effort I made to get my bearings were futile other than a glance at my wrist compass and a half-assed attempt at measuring the distance we covered. It would turn out not to be a problem as we were given good maps and navigation would never really hurt us. We knew where we were; one helluva long way from the next point.
After gear check and briefing, we received our maps and checkpoint coordinates and quickly got to work on a basic game plan. We did a pretty darned good job as our initial plan was good and only took basic tweaks as we made our way around the Arena for the next 24 hours. We set out for our first checkpoint.
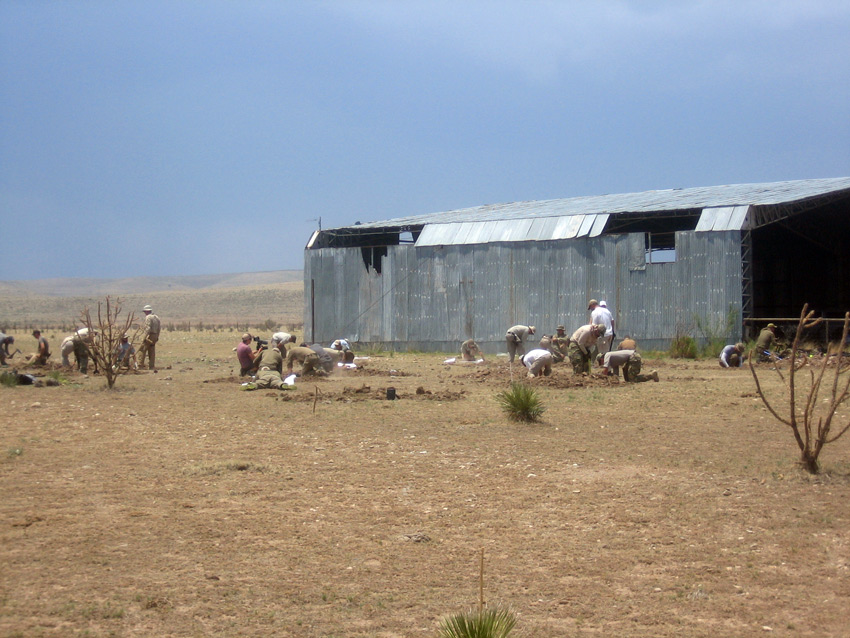
Our first challenge was a physical one that required us to fill sandbags and use them to build a levy. It was extremely demanding but we went to work and completed it quickly; on to the next spot. Route selection would be critical through this event and our initial route from the start point had us traversing an open field. All open field crossings had uneven footing causing ankle rolls and uneven landings that were certain to multiply foot issues. We had a shortcut to the next checkpoint but decided to stick to the road to save the wear and tear.
It took a LONG time to get to the next checkpoint. We had almost beaten the Evaluators to the first checkpoint and did beat them setting up a mental challenge checkpoint on the way to our second spot that we were able to complete on our way back up north. Our second stop was a shelter building challenge that Brian came up with a fantastic solution for. This challenge taught us a valuable lesson; when we have a great idea, do it. Brian had the idea of reinforcing our shelter material with duct tape prior to lashing – pure genius as the wind was blowing like CRAZY. I had the idea of splitting out material long ways in order to have more to work with. As we started the challenge, we both took each other’s ideas yet didn’t follow our own. Really?! Lesson learned, come up with a plan and execute. We did eventually complete the task and set off for the next point a bit wiser. This event is designed to challenge you physically and mentally, the latter mainly due to the former.
The Decision
Brian and I are headstrong A types that want to win. We keep our goals realistic but no matter what, there’s a part of us that expects to win. This event had 14 other teams that undoubtedly feel the same way. For those of them who will read this – all due respect to you, but as we left the second checkpoint, Brian and I made a decision that would keep us from winning. We knew that it could and made a pact to be OK with our decision if in fact it did end up costing us.
As we were leaving our second checkpoint, we mentioned to the Evaluators that we were considering running up the mesa to the precision rifle checkpoint. The challenges at each checkpoint were not made known to us prior to arriving but this was one of the two that closed at dusk so we felt certain that it was a long range one. When I said this out loud, one of the evaluators hawed a little, commenting that it may be a risky decision. I didn’t really understand what he meant by that but as we made our way back up to that intersection, we realized that it may take too much time to get there and back. Considering it was only a 100 point checkpoint and we risked being able to get to a 300 point “Mandatory” one, we knew – prior to making the turn – that it could cost us 200 points. It did and with the 200 points we would have been the overall winners.
It took us 6 hours to climb, shoot and retreat from this checkpoint and aside from the crying I just did, it was worth it.
Banging Steel
Brian and I are long range shooters. It’s what we do. Yeah, we shoot our pistols and carbines and would put those skills up against anyone, but we compete and train as snipers. We labored over the decision to go after this checkpoint but there really was no way we were going to pass on it. We turned right at the intersection and started to climb.
Upon our arrival we dropped our gear, made ready for the stage and received our briefing. The scenario was one of “disposing” IED’s by rifle shot. Good times. We had spent the day before the event getting dope on Brian’s gun and had a range in which to deal with. I made a choice of which range to use, grabbed my carbine to spot with and we headed to the firing position. The targets were approximately 10” steel plates at 415, 550 and 660 yards. Each one had Tannerite affixed to the face so identifying a hit would not be an issue. With the wind at the time, we decided to dial in an MOA of left and holdover any more that was needed. Our up numbers were 7.5, 10 and 15.5 MOA.
The Evaluator gave us the signal to start and Brian’s first shot broke, high left. I gave him a correction and his next shot splashed just right. Another correction and the Tannerite exploded. Without hesitation we dialed in 10MOA and pounded the second target. One shot left, one target left. 15.5 MOA up, hold left edge – BOOM. Brian had cleared the stage. Our exuberance overflowed as I tackled him into the dirt in celebration. The previous team we passed on the route to this stage said they hadn’t touched the first plate and that it was ridiculously hard. We had labored over the decision to come here and getting skunked would be a demoralizing blow. Not to be, Team Charlie was on cloud 9.
The Evaluator handed me my 5 rounds and we made ready with Brian under my carbine as spotter and me under his as shooter. With his hold-overs I broke the first shot. 6’ high, what? Held low, high again??! I looked at the vertical turret, SHHHIIIIIT!!! I had forgotten to change the turret back to the shorter target from 15.5 MOA! Dammit! We recovered, dialed in the appropriate numbers and BOOM, BOOM, BOOM. Charlie had cleaned the stage.
Before leaving the stage we sat down and made some hot food. Mashed potatoes and corn mix was on the menu with a side of pride. After woofing that down, refilling our water and reloading our gear, we headed back down the mesa to the trail that would take us back to the Whittington Center.
Trail of Tears
The descent down from the long range shooting stage would take us 2.5 hours even with our feet barely touching the ground. We were certainly motivated by the stage but it was a long damned way, well, relatively. What was a long damned way was the return back to the Whittington Center. It was approximately 1800 hours when we reached the intersection and headed right. We would spend the next 10 hours on that trail.
We plotted a course that afforded us a couple more unmanned checkpoint opportunities and we picked them up along the way. Time on our feet, mileage and the terrain were really taking their toll. We were doing about 3 kilometers before needing to take a break. We both commented that we wished we could walk slower but our normal stride was all we could comfortably do.
The physical effects had really set in and some mental stumbles were in our future. I said earlier in this article that navigation was not an issue and it wasn’t, but our one back track occurred in the death march that was the return to the Whittington Center. Pitch darkness was a contributor as well as some confusing intersections but at one point we did go about 1 KM too far past a turn. We stopped at the intersection and considered turning but on my lead we continued straight until another physical boundary illustrated my poor choice. So, we quickly backtracked and got back on the right route, after rightfully being called a jackwagon by my partner.
For those of you who have been around us, you know Brian and I incessantly hack on each other. It’s our way, it works for us and it keeps things fun and light hearted. Brian and I learned a lot about each other on this trip, mainly that we make a good team and can count on each other to keep the other going.
On this route back, we took turns motivating each other. One’s mental lapse, complaint or cry would be met by a “tighten up you sumbitch” from the other. We stopped for another hot meal as we reached an identifiable landmark on our route. These spots let us know we were on the right track and were nice moral maintainers. I say maintainer because actual “boosts” were almost impossible based on our condition. We were truly in survival mode and Charlie, by god, wasn’t gonna stop.
We made it to the left turn, over the railroad tracks, which we had been looking for and took a short break to check the map and drop our gear for a few minutes. This area was also an unmanned checkpoint. Loaded back up, we set off across what I estimated would be the last field before we made it to the Whittington Center. We spotted lights after a couple of hours and worked our way closer to them. Maybe it was the sleep deprivation and exhaustion, OK it certainly was, but we couldn’t decide what lights we were looking at. To me it looked lights in someone’s back yard; I actually could see some elaborate glass porch and patio. I knew better than to trust myself, besides, who in the hell would have their back patio lit up at 2 in the morning? We decided to scope the area out with a team shooting position. Brian “assumed the position” and I laid his rifle over his back and check it out. It was the entrance to the Whittington Center. Alas, it looked like an oasis in the vast desert of, well, desert.
“Pass the ‘Ssault Shaker”
Leading up to this event, the event organizer had been posting some helpful (his words), misleading (our words) and somewhat frightening (everyone’s words) videos. One particular series of videos had everyone’s attention. Those involved John being chased by some zombie looking creature. During our event briefing, we were told these creatures were ‘Ssault Shakers and that they would be out on the prowl looking for us starting at 1030 hours. Up until this point we hadn’t seen any.
As soon as we had approached the final fence crossing between us and the Whittington Center entrance, two trucks swarmed in on top of us with lights blaring and camera crew rolling. Standing on top of the culvert we had to cross was the ‘Ssault Shaker, backlit from headlights and looking pretty damned evil in a green hoodie and a dark mask. The biggest fear factor was the unknown, what the hell was thing guy gonna try to do to us? He certainly wasn’t running towards us at this point and we had made it clear to ourselves and the event organizers that were had no intentions of running from this thing; we were too exhausted to do so and it would take a lot less energy to apply “nature’s lead pipe” to his neck than to take off with 60 lbs on our backs.
As we struggled up the hill towards the ensemble of unknown evil and paparazzi, including the omnipresent John, we were greeted by another guy wearing a green hoodie and no mask. He started reading off a sheet of paper describing the situation, the opportunity to make points by engaging the Shaker or the loss of points and/or time by not. There was no doubt we were engaging this guy and I looked over to Brian to give him the opportunity to back out; he had been talking trash all day about how he was going to lay into this thing whenever we ran into it.
After 21 hours and around 30 miles of ruck to this point, a couple of mental hiccups and more than any man should have to endure, Brian stepped right in with a “You’re going down son!” I won’t give any more details from here other than to say that Brian moved like a cat with the strength of a grizzly bear to secure our point bonus; another real high point in the event. After our stage debriefing we chatted with the Shaker who had run the encounter for us (not in the mask). “We’ve been tracking you guys for 10 hours!” he said. “The last team we engaged was a little after lunch time”. They had engaged every team but us and while certainly resting and doing other things, they searched for us for the good part of the night. We took a little pride in that, we stayed on the move!
The Finish
After dispatching the Shaker we paused briefly to gather ourselves and check the maps. We didn’t feel like we had enough time to make it up to the checkpoint in closest proximity but we decided to walk it up to where we checked in and see how much ground we made and how much we had left after that. Upon reaching the building, we realized we certainly didn’t have enough time left and we were greeted by 4 or 5 other teams who had already ventured to the spot including the eventual overall winning team.
Done. Sore. Throbbing.
We had made friends with some great folks before the event and enjoyed catching up with them and sharing stories as we waited for the awards ceremony. We ended up finishing in 4th place, less than 200 points from the overall winners. We were certainly pleased but, even though we had promised to be at peace with it, hindsight was beating us down for our decision to climb and shoot the precision stage.
Looking Back
The previous section was titled “The Finish” as it certainly was the finish of the event, but Brian and my adventures were far from over. We had to beat a quick exit at 0930 to make it to Denver Airport in time to catch our departing flight. We did, barely, only to find Brian’s seat request not be honored and me to make it to Atlanta and end up spending the night there – in the terminal. I got two hours of sleep in the airport but overall was up from Saturday at 0200 to Monday at 1200. Brian stayed with family in Denver that night and was rewarded with a first class upgrade on his return to the airport the next day.
For the event, we had covered more total mileage than any other team and we were darned proud of that. The GPS tracking website showed every tenth mile covered, every minute stopped and every minute underway. We were a little surprised to see that some teams got a full night’s sleep while out there, especially the 20-something Army LT’s that we thought we would get crushed by. A good buddy and former SEAL told me before the event, “Be smart, but if you can’t be smart, be hard.” I thought we did a good job of being smart, our routes were good and we knew where we were the majority of the time. We certainly were hard. The fear of failing, the fear of losing, the fear of disappointing those we care about, drove us to keep moving. We didn’t really think we were in a position to win, we just wanted to make it back to the property on our own terms.
We learned a lot about gear and kit, what to take and what not, but the most valuable lessons we learned were about ourselves. We weren’t the strongest, the most fit, the best equipped or best trained guys in the field, but we were among the most determined. It was an honor to compete with all of the teams that participated.
Gear
Folks always end up asking for a gear list so here it is:
Bushmaster M4 variant carbine with ACOG TA31F optic, MagPul BUIS
Spikes tactical carbine with Eotech optic, MagPul BUIS
Viking Tactical slings
Glock 19’s
Bladetech and the dreaded and evil SERPA retention holsters
Eberlestock Gunslinger I and Gunslinger II packs
JetBoil
Benchmade Auto Stryker and Presidio knives
TAD Ranger Hoodies
TAD Legionnaire Pants
Wiley X and Mechanics Wear gloves
Loksack, Cammenga, Surefire and many others.
Merrell and AKU NS-564 Boots
For the next event I may consider a lighter pack and just sling my gun like I did at Mammoth; the Eberlestock packs are awesome but weigh at least 6 pounds. The primary precision rifleman really does need the gun scabbard capabilities of the Eberlestock as he/she is required to carry two long guns.
During this event I fastened my G19 to the back of my pack. We weren’t allowed to have any ammunition so I didn’t need quick access to it. Next time I would consider carrying it inside my pack. When I got home and cleaned it, it was totally saturated with that ultra-fine desert dust. It’s a Glock so it still functioned, but was filthy!
As mentioned earlier in the article, the AKU Nave Seal boot is not a long distance heavy load boot. It doesn’t have the toe-spring, sole cushion and strength required for heavy loads over 30+ miles.
Thanks
A big thanks to John Weiler and the STIV staff. These guys provided an impossible task and encouraged us all the way. First rate event.
Special thanks to Brett with Triple Aught Design. He helped prepare us for the event fairly without giving up any specific details and turned us on to TailWind nutrition. Again, as at the Mammoth Sniper Challenge, TAD gear served us extremely well in the field – USA made extreme use outerwear that has always been up to the task.
ITS Tactical and our Muster 1 brothers and sisters. My recent charge to fitness and physical accomplishment is owed to these guys. They were the ones we didn’t want to see or hear of us failing.
TailWind Nutrition. I hate to give away secrets to potential future competitors but this stuff is for real. I’ll leave it at that.
Editor-in-Chief’s Note: Jason is a small business owner in Virginia specializing in Physical IT Infrastructure and Electronic Security. He splits his free time between racing cars and all things tactical. Jason is very proud to have attended the Inaugural Muster event with ITS and we’re stoked to have him as a Life Member!
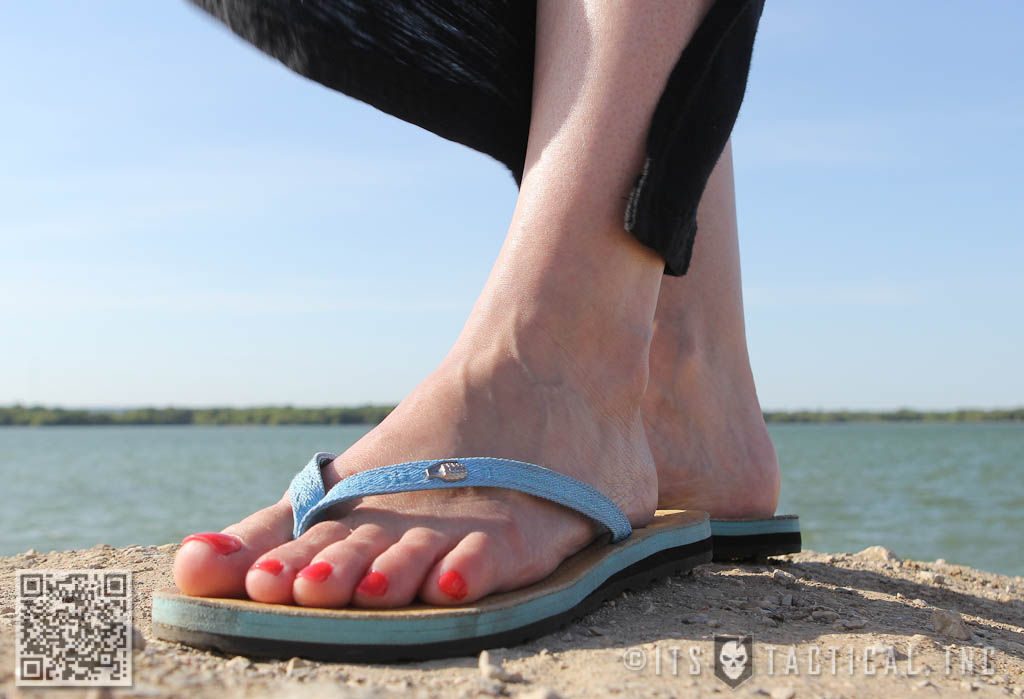
Each year when the weather begins to warm up, I pull my flip flops out of hybernation. Keeping my feet uncovered helps keep my body temperature regulated throughout the hot summer months, plus I simply like being bare foot. It reminds me of being a kid.
No matter what style of shoe I wear these days, I keep a few things in mind; comfort, back support and traction. I’ve grown tired of trying to keep up with trends that leave my feet and often times my back, feeling achy. Life’s too short to walk around in pain just to look good. So, when I find shoes that look good and my body still feels great after wearing them all day, I feel like my investment was worthwhile.
In the past, I’ve made the mistake of buying designer sandals as I tried to be trendy. When the designer choices left me wanting, I went to the other end of the continuum and bought super cheap sandals thinking they were all really the same. Most of the flip flops I’ve bought prior to this year have ended up gathering dust in my closet because they simply weren’t comfortable or supportive. One pair had such slick soles that my feet slid right out from under me and I fell on my butt twice in public.
Back in March I purchased my first pair of Combat Flip Flops after Bryan tested out a pair. I really liked the mission statement of the company and Bryan raved about how the sandals felt on his feet. He and I are both pretty hard on our shoes, so I figured if the Combat Flip Flops were working for him they might just work for me, too.
Message Behind the Brand
In case you’re not familiar yet with Combat Flip Flops, it’s important to point out what this company stands for. American soldiers who spent numerous deployments in Afghanistan saw first hand the need for jobs and commerce as a way for Afghans to provide a sustainable way of life for their families.
Due to the rapid changes in leadership and political climate in Afghanistan, the factory where Lee, Andy and Griff opened Combat Flip Flops had to be closed and production moved to the United States. All Combat Flip Flops are currently manufactured in Issaquah, Washington. The founders continue to provide work not only to Americans in their current factory, but also plan to reopen a manufacturing facility in Afghanistan when they’re able to provide customers with both American and Afghan made products.
The Options
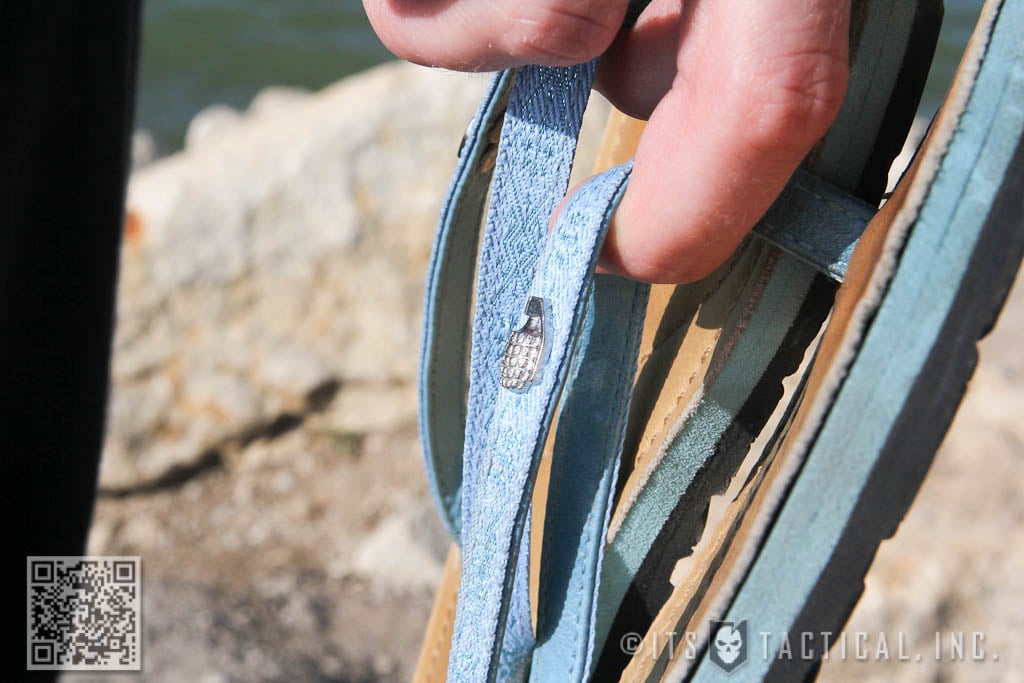
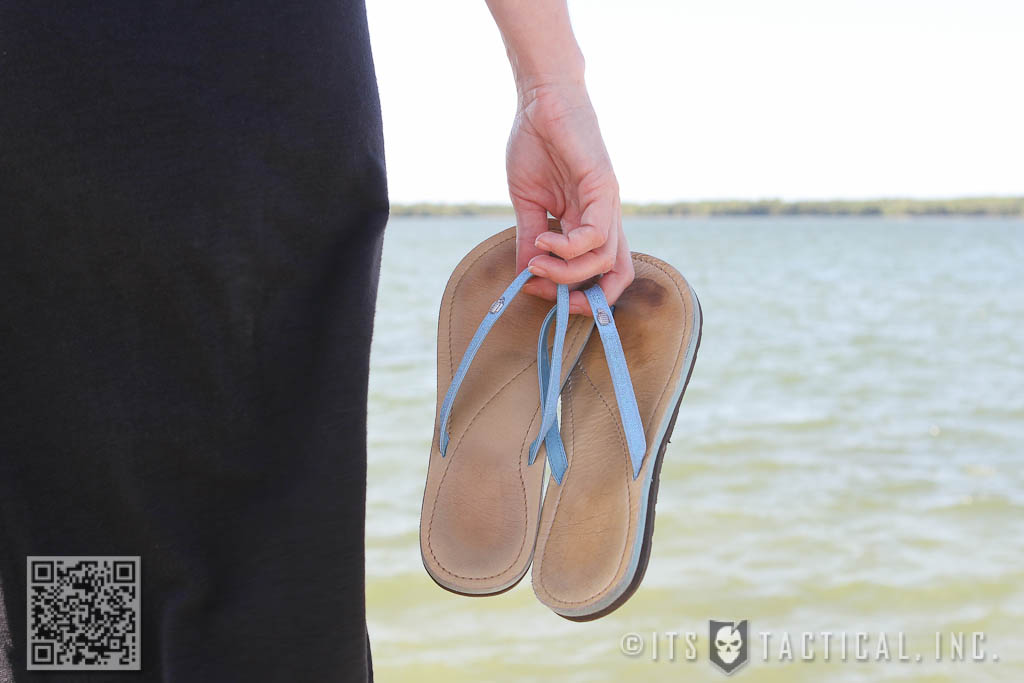
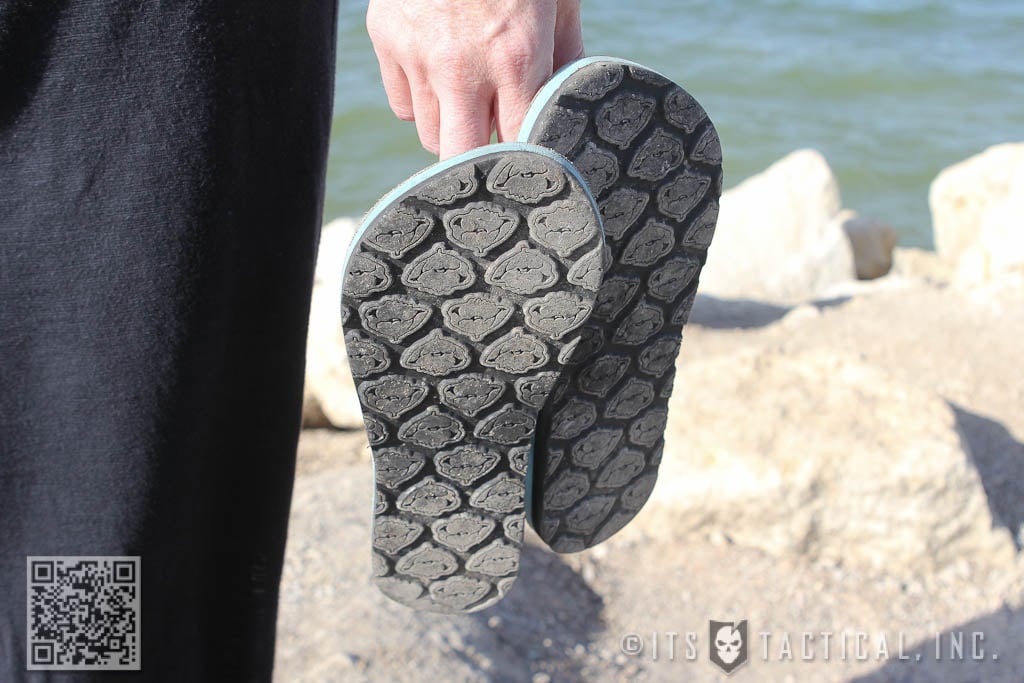
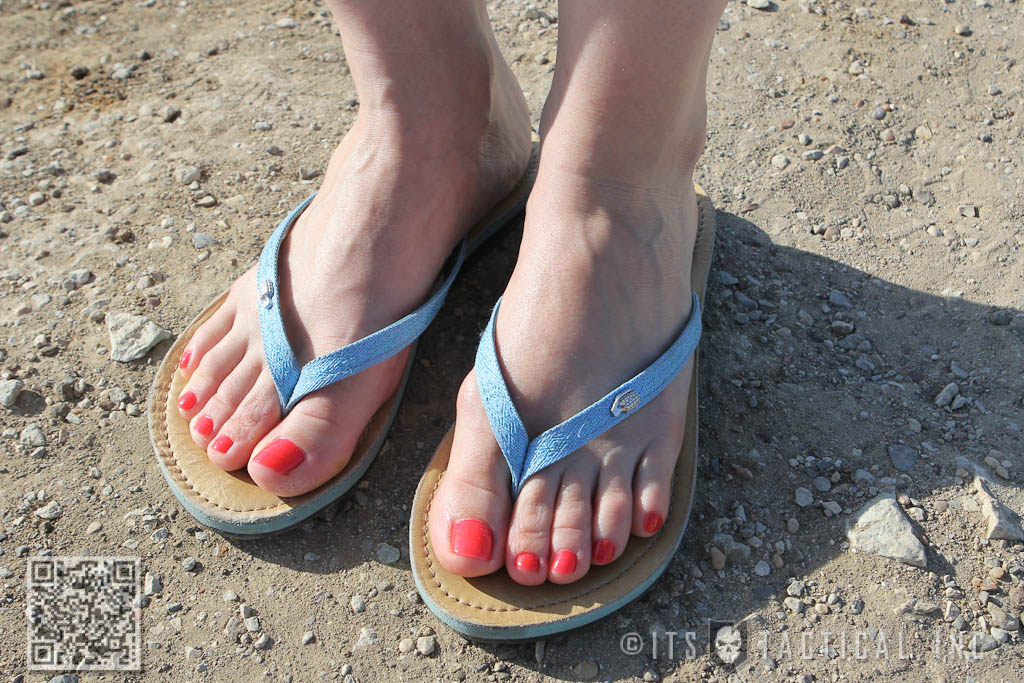
I picked out the Bombshell Light sandals with bright blue straps, a chrome grenade charm and a golden tan foot bed. Combat Flip Flops also offers the Bombshell Dark with black straps and a black foot bed and ladies looking for a little more bling may prefer the Lady Tuck Tuck, which features shiny silver straps and a deep red foot bed. The tread on the bottom of all their flops sport a repeating poppy design as a reminder of the prevalence of poppies in the Afghan region.
I was excited to see that they Combat Flip Flops carried size 5’s since a lot of manufacturers skip right to size 6. All of their Ladies’ flops are available in whole sizes from 5 up to 10 and are priced at $65.00.
Flopping Around Town
I’m not kidding when I say that these sandals felt awesome from the first time I wore them. There was a very brief moment that the piece of leather between my first two toes felt a bit odd as my winter feet got used to wearing flops again, but after those first few minutes I’ve never noticed the leather piece again.
Recently, I wore my Bombshell Lights to a small town we were visiting that had lots of places to walk to, opting not to rent a car to get around. We literally walked a total of about five miles on concrete one afternoon and I wore my Bombshells the entire time. Not once did my feet ache, nor did my lower back show any signs of fatigue. That’s the first time I’ve ever walked that far and not felt it in the rest of my body when I got back home.
These sandals have also been holding up really well. I’ve managed to stain them a bit near the toes from puddles and sweat, but other than that they’re aging nicely. They’ve literally become my daily shoe this summer. If you’re looking for a stylish, lightweight sandal that offers excellent support and stability then go no further than to CombatFlipFlops.com.
With technology getting better and the proliferation of a GPS in almost every car, thanks to smart phones, when was the last time you brushed up on your skills of reading a road map or a road atlas?
I always carry a current version of the popular Rand McNally Road Atlas in my vehicle and like to consider it a backup to my iPhone’s Navigation. With nothing more than a mile marker and general knowledge of where I am, I can navigate to just about anywhere in the United States via roads and highways. Not only that, but give you the approximate distance in mileage between where I’m currently at and the next town ahead. All thanks to the indispensable Road Atlas.
I’ll also mention that reading a Road Atlas can be a perishable skill in some situations, if you don’t review some of the finer details as often as you should. In this article, I’ll describe these finer details and walk through how to use a Road Atlas to navigate without electronics (other than those that keep your car running.)
Hitting the Open Road
A Road Atlas is nothing more than a well put together collection of road maps from all over a given area, such as the United States in general. Knowing how to properly read a Road Atlas can be an empowering tool for giving you the confidence to travel anywhere, without the need for other transportation methods like an airplane or a train.
There are a lot of benefits to traversing the country with your vehicle, such as always having a way out and being completely independent. By that I mean not having to worry if a plane is delayed or flights get cancelled, not to mention the lack of pat downs required to reach your destination. You’ll obviously still be at the mercy of your vehicle and how well you’ve maintained it, but you have to do that anyway, right?
It will more than likely take you longer to reach your destination via auto, but it’s a great way to see the countryside and get off the beaten path a bit. If you’ve driven cross-country for travel, consider taking the smaller roads and seeing new sights. We’re all so busy these days that it may be just what you need. I for one love driving through smaller towns and learning the history.
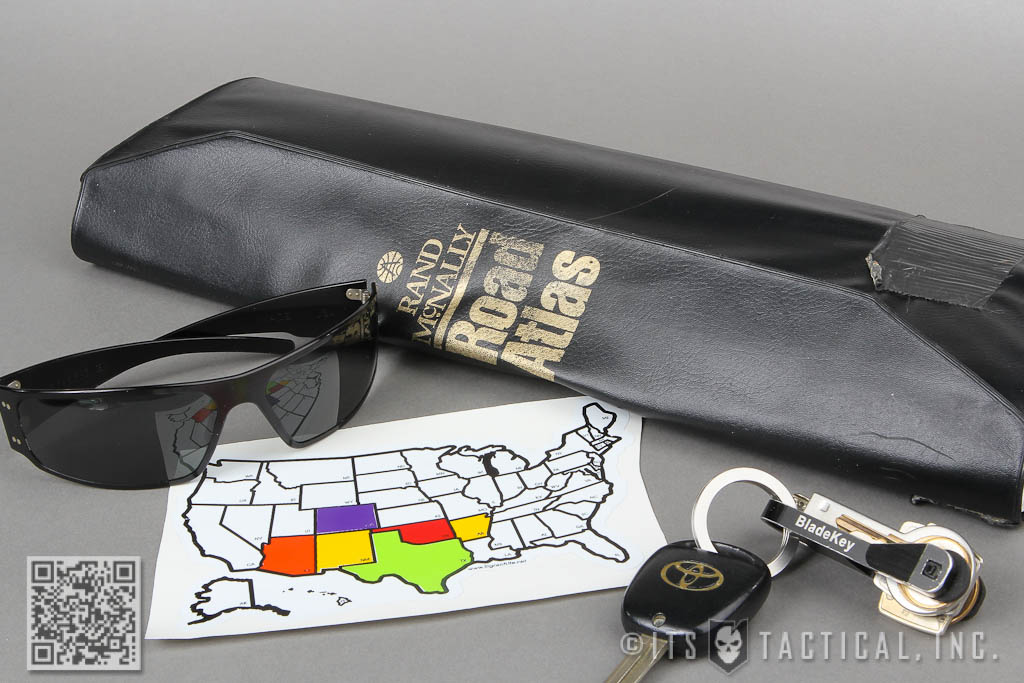
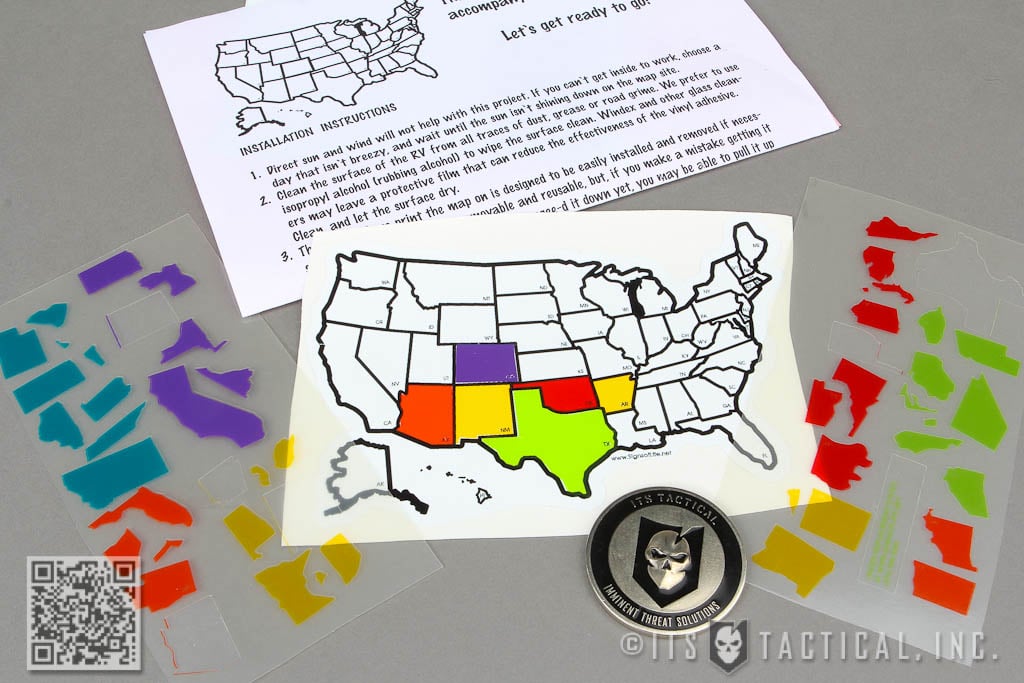
I’ve also recently picked up a neat Travel Map Sticker that allows me to add a new individual state stickers for each one I travel to on my FJ Cruiser. They come in many different sizes, all the way up to 13″ x 20″. I purchased the small 4″ x 6″ and really love the size. You have to apply the included state stickers with a razor blade since they’re so small, but I don’t mind a bit. The Travel Map Sticker is a fun way to log where you’ve been.
Dissecting the Road Atlas
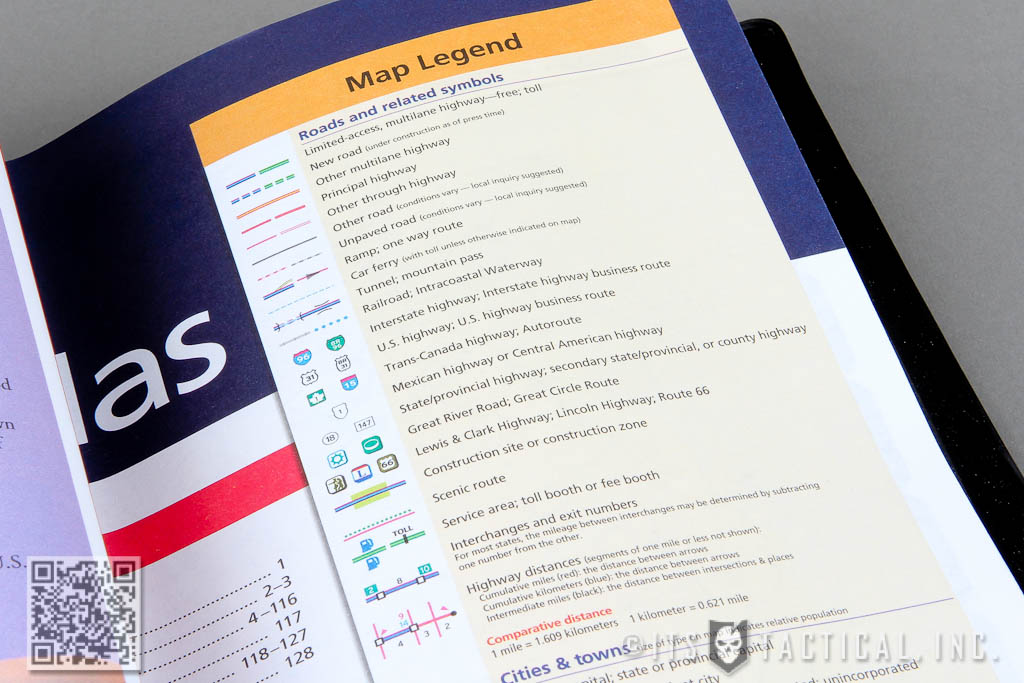
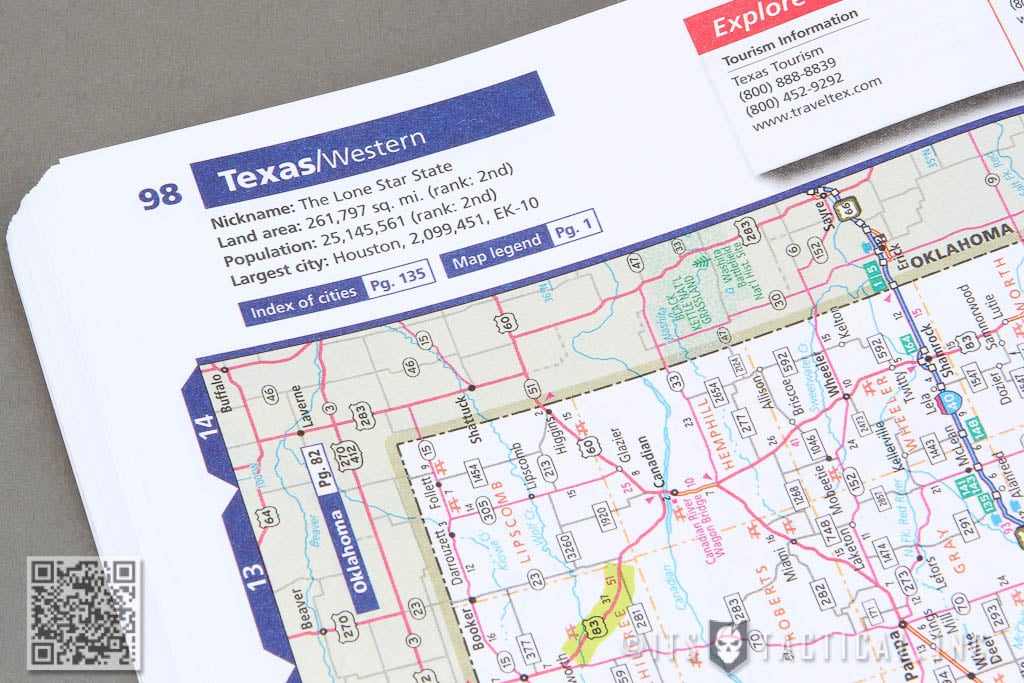
A Road Atlas is easy to read, but can be overwhelming if you don’t take the time to learn the Map Legend and how to figure out distance. The first thing I’d like to go over is how a Road Atlas is organized. While these tips should apply universally to any Road Atlas, I’ll be mentioning a few things that are proprietary to the Rand McNally Road Atlas. As an aside, 2014 marks the 90th year that the Rand McNally Road Atlas has been in publication. You can already pick up the 2014 edition too.
The front of the Road Atlas will give you the all important Map Legend, as well as a contents list with corresponding page numbers and a quick map references guide. These simply give you a quick reference for the page numbers that contain a specific state you’re wanting to view. The atlas is organized alphabetically by state, with some massive states like Texas taking up about six pages. Cross-country travel can find your navigator turning the atlas multiple times as you switch states during your drive.
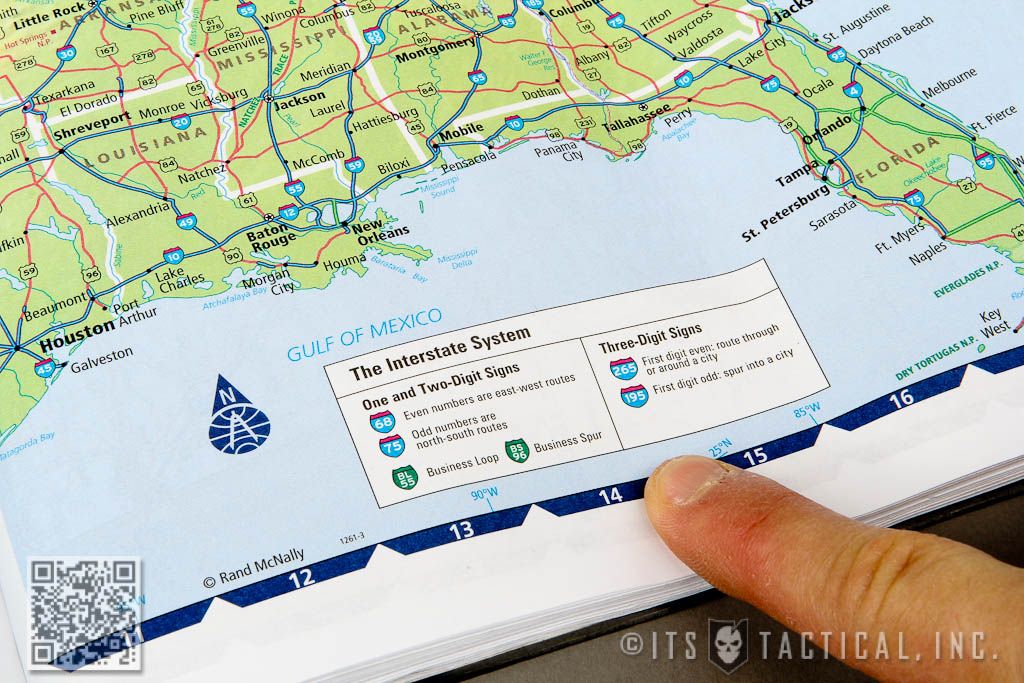
Our Interstate System is interesting and a Road Atlas is where I first learned what all those numbers and different sign shapes mean. The first split is between One and Two-Digit Signs versus Three-Digit Signs. One and Two-Digit Signs signify East/West Routes (even numbers) and North/South Routes (odd numbers.) Three Digit Signs are routes through or around a city (first digit even) or a spur into a city (first digit odd.)
Distance
Next to knowing your legend and highways, distances is the next big thing that can help you out immensely. Hopefully you’ve driven enough to know what mile markers are, but their value is truly in providing you number to reference on your Road Atlas to pinpoint your location. Assuming you know what highway you’re on, that is. Mile markers increase moving West to East and South to North.
For example, driving into Texas from New Mexico on Interstate 40, you’ll catch a glimpse of Mile Marker 374 right before you hit the border of Texas and see the number 1. It will grow in size as well before you hit Mile Marker 177 as you cross into Oklahoma. The way you can find out how many miles of highway run through a state, is with a quick look up to the top of a given state’s page for “Total Mileage Through” on a particular Interstate. Another tip is that Exit Numbers and Interchanges also correspond with Mile Markers. So exit 353 would also be Mile Marker 353 (in most cases.) Exits can be tricky in big cities, where Exit 40 can have an Exit 40a, 40b and so on.
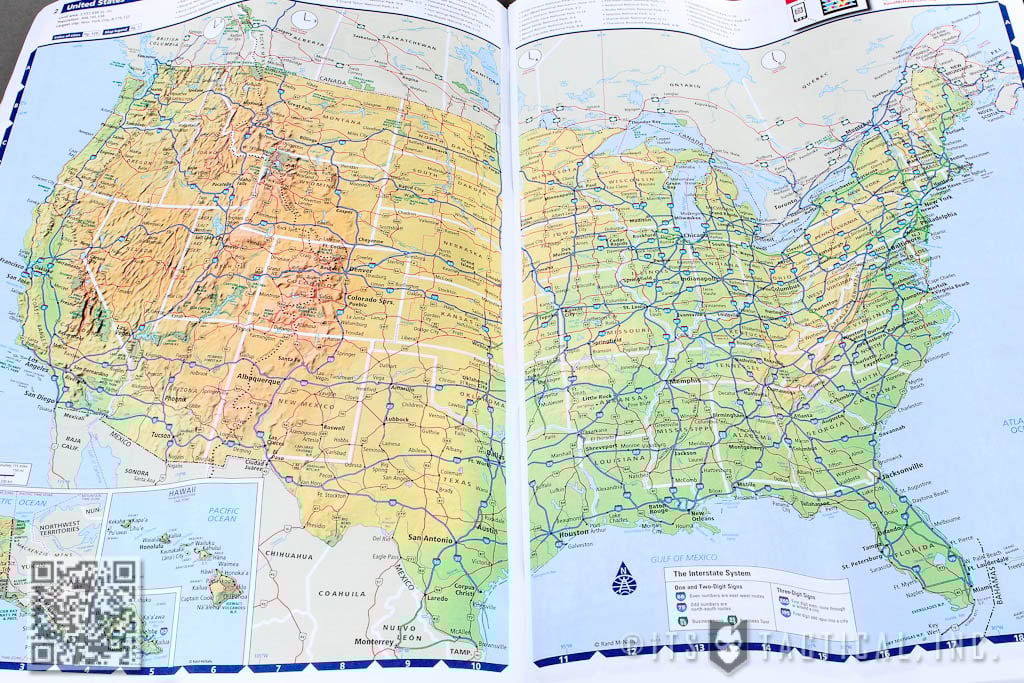
There are two sets of numbers on the photo above that correspond to distance (not counting the green boxes that are exit numbers) The black number shown is the distance between exits or interchanges, designated by the small black hollow square in the towns of Van Horn to the West on Interstate 10 and Kent to the East. 37 is the mileage between these two towns. The red number 47, just below the black number 37, is the distance between the closest red arrows. You can see one to the West in Van Horn and one to the East of Kent. We also know by the solid blue building icons near Van Horn, that we’ll be able to find a restroom at the rest area. To the East near Kent, there’s a rest stop, but no restrooms because of the hollow blue building icon.
By adding multiple black or multiple red numbers (don’t cross the colors or the streams,) you can calculate a distance between larger spans of highway. It’s also possible to calculate distance between numbered exits by subtracting them. In all it’s fairly simple to read a Road Atlas and inexpensive (about $10-12) to carry one in your vehicle as a backup. The power comes from knowing the Legend and being able to identify exactly what it is you’re looking at on the map. A small calculator can also help, just in case you’re math gets a little fuzzy on the open road.
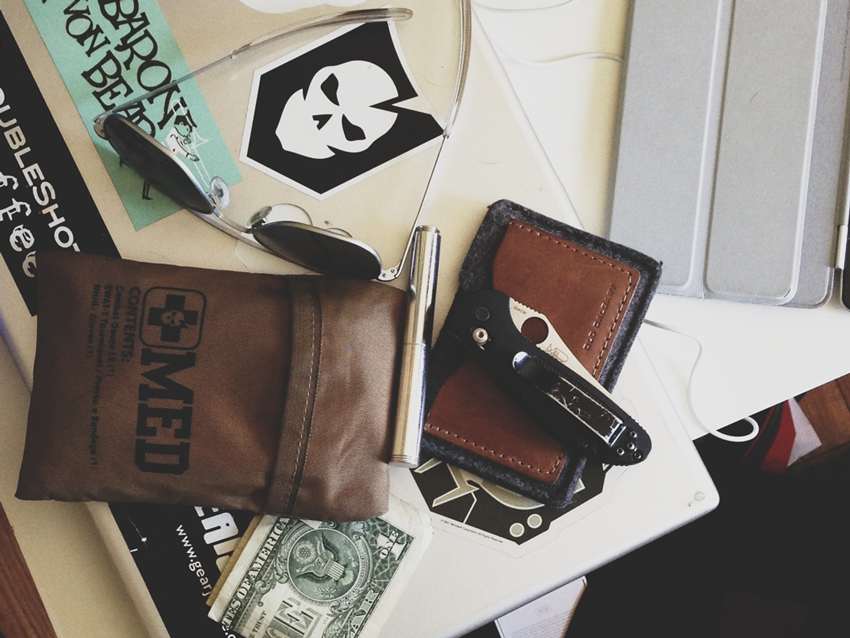
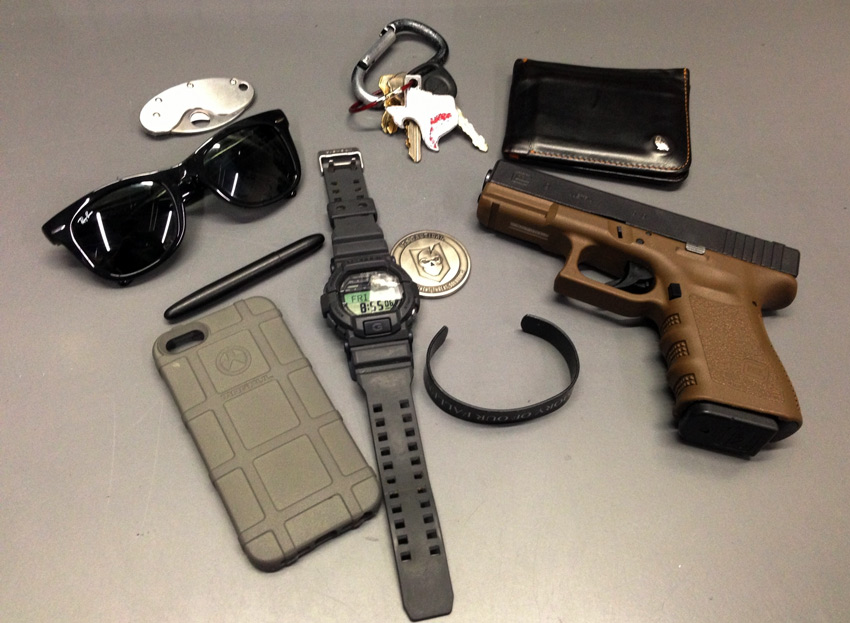
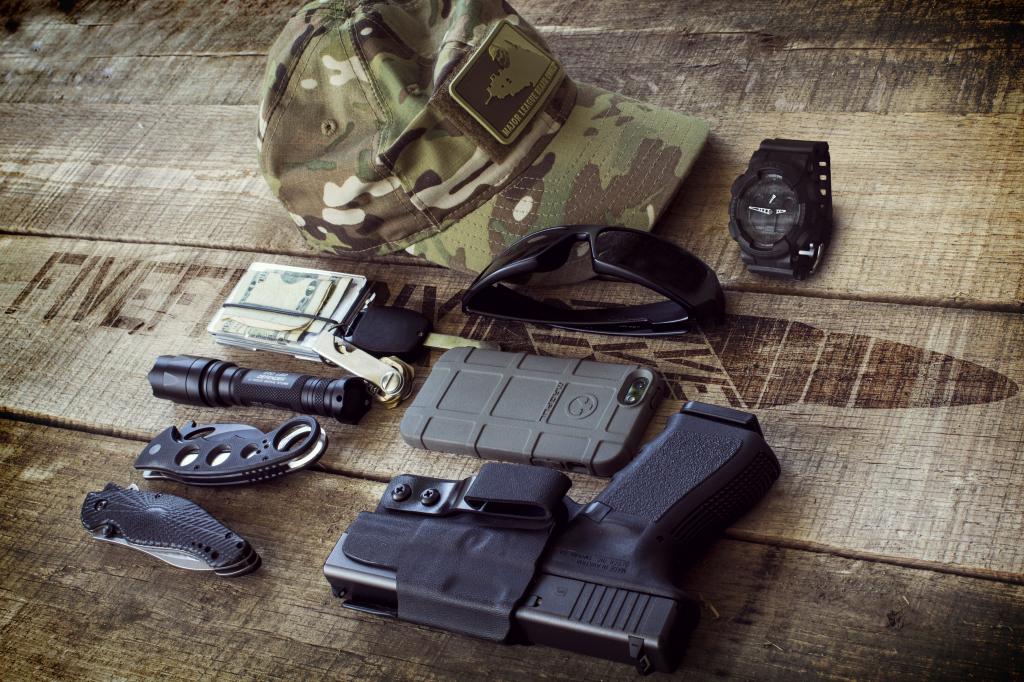
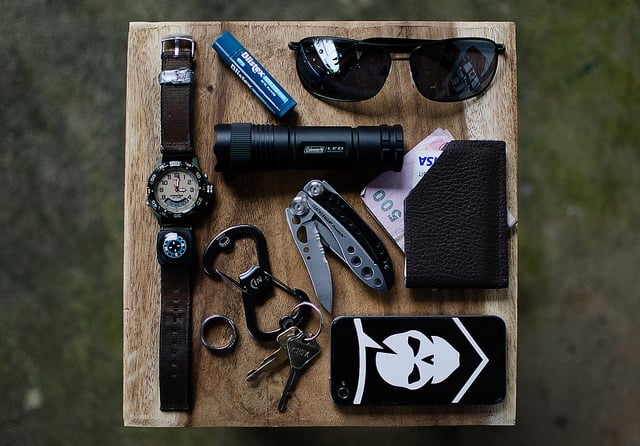
We want to see what you carry in your pockets, your wrist, your belt, your hat and pretty much anything that is always on your person. This doesn’t include your bag, even though we love showcasing those as well.
Past submissions have shown people carrying loads of random stuff. Nothing wrong with carrying what you do, but be honest. Most of us can spot a fake “look at this pile of awesome gear” pic when we see it. Actually, if you think people are going to call you out for not truly carrying what you say you carry, why not show “how” you carry it all too? That could help others modify their every day carry setup!
To enter, simply post a photo of what you carry with a brief description in our Forum. We’ll be checking on the submissions and selecting winners based on that pool.
To kick things off, here’s what Rob carries just about every day:
Show What You Carry and Submit Your Entry To The Forum for Your Chance to Win!
We’re going to let this contest run for two months, so everyone has a chance to submit something awesome. Keep checking back on the site and the Forum for carry inspiration. Good luck!
Update: Thanks everyone for your submissions! There were a ton of great entries but we had to narrow it down to just two.
Continuing our DIY AKS-74U Krink Build today, we’ll be completing the disassembly and demilling on our Tula Krink Parts Kit. Before we go any further, I’d like to discuss a question I received about this build. I was asked if the processes we’re going over would translate to any DIY AK Build. For the most part, the answer is yes.
Many AKs are imported into the US in a demilled parts kit and the process for completing the demilling is roughly the same. You still need finish disassembling the parts kit you receive before you can start putting it back together again. You may be able to source a fully demilled parts kit or even individual parts, but you really need to be sure that the parts were originally part of the same gun. That’s truly the only way you can safely ensure that the AK you’re building will assemble correctly.
When I say that you need to make sure the parts were from the same gun, I mean the integral parts like the trunions and any proprietary parts. To the best of my knowledge, I couldn’t just use any old front-sight/gas-block from an AK74 for this Krink build, as it wouldn’t contain the integral functionality of the Krink FS/GB to attach the correct booster.
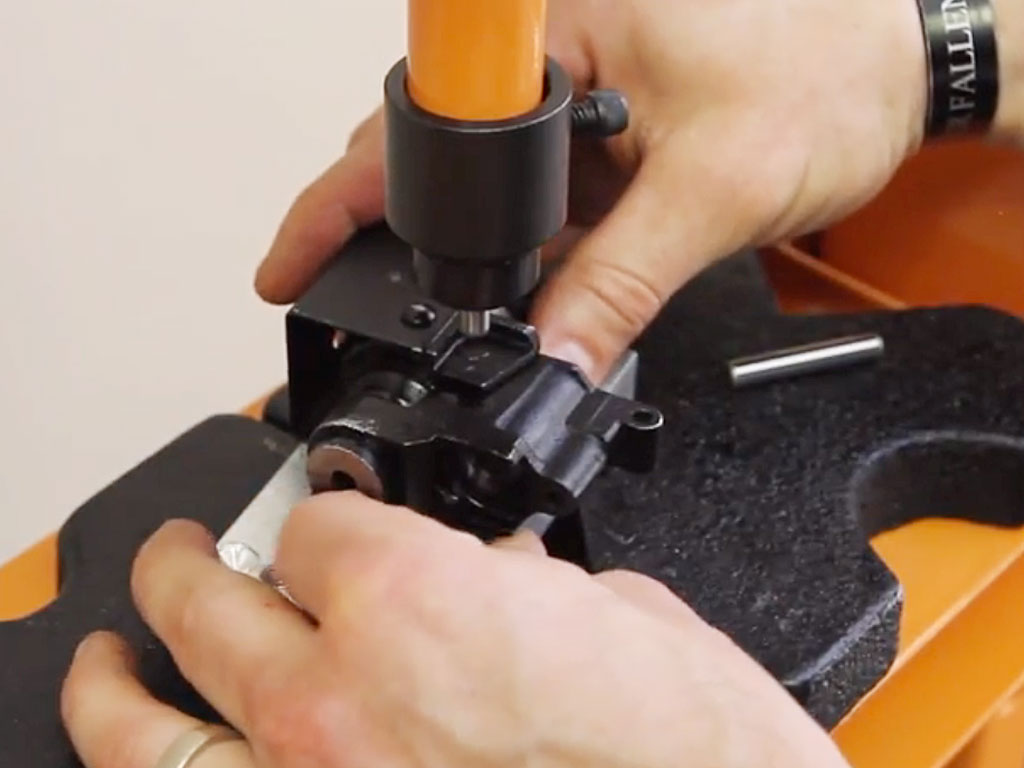
Barrel Pin Removal
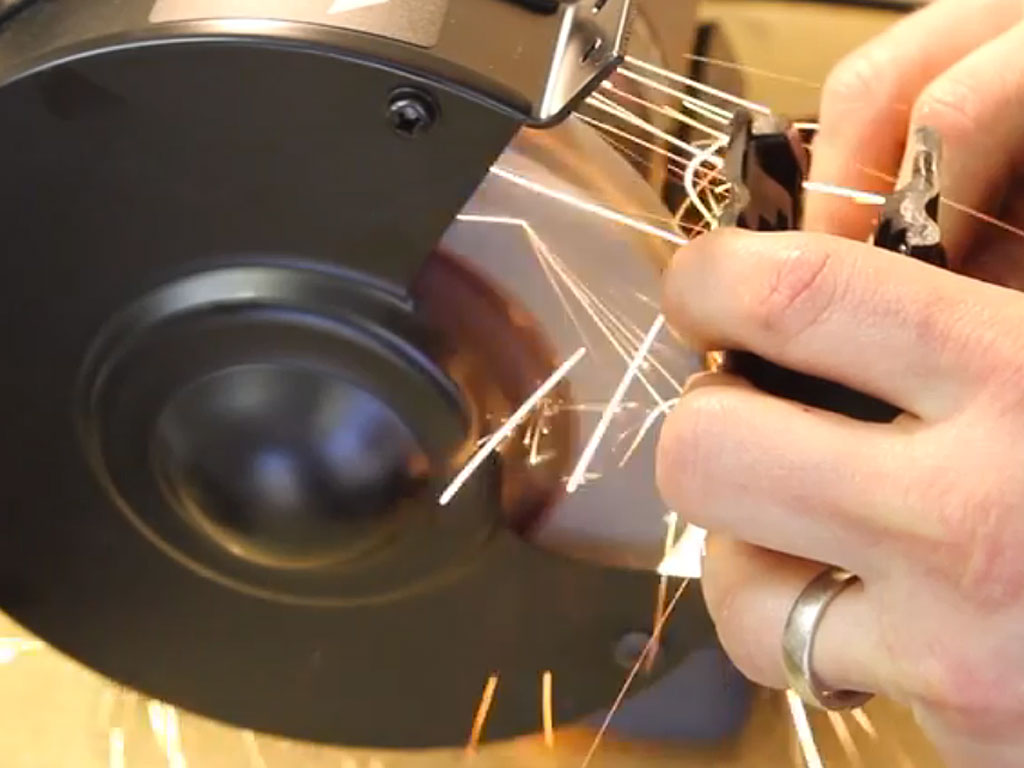
To remove the Barrel Pin from the Front Trunion, you’ll need your 12-Ton Press, the AK Builder Barrel Press Kit and the small u-shaped block from the AK Builder Riveting Jig to help stabilize the trunion as the pin is pressed out.
After you’ve positioned the trunion correctly on the aluminum plate, ensure the press is in-line on the pin and get started with the smaller Barrel Press Kit pin. You’ll then switch to the longer pin after it starts to move. You’re going to hear a loud pop at this stage as the pin is removed, due to the tremendous pressure it takes to drive out the pin. Press as straight as possible and remember to hang onto your barrel pin, because you’ll need it again during assembly.
Front Trunion Barrel Stub
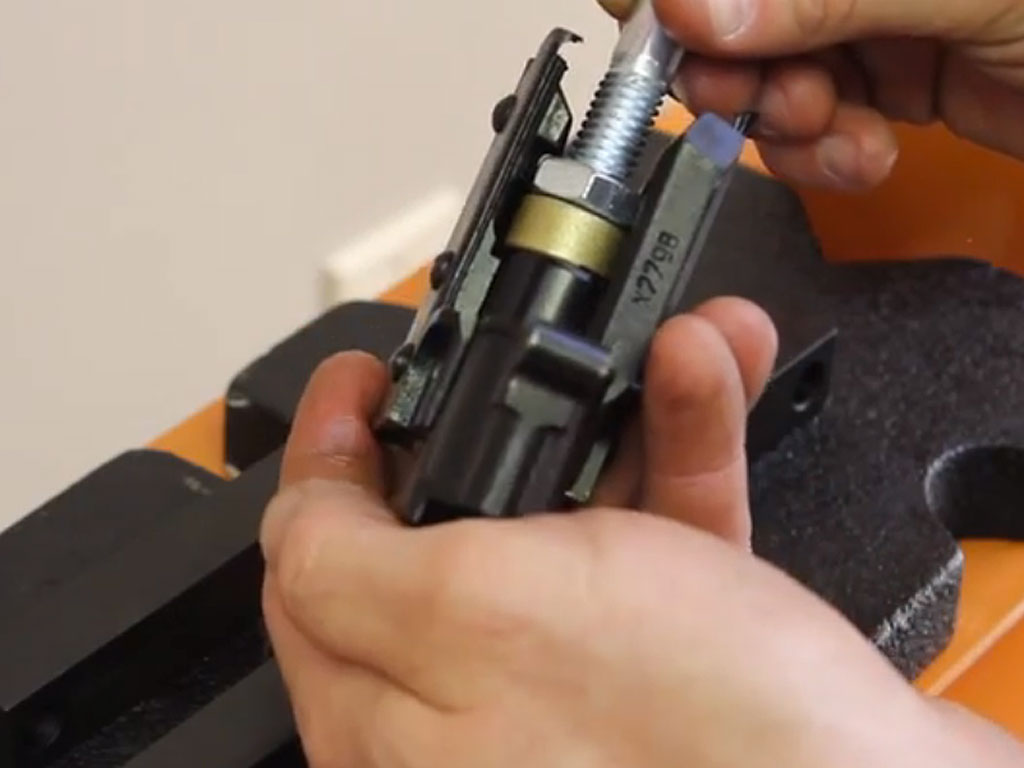
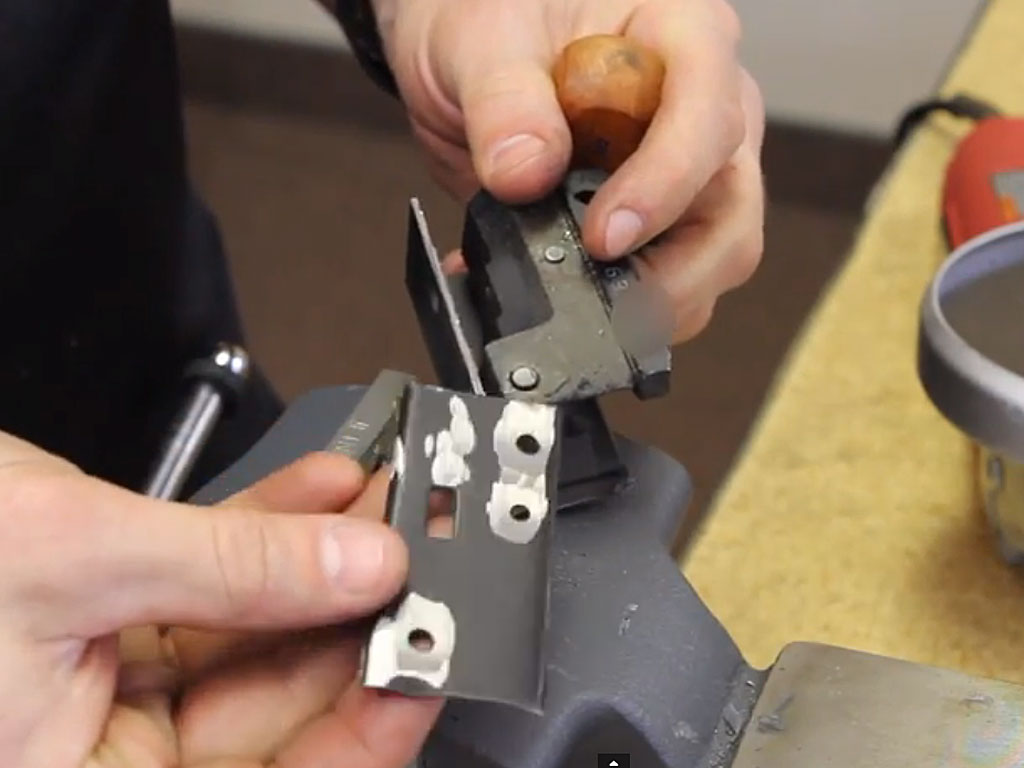
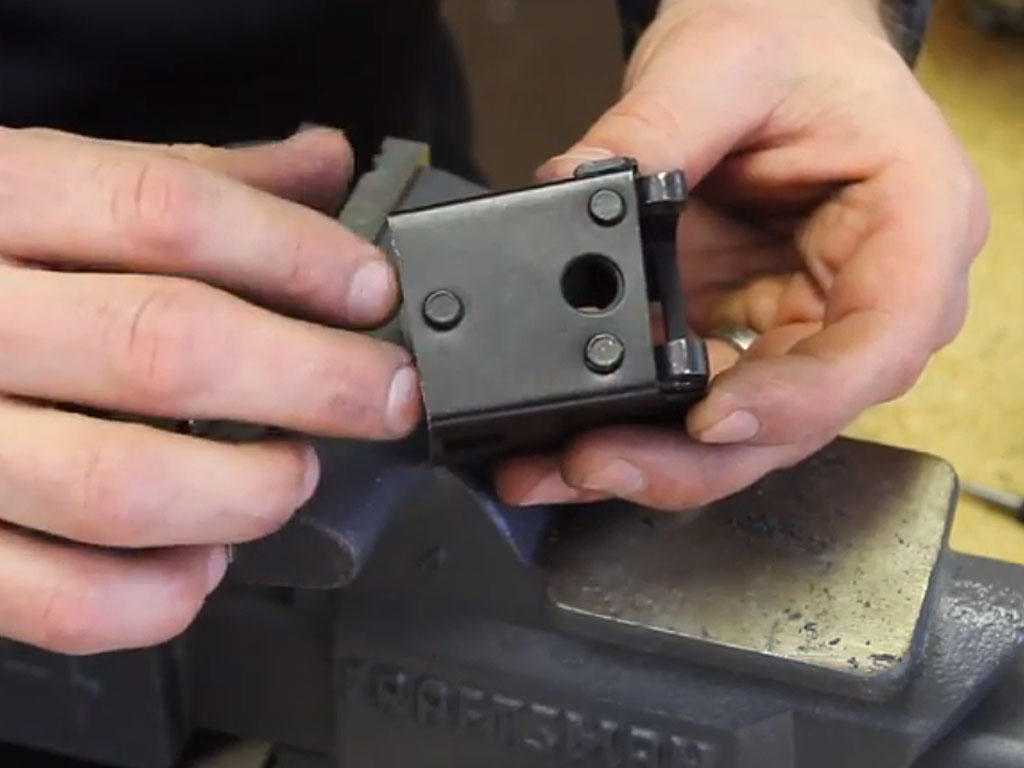
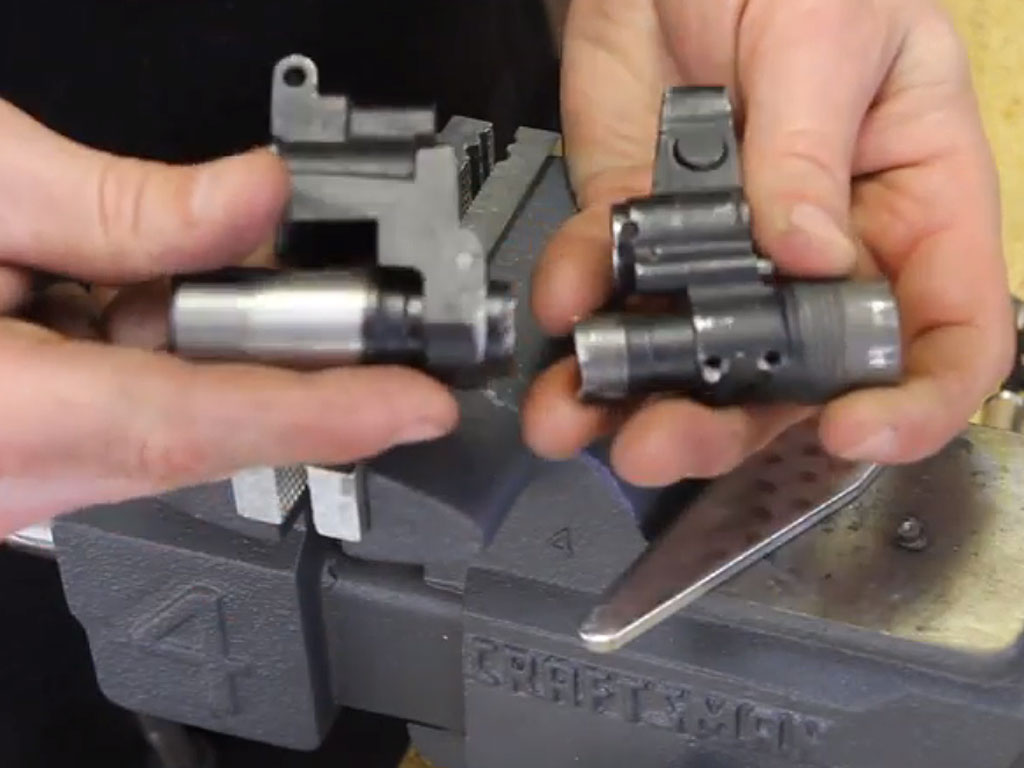
Using the Barrel Press Kit again, set up the two included bars over the V notch configuration on your 12-Ton Press blocks to give yourself a larger opening to work with. The Front Trunion is supported on either side by the bars as the barrel stub is pressed out.
You’ll then insert the included bolt with the brass nut on the end and align the step on the nut with the extractor notch on the barrel. Once it’s lined up a few presses on the shop press will free the Barrel Stub from the trunion. Once it’s removed, we’ll still need to separate it from the Rear Sight Tower, which we’ll tackle in a bit.
Front Trunion Skin
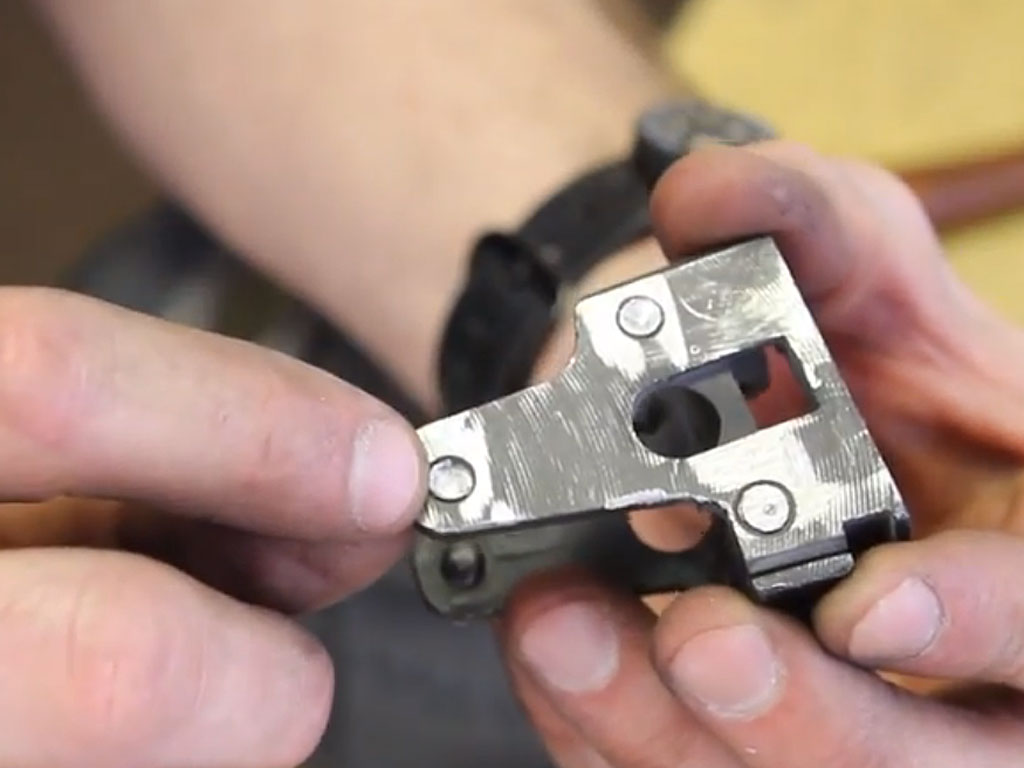
The first step in removing the remaining demilled receiver from the front trunion is to grind down the rivet heads flat on each side. This will better enable us to reach the remaining rivet still left holding the skin on with an angle grinder. A cut along the bottom of the latch side on the demilled receiver is made with the angle grinder, so that we can save a portion of the demilled receiver as a template.
This will be used to mark the location of the six rivet holes that aren’t already pre-drilled in our 74U Receiver. The cut is also important so that when the skin separates we have that template ready to go.
After the rivets are sufficiently ground down, stick the receiver in the vise and finish separating the rivets from the Front Trunion by using a screwdriver and a hammer to pry them loose. Once the skin is removed, go back and knock out the remaining rivet pieces with a punch and hammer. I used a combination of an AR Taper Pin Punch and a ground-down 3/32″ Punch.
Rear Trunion Skin
Again on the Rear Trunion, we’ll grind down the rivet heads on the bench grinder and then move onto the angle grinder to finish them off. Pay particular attention that you don’t damage the hinge when grinding. We’ll also score a line on the bottom side of the receiver skin so that it filets off when separated from the Rear Trunion.
After the skin is removed, you’ll need to flatten out the leftover rivets on the bench grinder and then center punch them to prep for drilling them out on the drill press. Since the two rear rivets are actually one long rivet, I started to drill it out with a #21 bit and then chased it most of the way down with a #15 drill bit. The other four rivets were just slightly drilled into so that they could be punched out. Always be sure to measure for yourself though so you don’t drill a larger hole into your trunion than was there before.
The final three steps in the demilling process are quite complicated and void of any pre-made jigs or tools to help you out. These steps are removing the pin from the Rear Sight Tower (which may seem easy in theory,) pressing out the remaining barrel stub from the Rear Sight Tower and pressing the barrel stub out of the Front Sight/Gas Block.
Rather than get into specifics in the article, it’s best you follow along here with the video. I’ll go into exactly how we modified things and jigged everything up to get these final steps accomplished.
I highly recommend that you complete the whole demilling process before starting on the assembly, because the way you’ve removed the various parts will often give you a clue on how they’ll go back together. Take good notes and remember to properly label and store the parts you’re removing. Keeping things together is important, as when I reached this point, my workbench was cluttered and it would have been really easy to lose a small pin.
Next up in our DIY AKS-74U Krink Build, we’ll start riveting together the receiver!
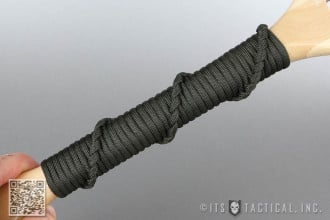
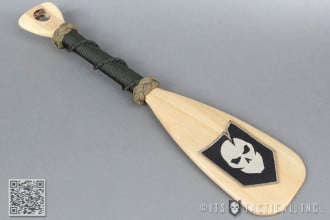
If you’ve been in the Military, particularly the Navy, then you’ve probably seen the intricate work that’s been done with presentation paddles or other keepsakes given to service members. They’re usually given out by a unit to commemorate one’s accomplishments there or as a token of appreciation when someone leaves a unit. This can be a change in duty station, retirement or any to mark any occasion.
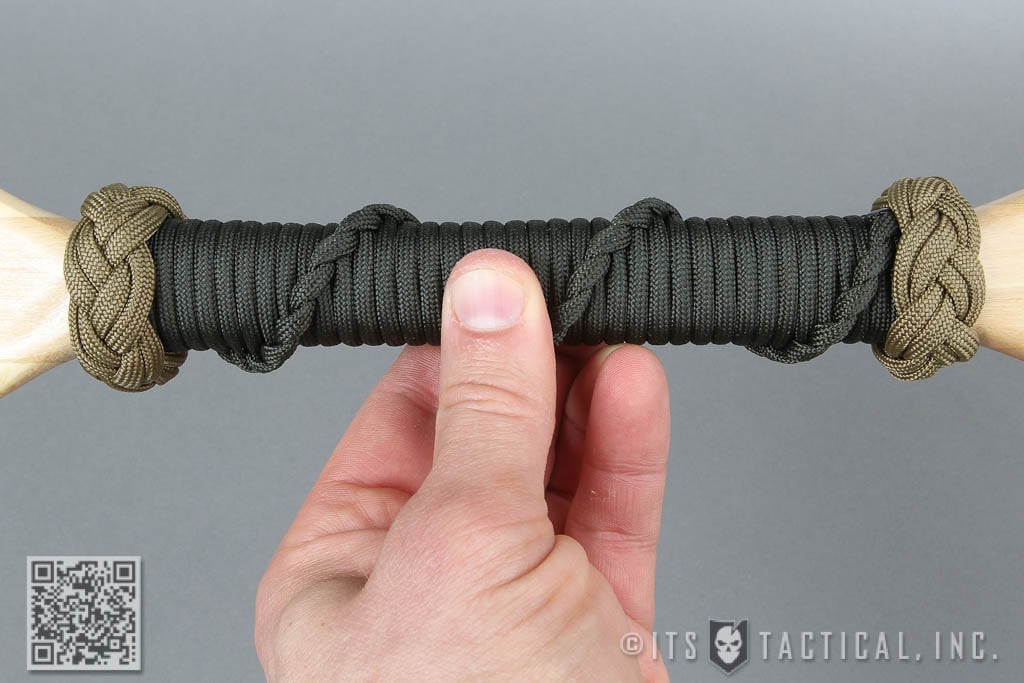
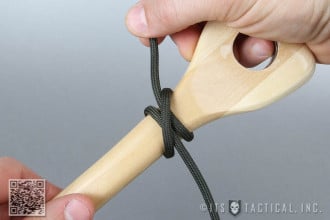
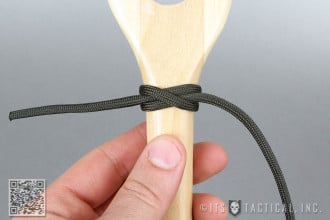
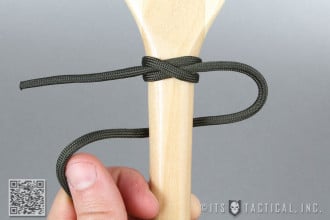
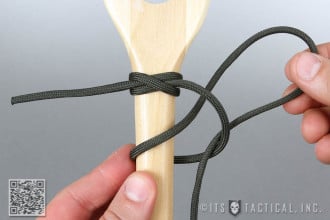
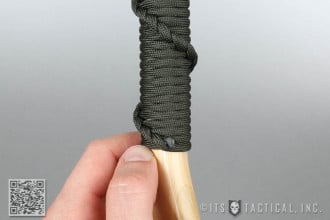
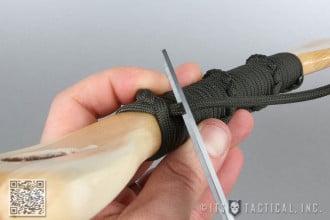
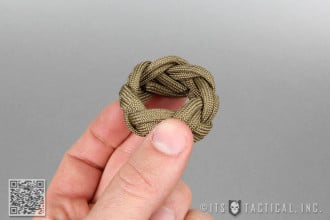
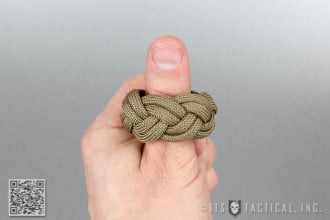
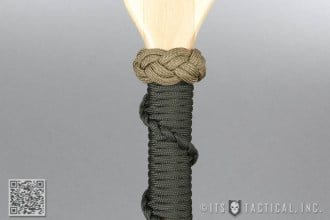
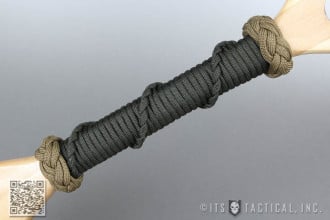
Decorative knot work, like we’ll show today on an example paddle, has existed in the Military for a long time. Coxcombing, or spiral hitching has long been a staple on Navy Ships to add grip to stanchions and railings, but has become less used since WWII. Today we’ll demonstrate Coxcombing to wrap our paddle and finish off the top and bottom with Turk’s Heads.
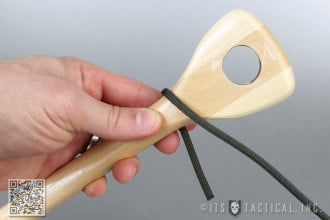
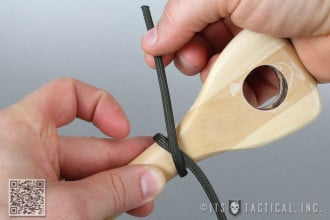
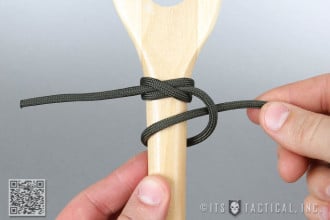
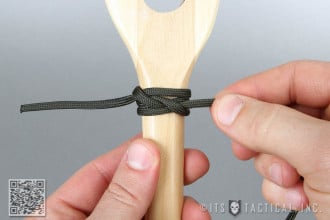
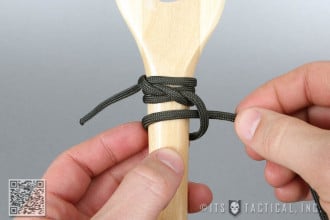
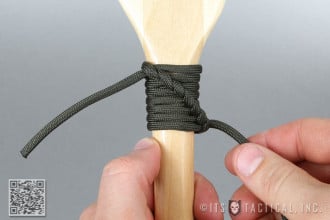
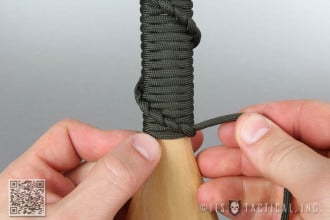
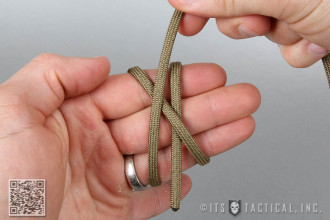
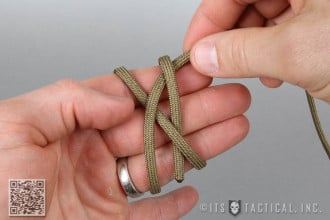
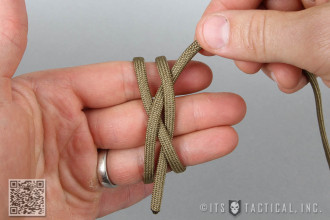
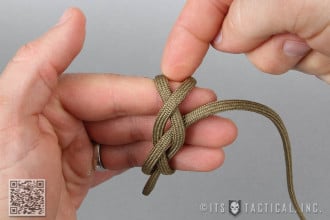
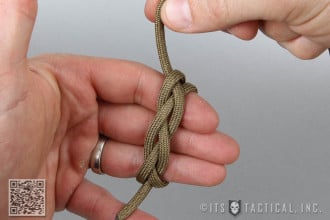
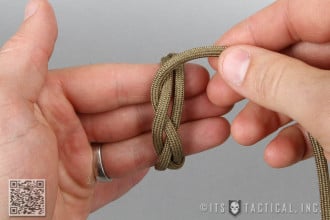
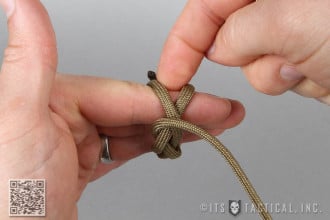
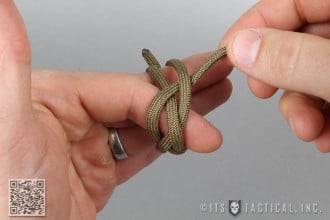
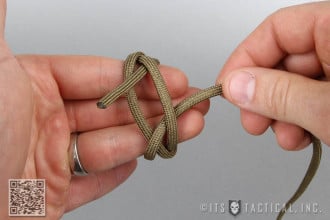
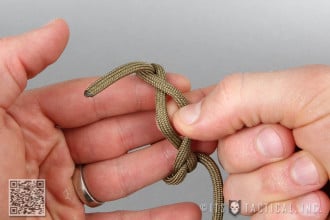
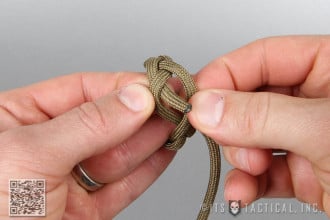
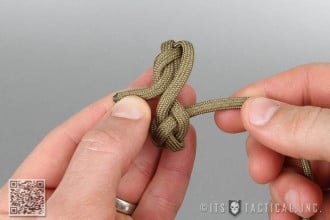
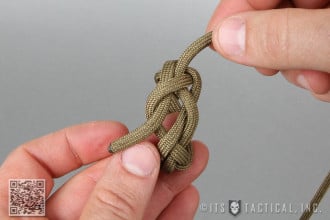
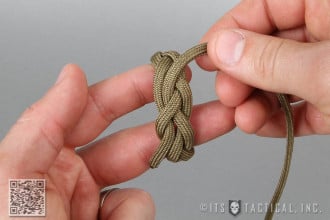
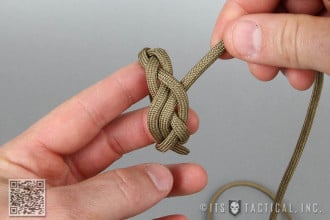
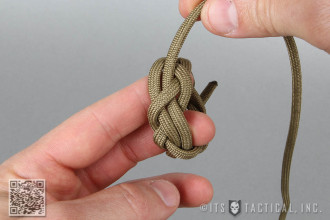
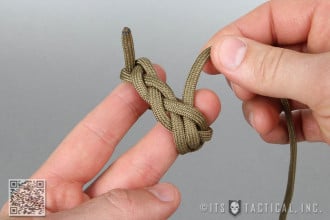
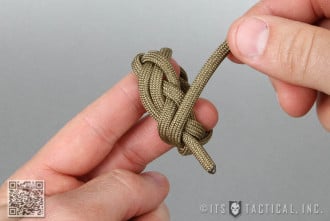
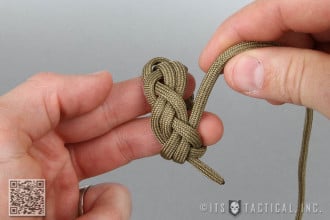
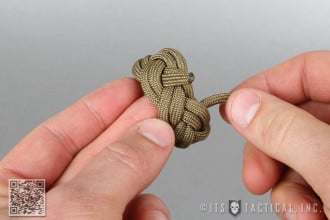
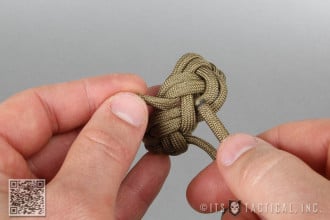
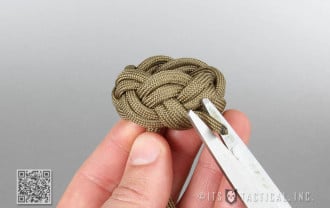
How to Wrap a Paddle or Handle with Paracord » Decorative
(Strength: –/Secure: –/Stability: –/Difficulty: 5) Please refer to our Knot of the Week introduction post for a description of what these ratings mean.
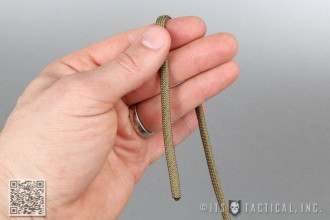
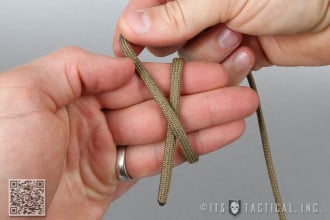
As this project combines multiple knots, or ties, the rating above is purely based on difficulty. The biggest challenge is tying the Turk’s Heads directly on the paddle. The photos and video below demonstrate tying these on your hand, which is definitely how you should learn the Turk’s Head if you’re not already familiar with it.
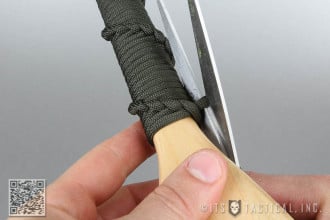
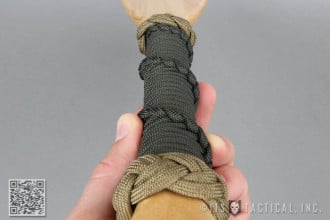
The coxcombing or spiral hitching is fairly self-explanatory, but can wear on you after awhile, as you really need to thoroughly tighten each wrap. This is not only ensure tightness, but also that the pattern comes out correctly and covers the wood of the paddle that can often show through. Additionally, you’ll need to ensure you’re pushing the wrapping up frequently to again hide the gaps that can be created.
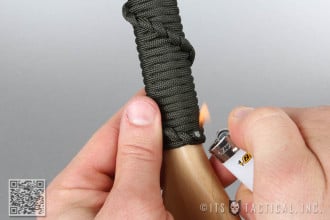
You’ll need a few tools for this project, to include multiple colors of paracord if desired. We’ve got plenty in stock in the ITS Store (shameless plug). You’ll also need a pair of scissors and a lighter to cut and fuse the paracord after finishing the wraps and ties. The mini paddle used in this article was about $10 from Bass Pro Shops, but we’d highly recommend these mini paddles available on Amazon. The mini paddle in this article was cheap and when attempting to drill out the hole the wood, it splintered horribly causing a larger hole than desired.
A Marlinspike was also almost a must on the small Turk’s Heads tied to open up the paracord and weave the successive wraps through. Just to be clear, the demonstration of the Turk’s Head being tied on a hand in the photos and video is to clearly illustrate the steps and can not be transferred to the paddle once it’s tied. It needs to be tied directly on the paddle or object being decorated.
Just as an example, with this 3″ circumference paddle at a length of 7″ it took 14 ft. to wrap the coxcombing. Using that measurement and circumference as a reference, you’ll need approximately 18″ of paracord for every inch of coxcombing. The Turk’s Heads were tied with 4 ft. sections of paracord.
Uses:
Increase the grip of an object
Decorating an object
Tying Instructions:
Additionally, see this article for written instructions for tying the Turk’s Head.
So its been a few weeks since Competition Dynamics’ Sniper Adventure Challenge 2013 and my team is finally recovered from all we endured during our 32-hour, 40+ mile slog across the New Mexico high desert. I consider myself fortunate to have been able to participate and am proud of every team that showed up to challenge themselves, especially those in Endurance class. For a look back at our preparations and gear selection for the competition, please see my previous preparation article.
SAC 2013 was definitely a challenging, professional and well-run competition. Like all creative competitions though, it was not without its quirks. Any teams that “quit” prior to the time cut-off time of 34 hours could receive a ride back to the finish line and retain all points earned up to that point. There was no penalty for quitting the race early. This gave all teams a fair chance of doing well without any medical consequences while de-emphasizing the endurance aspect of the challenge. We definitely had our pre-conceptions of what would be important during the competition. Here’s a look at what worked and what didn’t for our team.
Navigation and Travel
First off, minimizing weight cannot be emphasized enough. The total course mileage was over 40 miles of on foot travel over often rough, rocky terrain and changing elevations. The New Mexico desert is unforgiving and harsh. While none of the terrain was particularly steep, the rolling hills were composed of hard, broken rock that constantly threatened to twist or sprain ankles. The vegetation was invariably sharp and it seemed like everything tried to cut or poke you, especially during the moonless night.
Ounces mattered. Many teams suffered fatigue and exhaustion simply by being over encumbered. We needed every weight saving trick we used and could have benefited from a few more. The largest savings, of course, came from our primary weapon choices. Trading down to the AIAW .308 and .223 Colt SBR weapons from the AIAW .338 and Rock River LAR-10 .308 combination saved us over 10 pounds each in weapon and ammo weight. That 10 pounds was critical in allowing us to continue hiking well past when many teams could go no further.
We also used the more lightweight and comfortable Osprey backpacking packs instead of our Eberlestock Gunslinger packs, saving about 3 pounds each. In general, we opted to stay as close to the required gear list as possible. However, we still ended up carrying loads of 42 and 48 pounds each including water, food, weapons and ammunition. We could have benefited from even more aggressive weight reduction to go faster on the course.
The Suunto magnetic declination adjustable sighting compasses we used proved to be very effective. Magnetic declination adjustment is pretty much mandatory to maintain navigation efficiency in a race. It inspires confidence being able to set the declination and never have to worry about it when transferring an azimuth from real world to the map and vice versa.
While my team elected to plot every mandatory and bonus checkpoint on our map as soon as the race started, spending an additional 40 minutes at the starting line, most teams took off as soon as they plotted their first point. Looking back, this decision cost us several hours as our team got stuck in the confusion and traffic jam of teams waiting to shoot at checkpoint #2. The more efficient strategy would have been to plot points a few at a time as we progressed in the race.
Once the moonless night descended upon the course, we generally used the stars to help us maintain our heading instead of repeatedly looking at the compass or referencing intermediate points we could not see. Pace counting supported by the laser rangefinder was instrumental in navigating to difficult checkpoints in the dark.
Another critical piece of our travel kit included trekking poles which maximized our on foot mileage and also doubled as shooting sticks during the first shooting stage. In that stage, steel targets were arrayed in a valley from 300 to 1200 yards and many targets could only be seen from a seated position.
Weapon Performance
I was impressed by the performance of my Colt LE6946CQB short barreled rifle. I fired Hornady 55 grain A-Max rounds from the 10.3″ barrel and achieved consistent 600 yard hits on torso sized targets. While there is argument about whether short barreled rifles can deliver sufficiently lethal amounts of kinetic energy at longer ranges, the overall accuracy of the bullet and weapon are generally unaffected by shorter barrels as long as the projectile achieves stable rotation leaving the muzzle. Matching the twist rate of a quality barrel to bullet weight can ensure that stable rotation.
My partner’s Accuracy International AW .308 also performed admirably. However, the exposed turrets on the Schmidt & Bender PMII scope got turned unpredictably by the process of stowing the rifle in the backpack, leading to several missed shots. This just emphasizes the imperative to always check your scope turrets before firing.
Since much of the rifle scoring relied on first round hits on unknown range targets, knowing your dope was critical. While my team did use a Vectronix magnified laser rangefinder to quickly and accurately range targets, we were not prepared with density / altitude tables to accommodate changing atmospheric conditions over the 34 hours of competition. Thunderstorm conditions on the first day affected the barometric pressure significantly.
With daytime temperatures approaching 100 deg F and nighttime temperatures of about 70 deg F, the temperature difference affected both muzzle velocity and air density. Having a Kestrel device or an ABC-type watch (such as a Suunto Core) along with range tables taking into account variables such as temperature, density / altitude and muzzle velocity would have improved our first round hits. An ABC-type watch would have been particularly helpful due to its small size and its function as a backup compass.
In the end, long range shooting is worth less than 10% of the total possible points. Prioritizing adventure race fundamentals like weight reduction, physical fitness, navigation and nutrition over long range shooting is the way to go at this competition.
Other Gear Considerations
The mandatory gear list for the challenge included the requirement of a “shovel,” with no further clarification or detail. We carried a spade with a 3′ handle, a midget shovel of sorts and made quick work of the Gravedigger stage. Each team was required to dig a 6′ x 2.5′ x 1′ hole in the dry, hard-packed desert soil. Many an E-Tool were thrown down in frustration during that event.
Our clothing selections of white Outdoor Research Sun Runner caps and white Columbia long-sleeve tech shirts were by no means “tactical.” However, they kept us cool and protected from the sun during the long hours of exposure. Most of the teams in contrast wore coyote, some shade of dark green, or Multicam and probably felt a lot hotter than we did. Also, our Arcteryx LEAF rain gear was light to carry and bomber during the thunderstorm on the first day. Arcteryx has always been a solid choice despite the cost.
The best blister management strategy is blister prevention. Many endurance athletes use moleskin and mole foam successfully. I highly recommend Leukotape, a waterproof fabric medical tape, as my blister solution. Leukotape is light, thin and low friction. I covered the blister prone areas on my feet with Leukotape and went about 28 hours before I started to feel the first hot spot. By the end of 32 hours, I had blisters on the pinky toe of each foot, but no blisters on any area covered by Leukotape.
While this year’s competition emphasized orienteering over the unique challenges, shooting and endurance aspects, I still very much enjoyed it. With many lessons learned, I look forward to how Competition Dynamics improves and evolves the Sniper Adventure Challenge in the coming years.
Editor-in-Chief’s Note: Arthur Guo has been a peace officer in Southern California for the last nine years. He’s worked a variety of assignments in Law Enforcement and has been a SWAT Sniper for the last four years. Arthur is also an avid rock climber and mountaineer.
Editor’s note: This post was written by Brett & Kate McKay and originally ran on The Art of Manliness.
So you’re stranded in the wilderness. You consumed the last nub of your Clif Bar two days ago, and now you’re feeling famished. Civilization is still several days away, and you need to keep up your strength. The greenery all around you is looking more and more appetizing. But what to nibble on? Some plants will keep you alive and are chock full of essential vitamins and minerals, while some could make you violently ill….or even kill you.
Which of course makes proper identification absolutely critical.
Below we’ve given a primer on 19 common edible wild plants. Look them over and commit the plants to memory. If you’d like to discover even more edible wild plants, we suggest checking out the SAS Survival Guide and the U.S. Army Survival Guide.
Plants to Avoid
If you can’t clearly identify a plant and you don’t know if it’s poisonous, it’s better to be safe than sorry. Steer clear from a plant if it has:
Milky or discolored sap
Spines, fine hairs, or thorns
Beans, bulbs, or seeds inside pods
Bitter or soapy taste
Dill, carrot, parsnip, or parsley-like foliage
“Almond” scent in the woody parts and leaves
Grain heads with pink, purplish, or black spurs
Three-leaved growth pattern
Many toxic plants will exhibit one or more of the above characteristics. Bear in mind that some of the plants we suggest below have some of these attributes, yet they’re still edible. The characteristics listed are just guidelines for when you’re not confident about what you’re dealing with. If you want to be completely sure that an unknown plant is edible, and you have a day or two to spare, you can always perform the Universal Edibility Test.
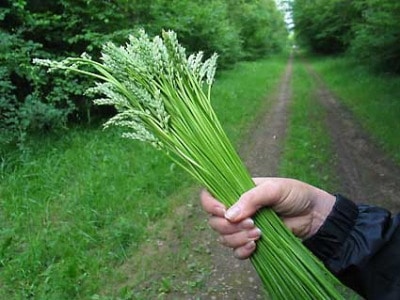
Amaranth (Amaranthus retroflexus and other species)
Native to the Americas but found on most continents, amaranth is an edible weed. You can eat all parts of the plant, but be on the look out for spines that appear on some of the leaves.
While not poisonous, amaranth leaves do contain oxalic acid and may contain large amounts of nitrates if grown in nitrate-rich soil.
It’s recommended that you boil the leaves to remove the oxalic acid and nitrates. Don’t drink the water after you boil the plant. With that said, you can eat the plant raw if worse comes to worst.
Asparagus (Asparagus officinalis)
The vegetable that makes your pee smell funny grows in the wild in most of Europe and parts of North Africa, West Asia, and North America. Wild asparagus has a much thinner stalk than the grocery-store variety. It’s a great source of source of vitamin C, thiamine, potassium and vitamin B6. Eat it raw or boil it like you would your asparagus at home.
Burdock (Arctium lappa)
Medium to large-sized plant with big leaves and purplish thistle-like flower heads. The plant is native to the temperate areas of the Eastern Hemisphere; however, it has been naturalized in parts of the Western Hemisphere as well. Burdock is actually a popular food in Japan. You can eat the leaves and the peeled stalks of the plant either raw or boiled. The leaves have a bitter taste, so boiling them twice before eating is recommended to remove the bitterness. The root of the plant can also be peeled, boiled, and eaten.
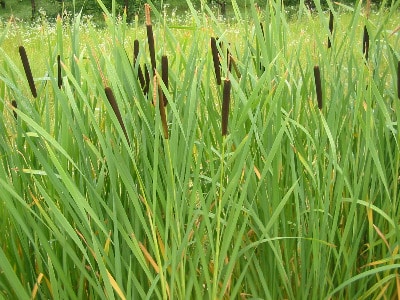
Cattail (Typha)
Known as cattails or punks in North America and bullrush and reedmace in England, the typha genus of plants is usually found near the edges of freshwater wetlands. Cattails were a staple in the diet of many Native American tribes. Most of a cattail is edible. You can boil or eat raw the rootstock, or rhizomes, of the plant. The rootstock is usually found underground. Make sure to wash off all the mud. The best part of the stem is near the bottom where the plant is mainly white. Either boil or eat the stem raw. Boil the leaves like you would spinach. The corn dog-looking female flower spike can be broken off and eaten like corn on the cob in the early summer when the plant is first developing. It actually has a corn-like taste to it.
Clovers (Trifolium)
Lucky you-clovers are actually edible. And they’re found just about everywhere there’s an open grassy area. You can spot them by their distinctive trefoil leaflets. You can eat clovers raw, but they taste better boiled.
Chicory (Cichorium intybus)
You’ll find chicory growing in Europe, North America, and Australia. It’s a bushy plant with small blue, lavender, and white flowers. You can eat the entire plant. Pluck off the young leaves and eat them raw or boil them. The chicory’s roots will become tasty after boiling. And you can pop the flowers in your mouth for a quick snack.
Chickweed (Stellaria media)
You’ll find this herb in temperate and arctic zones. The leaves are pretty hefty, and you’ll often find small white flowers on the plant. They usually appear between May and July. You can eat the leaves raw or boiled. They’re high in vitamins and minerals.
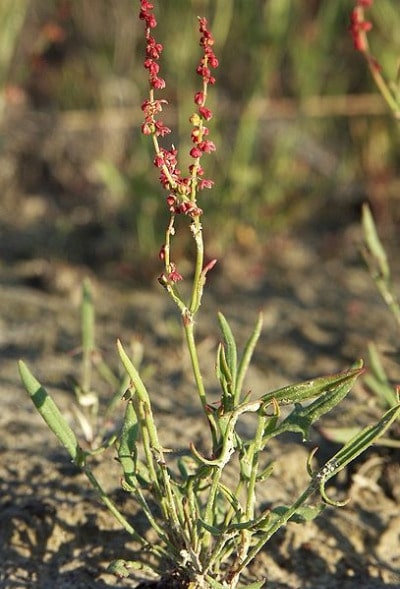
Curled Dock (Rumex crispus)
You can find curled dock in Europe, North America, South America, and Australia. It’s distinguished by a long, bright red stalk that can reach heights of three feet. You can eat the stalk raw or boiled. Just peel off the outer layers first. It’s recommend that you boil the leaves with several changes of water in order to remove its naturally bitter taste.
Dandelion (Taraxacum officinale)
Sure, it’s an obnoxious weed on your perfectly mowed lawn, but when you’re out in the wild this little plant can save your life. The entire plant is edible- roots, leaves, and flower. Eat the leaves while they’re still young; mature leaves taste bitter. If you do decide to eat the mature leaves, boil them first to remove their bitter taste. Boil the roots before eating as well. You can drink the water you boiled the roots in as a tea and use the flower as a garnish for your dandelion salad.
Field Pennycress (Thalspi vulgaris)
Field Pennycress is a weed found in most parts of the world. Its growing season is early spring to late winter. You can eat the seeds and leaves of field pennycress raw or boiled. The only caveat with field pennycress is not to eat it if it’s growing in contaminated soil. Pennycress is a hyperaccumulator of minerals, meaning it sucks up any and all minerals around it. General rule is don’t eat pennycress if it’s growing by the side of the road or is near a Superfund site.
Fireweed (Epilobium angustifolium)
This pretty little plant is found primarily in the Northern Hemisphere. You can identify fireweed by its purple flower and the unique structure of the leaves’ veins; the veins are circular rather than terminating on the edges of the leaves. Several Native American tribes included fireweed in their diet. It’s best eaten young when the leaves are tender. Mature fireweed plants have tough and bitter tasting leaves. You can eat the stalk of the plant as well. The flowers and seeds have a peppery taste. Fireweed is a great source of vitamins A and C.
Green Seaweed (Ulva lactuca)
If you’re ever shipwrecked on a deserted island, fish the waters near the beach for some green seaweed. This stuff is found in oceans all over the world. After you pull green seaweed from the water, rinse with fresh water if available and let it dry. You can eat it raw or include it in a soup. Or if you’re particularly enterprising, catch a fish with your homemade spear and use the seaweed to make sushi rolls, sans rice.
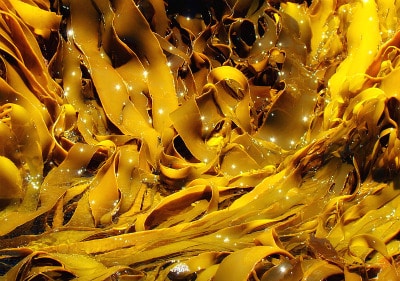
Kelp (Alaria esculenta)
Kelp is another form of seaweed. You can find it in most parts of the world. Eat it raw or include it in a soup. Kelp is a great source of folate, vitamin K, and lignans.
Plantain (Plantago)
Found in all parts of the world, the plantain plant (not to be confused with the banana-like plantain) has been used for millennia by humans as a food and herbal remedy for all sorts of maladies. You can usually find plantains in wet areas like marshes and bogs, but they’ll also sprout up in alpine areas. The oval, ribbed, short-stemmed leaves tend to hug the ground. The leaves may grow up to about 6″ long and 4″ wide. It’s best to eat the leaves when they’re young. Like most plants, the leaves tend to get bitter tasting as they mature. Plantain is very high in vitamin A and calcium. It also provides a bit of vitamin C.
Prickly Pear Cactus (Opuntia)
Found in the deserts of North America, the prickly pear cactus is a very tasty and nutritional plant that can help you survive the next time you’re stranded in the desert. The fruit of the prickly pear cactus looks like a red or purplish pear. Hence the name. Before eating the plant, carefully remove the small spines on the outer skin or else it will feel like you’re swallowing a porcupine. You can also eat the young stem of the prickly pear cactus. It’s best to boil the stems before eating.
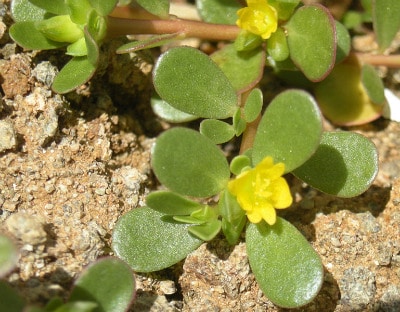
Purslane (Portulaca oleracea)
While considered an obnoxious weed in the United States, purslane can provide much needed vitamins and minerals in a wilderness survival situation. Ghandi actually numbered purslane among his favorite foods. It’s a small plant with smooth fat leaves that have a refreshingly sour taste. Purslane grows from the beginning of summer to the start of fall. You can eat purslane raw or boiled. If you’d like to remove the sour taste, boil the leaves before eating.
Sheep Sorrel (Rumex acetosella)
Sheep sorrel is native to Europe and Asia but has been naturalized in North America. It’s a common weed in fields, grasslands, and woodlands. It flourishes in highly acidic soil. Sheep sorrel has a tall, reddish stem and can reach heights of 18 inches. Sheep sorrel contains oxalates and shouldn’t be eaten in large quantities. You can eat the leaves raw. They have a nice tart, almost lemony flavor.
White Mustard (Synapsis alba)
White mustard is found in the wild in many parts of the world. It blooms between February and March. You can eat all parts of the plant- seeds, flowers, and leaves.
Wood Sorrel (Oxalis)
You’ll find wood sorrel in all parts of the world; species diversity is particularly rich in South America. Humans have used wood sorrel for food and medicine for millennia. The Kiowa Indians chewed on wood sorrel to alleviate thirst, and the Cherokee ate the plant to cure mouth sores. The leaves are a great source of vitamin C. The roots of the wood sorrel can be boiled. They’re starchy and taste a bit like a potato.
Editor-in-Chief’s note: Brett from Art of Manliness suggests a “Man Up Challenge” to go on on a hike or walk in the woods and try to locate and identify three edible plants. Give it a shot and if you know of other edible plants not mentioned, post them to the comments below!
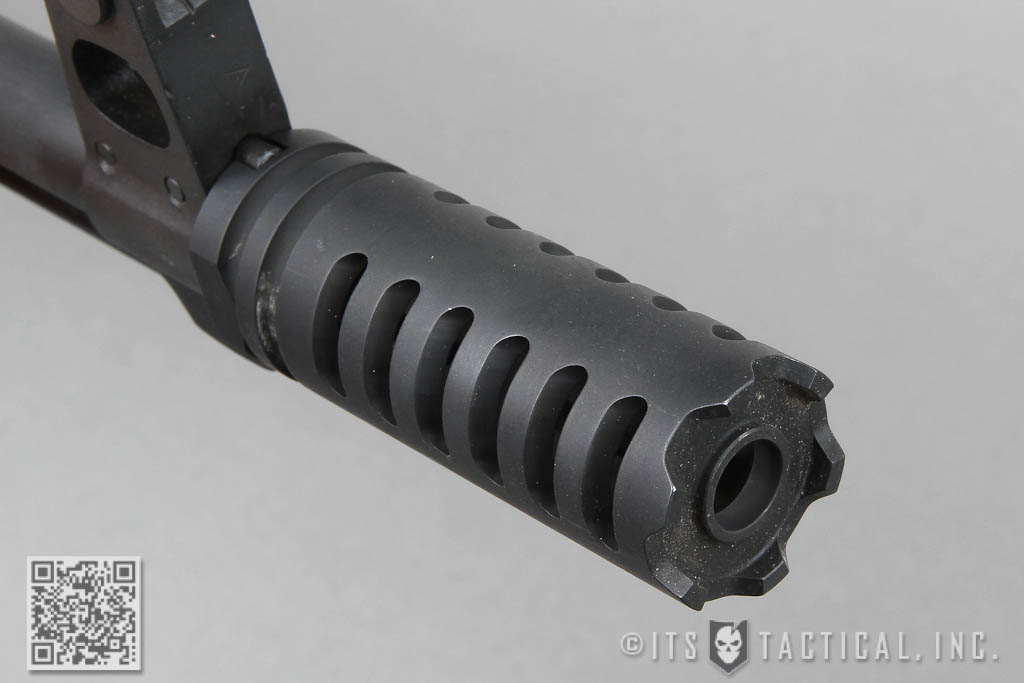
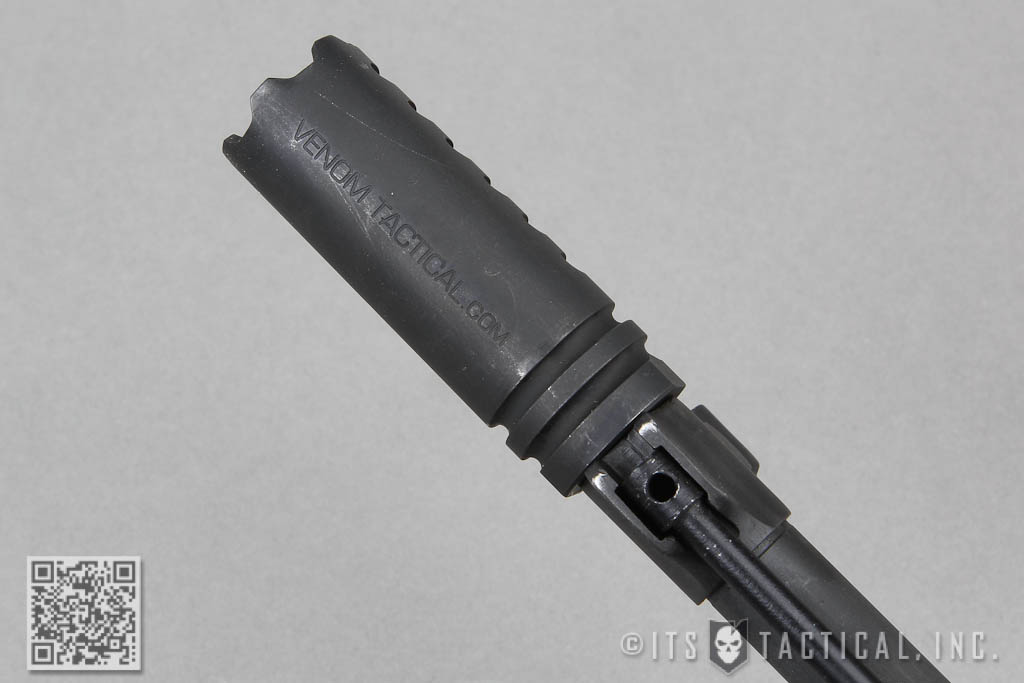
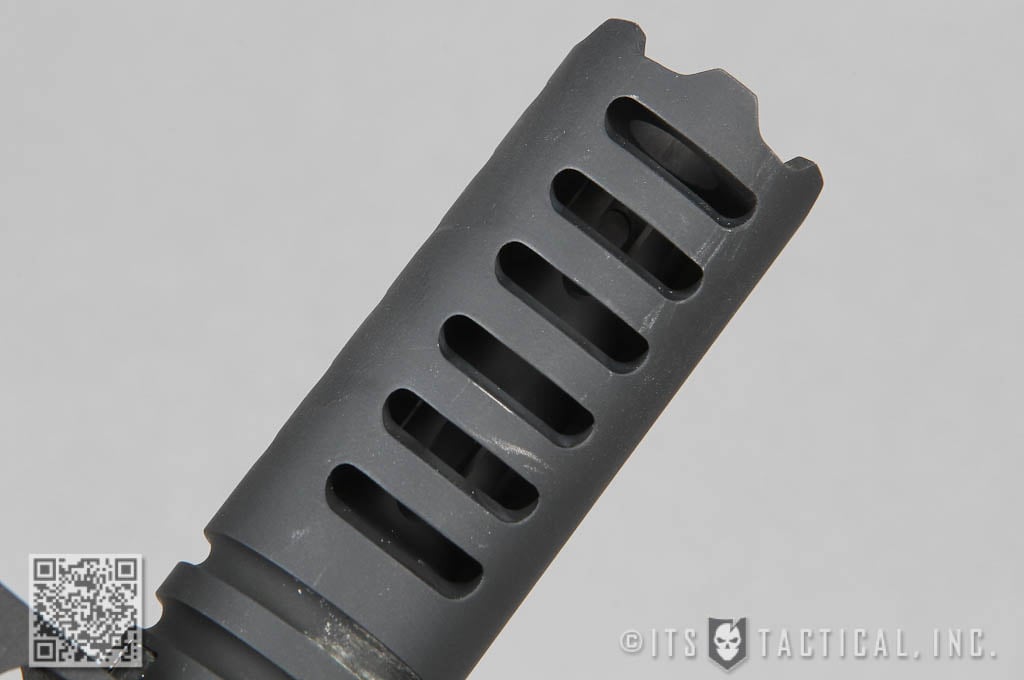
We’re excited to bring you an exclusive look at the new Venom Antidote AK Muzzle Brake that was designed with input from Jim Fuller of Rifle Dynamics. In the video below, Jim Fuller joins us to explain the concept behind the Antidote and we’ll show you the difference between a standard slant brake, the Antidote and even the Antidote fired on full-auto!
The Antidote was designed for the AK47 platform and is threaded for 14×1 LH (left hand.) According to Venom Tactical and Rifle Dynamics the Antidote was developed after studying the results of a system that Venom designed to measure the effects of recoil and muzzle rise on many breaks on the market. The result was the Antidote and a muzzle brake that reduces bullet turbulence and increases muzzle stabilization, this in turn allows for faster follow up shots and better accuracy.
As mentioned in the video, I did feel that the Antidote makes good on these promises and was impressed with the consistency of my shots during the test fire on both semi and full-auto. You can pick up an Antidote right here through Rifle Dynamics and while you’re checking out their newly re-launched Web store, be sure to check out our good friend Billy Cho’s new blog for a behind the scenes look on what’s happening at Rifle Dynamics.